
Printer Gamma Offset Auto.: Automatically Adjusting the Gradation and Background Density in Highlights
Change the printer gamma curve automatically to adjust the gradation and background density in highlights.
Use this function when the color reproducibility varies depending on the selection of screen for [Screen 1], [Screen 2], and [Stochastic], respectively.
Make this adjustment after operating [Gamma Automatic Adj.] of [Execute Adjust Operation] on the Adjustment Menu screen or [Gamma Automatic Adj.] accessed from the Utility Menu screen by pressing [Administrator Setting] - [System Setting] - [Expert Adjustment] - [Execute Adjust Operation] in order to complete the gamma automatic adjustment. For details about [Gamma Automatic Adj.], refer to Execute Adjust Operation: Adjusting in Adjustment Mode or Execute Adjust Operation: Executing Adjustment Operations.
Use plain paper or white paper for color printing in this adjustment. Using colored paper cannot make this adjustment properly, affecting the color of output test pattern.
Normally, this adjustment is made as the printer gamma adjustment. Perform [Printer Gamma Offset Adj.] if fine adjustment is needed.
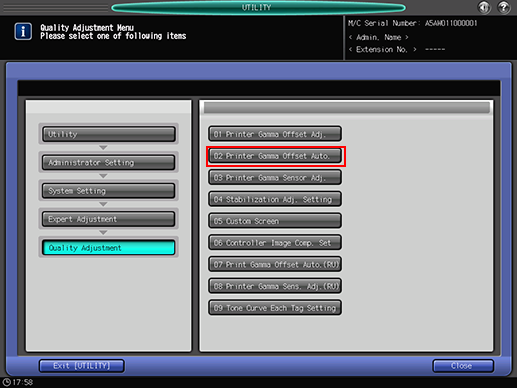
Follow the procedure on Administrator Setting to display the [Administrator Setting Menu] screen.
Press [System Setting] on the [Administrator Setting Menu] screen, and then press [Expert Adjustment], [Quality Adjustment], and [Printer Gamma Offset Auto.] in sequence.
The [Printer Gamma Offset Automatic Adj.] screen is displayed.
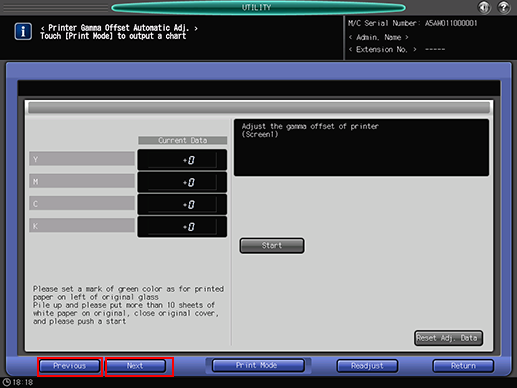
Use [Next] and [Previous] to select the screen to be adjusted.
Press [Readjust].
If the gradation appears widely misaligned in highlights of the image, press [Reset Adj. Data] to set the printer gamma offset adjustment value to "0", then press [Readjust].
A dialog is displayed for confirmation of readjustment.
Press [Yes].
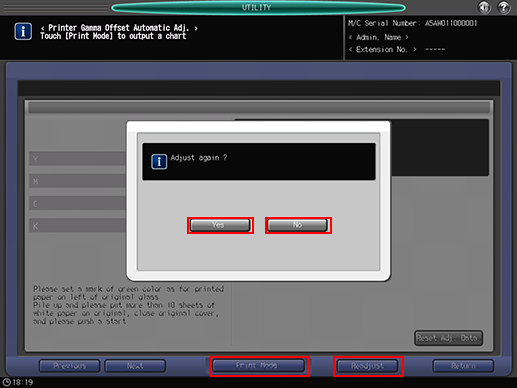
Or, press [No] to cancel the readjustment.
Press [Print Mode].
The [PRINT MODE] screen is displayed.
Select A3
 paper, then press Start on the control panel.
A test pattern is printed, and the screen automatically returns to the [Printer Gamma Offset Automatic Adj.] screen.
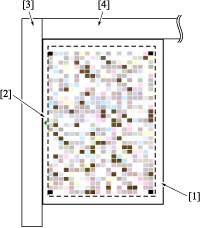
Place the test pattern on the original glass.
Position the test pattern [1] face down, with the green arrow [2] pointing at the left side.
Carefully align the test pattern [1] to the vertical original size guide [3] and horizontal original size guide [4] on the original glass.
Place about 10 sheets of blank copy paper on top of the test pattern [1].
Close the ADF.
Press [Start] on the screen, or Start on the control panel. The current data of YMCK will be updated.

Since the machine does not determine the adjustment data to be effective or not for the first scanning, the message [Completed normally] will not be displayed. Repeat steps 6 to 9 until the message [Completed normally] is displayed.
If an error code (Error 1, 2, or 10) is displayed, check that the test pattern is positioned properly.
If any other error code is displayed, please contact your service representative.
Check that the message [Completed normally] is displayed.
If any message other than [Completed normally] is displayed, repeat steps 6 to 10.
Press [Return] to return to the [Quality Adjustment Menu] screen.