
Printer Gamma Offset Adj.: Adjusting the Gradation and Background Density in Highlights
Change the printer gamma curve to adjust the gradation and background density in highlights. This adjustment is required when the color reproducibility varies depending on the selection of screen in copy mode.

Make this adjustment after operating [Gamma Automatic Adj.] of [Execute Adjust Operation] on the [Adjustment Menu] screen or [Gamma Automatic Adj.] accessed from the [Utility Menu] screen by pressing [Administrator Setting] - [System Setting] - [Expert Adjustment] - [Execute Adjust Operation] in order to complete the gamma automatic adjustment. For details about [Gamma Automatic Adj.], refer to Execute Adjust Operation: Adjusting in Adjustment Mode or Execute Adjust Operation: Executing Adjustment Operations.
Printer Gamma Offset Automatic Adjustment is to be made as the printer gamma adjustment using a scanner. Make this adjustment especially when the printer gamma requires to be finely adjusted.
This adjustment is not needed if you operate [Administrator Setting] - [System Setting] - [Expert Adjustment] - [Quality Adjustment] - [Print Gamma Offset Auto. (RU)] on the [Utility Menu screen]. For details about [Print Gamma Offset Auto. (RU)], refer to Printer Gamma Offset Auto. (RU): Automatically Adjusting the Printer Gamma Offset Using the Color Density Sensor.
Follow the procedure on Administrator Setting to display the [Administrator Setting Menu] screen.
Press [System Setting] on the [Administrator Setting Menu] screen, and then press [Expert Adjustment], [Quality Adjustment], and [Printer Gamma Offset Adj.] in sequence.
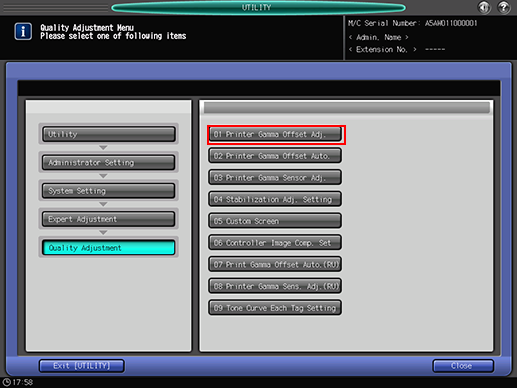
The [Printer Gamma Offset Adjustment] screen is displayed.
Use [Next] and [Previous] to select the screen to be adjusted.
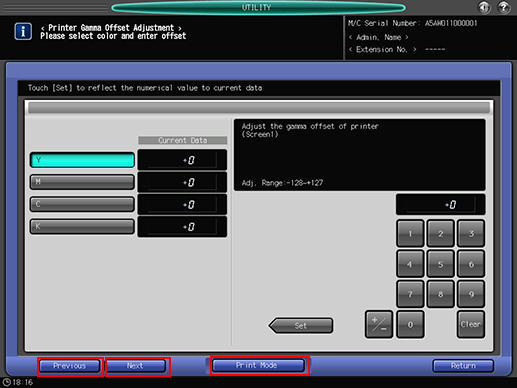
Press [Print Mode].
The [PRINT MODE] screen is displayed.
Select A3
 paper, then press Start on the control panel.
A test chart is printed.
Press [Exit PrintMode] to return to the [Print Gamma Offset Adjustment] screen.
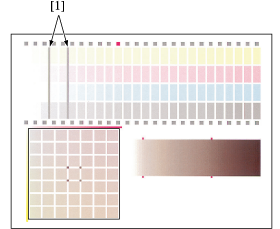
Check the output chart.
Check that the highlights of C and K start uniformly and appear aligned to the gray base line [1].
Make an adjustment, if required.
Press the color key (C or K) to be adjusted, then use the touch panel keypad or the keypad on the control panel to enter the desired adjustment value.
Use [+/-] to specify the value to be positive or negative.
Press [Set] to change the current value.
Adjustment Range: -128 (lighter) to +127 (darker)
Repeat steps 4 to 8 until the desired result is obtained.
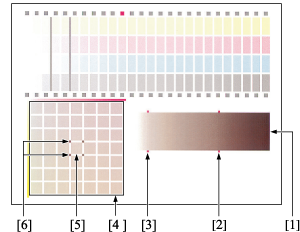
Next, focusing on the gray gradation pattern [1] created with C, M, and Y, check that the gray balance shows uniformity in the sections of square marks [2] and [3].
If the gray balance shows any difference, press the color key (Y or M) to be adjusted, then use the touch panel keypad or the keypad on the control panel to enter the desired adjustment value.
Use [+/-] to specify the value to be positive or negative.
Press [Set] to change the current value.
Adjustment Range: -128 (lighter) to +127 (darker)
Follow the procedure below to adjust the gray balance.
Focus on the 49 gray patches [4] created with C, M, and Y. These 49 patches show that M becomes deeper to the right, and Y becomes deeper to the bottom. C is fixed. The color of the patch in the center [5] is the same as the gray [3].
The color of the patches at four corners [6] of the patch [5] is the same as the gray [2]. Select the gray of the same hue as that of the gray [6] from among 49 patches.
When the appropriate patch is located in the lower right area of the central patch [5]: Adjust M and Y to the positive direction.
When the appropriate patch is located in the upper left area of the central patch [5]: Adjust M and Y to the negative direction.
Press [Print Mode].
The [PRINT MODE] screen is displayed.
Select A3
paper, then press Start on the control panel.A test chart is printed.
Press [Exit PrintMode] to return to the [Print Gamma Offset Adjustment] screen.
Repeat steps 10 to 13 until the desired result is obtained.
Press [Return] to return to the [Quality Adjustment Menu] screen.