[Calibration Manager] Screen
To display the [Calibration Manager] screen, click  ([Calibration]) on the Launcher screen.
The components of the [Calibration Manager] screen vary depending on which advanced calibration is selected.
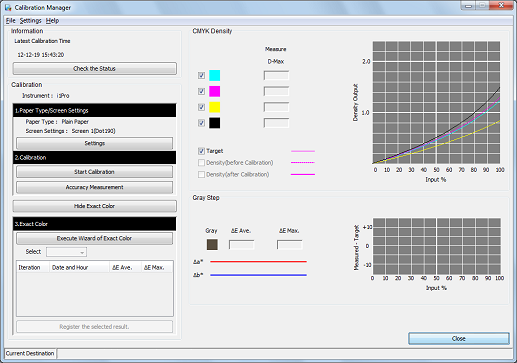
When Exact Color is selected

Screen Components (when Exact Color is selected)
No. | Name | Description |
|---|---|---|
1 | [Information] | Displays the date/time when the last calibration or scan calibration was executed. Or, if Color Density Control, the calibration function of the main body, is turned on, this indicates that. |
2 | [Check the Status] | Displays, per paper type for the selected screen setting, the screen type and the date/time when the data was registered. If scan calibration is executed, the relevant information is displayed in blue. |
3 | [Instrument] | Displays the colorimeter that you select in [Instrument] on the [Settings] menu. |
4 | [Type] | Displays the paper type selected in [Settings]. |
5 | [Screen Settings] | Displays the screen type selected in [Settings]. |
6 | [Settings] | Allows you to set the paper type and screen type. |
7 | [Start Calibration] | Starts calibration. |
8 | [Accuracy Measurement] | Measures the accuracy of the calibration. |
9 | [Hide Exact Color] | Hides [3.Exact Color] and [Gray Step]. Clicking this item changes it to [Open Exact Color]. |
[Open Exact Color] | Shows [3.Exact Color] and [Gray Step]. Clicking this item changes it to [Hide Exact Color]. | |
10 | [Execute Wizard of Exact Color] | Starts Exact Color. |
11 | [Select] | Allows you to select, for the registration of Exact Color adjustment table, whether to register Exact Color adjustment data or to register data from your selected accuracy improvement session. |
12 | List | Displays the results for calibration accuracy measurement, Exact Color adjustment accuracy measurement, and Exact Color adjustment accuracy improvement check. |
13 | [Register the selected result] | Registers Exact Color data. |
14 | C, M, Y, K | Allows you to select the curve to be displayed. Check to display curve. Remove check to not display curve. |
15 | [Measure D-Max] | Displays measured D-Max when calibration is executed or calibration accuracy is measured. |
16 | [Target] | Displays the target curve for the paper recommended for the selected paper type when this item is checked. |
17 | [Density(before Calibration)] | Switches between whether or not to display the graph from before the calibration. |
18 | [Density(after Calibration)] | Switches between whether or not to display the graph from after the calibration. |
19 | The [CMYK Density] graph | Displays the following measurement curves:
|
20 | [Gray Step] - [ΔE Ave.] | Displays the average ΔE value for gray steps of the Exact Color target. ΔE (Delta E) indicates color difference. |
21 | [Gray Step] - [ΔE Max.] | Displays the maximum ΔE value for gray steps of the Exact Color target. ΔE (Delta E) indicates color difference. |
22 | The [Gray Step] graph | Displays the gray balance of the gray step. |
23 | [Close] | Closes the screen. |
Items on the List (when Exact Color is selected)
The following items are displayed on the [Calibration Manager] screen.
Name | Description |
|---|---|
[Iteration] | Displays the counted number of measurement results. |
[Date and Hour] | Displays the date/time when the measurement was taken. |
[3. Exact Color] - [ΔE Ave.] | Displays the average ΔE value for the Exact Color target. ΔE (Delta E) indicates color difference. |
[3. Exact Color] - [ΔE Max.] | Displays the maximum ΔE value for the Exact Color target. ΔE (Delta E) indicates color difference. |
Operation on the List (when Exact Color is selected)
The measurement results listed on the [Calibration Manager] screen can be re-sorted.
For specific instructions, refer to Operation of Lists.
Screen Menu (when Exact Color is selected)
Menu | Menu Items | Description |
|---|---|---|
[File] | [Reset] | Resets the calibration data in the image controller to the settings of factory shipping. Discards the current measurement result and settings displayed on this screen, and resets the screen. |
[Import Calibration file] | Loads calibration data and Exact Color data from the computer. | |
[Export Calibration file] | Writes calibration data and Exact Color data to the computer. | |
[Close] | Closes the [Calibration Manager] screen. | |
[Setting] | [Instrument] | Specifies a colorimeter. |
[Calibration Group] | Allows you to group paper types for each screen. | |
[Help] | [Help] | Click to display the help. |
[Version Information] | Displays the version of Color Centro. |
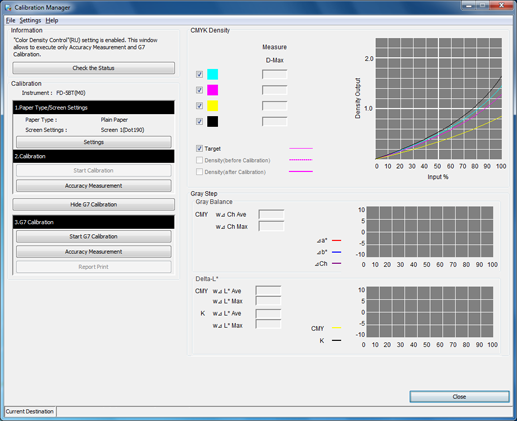
When G7 calibration is selected
Screen Components (when G7 calibration is selected)
No. | Name | Description |
|---|---|---|
1 | [Information] | Displays the date/time when the last calibration or scan calibration was executed. Or, if Color Density Control, the calibration function of the main body, is turned on, this indicates that. |
2 | [Check the Status] | Displays, per paper type for the selected screen setting, the screen type and the date/time when the data was registered. If scan calibration is executed, the relevant information is displayed in blue. |
3 | [Instrument] | Displays the colorimeter that you select in [Instrument] on the [Settings] menu. |
4 | [Type] | Displays the paper type selected in [Settings]. |
5 | [Screen Settings] | Displays the screen type selected in [Settings]. |
6 | [Settings] | Allows you to set the paper type and screen type. |
7 | [Start Calibration] | Starts calibration. |
8 | [Accuracy Measurement] | Measures the accuracy of the calibration. |
9 | [Hide G7 Calibration] | Hides [3.G7 Calibration] and [Gray Step]. Clicking this item changes it to [Show G7 Calibration]. |
[Show G7 Calibration] | Displays [3.G7 Calibration] and [Gray Step]. Clicking this item changes it to [Hide G7 Calibration]. | |
10 | [Start G7 Calibration] | Starts G7 calibration. |
11 | [Accuracy Measurement] | Measures the accuracy of the G7 calibration. |
12 | [Report Print] | Prints a report on the G7 calibration. |
13 | [CMYK Density] | Allows you to select the curve to be displayed. Check to display curve. Remove check to not display curve. |
14 | [Measure D-Max] | Displays measured D-Max when calibration is executed or calibration accuracy is measured. |
15 | [Target] | Displays the target curve for the paper recommended for the selected paper type when this item is checked. |
16 | [Density(before Calibration)] | Switches between whether or not to display the graph from before the calibration. |
17 | [Density(after Calibration)] | Switches between whether or not to display the graph from after the calibration. |
18 | The [CMYK Density] graph | Displays the following measurement curves:
|
19 | [Gray Balance] | Displays the following:
|
20 | The [Gray Balance] graph | Displays a measurement result of gray balance. Δa* (Delta a star) indicates color shades of the red-green direction in a gamut. Δb* (Delta b star) indicates color shades of the yellow-blue direction in a gamut. ΔCh (Delta chroma) indicates saturation in a gamut. In comparison with the target, the larger Δa* values are, the brighter red is, and the smaller Δa* values are, the brighter green is. In comparison with the target, the larger Δb* values are, the brighter yellow is, and the smaller Δb* values are, the brighter blue is. In comparison with the target, the larger ΔCh values are, the brighter colors are, and the smaller ΔCh values are, the more neutral colors are. |
21 | [Delta-L*] | Displays the following:
|
22 | The [Delta-L*] graph | Displays the measurement result of Delta-L*. CMY represents the adjustment result of gray. K represents the adjustment result of the single color of K. In comparison with the target, the farther the two values (CMY and K) in the plus direction, the lighter the color, and the farther in the minus direction, the darker the color. |
23 | [Close] | Closes the screen. |
Screen Menu (when G7 calibration is selected)
No. | Menu | Menu Items | Description |
|---|---|---|---|
1 | [File] | [Reset] | Resets the calibration data in the image controller to the settings of factory shipping. Discards the current measurement result and settings displayed on this screen, and resets the screen. |
[Import Calibration file] | Loads calibration data and G7 calibration data from the computer. | ||
[Export Calibration file] | Exports calibration data and G7 calibration data from the computer. | ||
[Save LUT] | Saves LUTs. | ||
[Close] | Closes the [Calibration Manager] screen. | ||
2 | [Setting] | [Instrument] | Specifies a colorimeter. |
[Calibration Group] | Allows you to group paper types for each screen. | ||
3 | [Help] | [Help] | Click to display the help. |
[Version Information] | Displays the version of Color Centro. |
