Save a Spot Color Table
This section describes how to save the adjusted spot color table.
To save the spot color table, use [Spot Color] screen.
When you save the spot color table to the image controller, the spot color table is registered into the image controller. When you register the spot color table, the adjusted spot color table can be adopted to the output according to the priority of the spot color table.
When the spot color table is saved in [Local], [My Documents] or [Network], the spot color table is saved as the spot color table profile (Extension: .spo).
Click [Save] on the [Spot Color] screen.
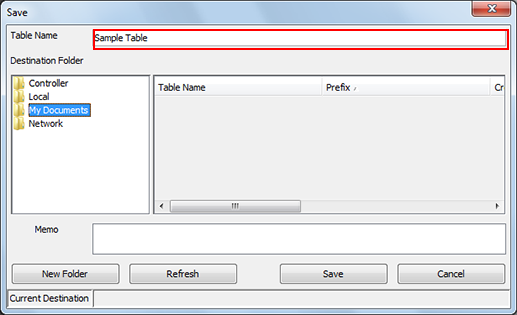
[Save] screen appears.
Enter the name of the spot color table to [Table Name].
Up to 31 one-byte characters can be used.
You can save the spot color table using the same name used by another spot color table already saved in the image controller.
To update the tree view to the latest information, click [Refresh].
To save the stop color table to a local folder, click [New Folder] to add a new destination folder.
From the tree view of [Destination Folder], select the place to save the tone curve.
The list appears according to the selection.
When [Controller] is selected on the tree view, an asterisk (*) is added to the end of the name of the factory-preset spot color table. In addition, the name of the spot color table which was registered at factory shipping is displayed in red.
If necessary, enter the description to [Memo].
Click [Save].
When you select [Controller] as the destination folder, the spot color table is saved in the image controller.
When you select [Local], [My Documents] or [Network] as the destination folder, the spot color table is saved as the spot color table profile (Extension: .spo).
The priority of the newly saved spot color table becomes the top among the spot color tables with the same prefix (in the same group). When you change the priority of the spot color table in the image controller, go to Change the Priority of a Spot Color Table.
