
Density Balance Adjustment
- Applied Density Balance Adjustment Data
- Scanning the density balance chart for automatic adjustment
- Registering Colorimetric Data for Automatic Adjustment
- Outputting the Density Balance Chart
- Measuring the Colorimetric Data for Density Balance Chart Using the Spectrophotometer
- Registering Colorimetric Data in the Machine
- Registering the colorimetric data to the machine
- Registering colorimetric data (via Web Utilities)
- Entering New Density Balance Adjustment Data for Manual Adjustment
- Manually Adjusting the Existing Density Balance Adjustment Data
- Duplicating or Deleting Density Balance Adjustment Data
- Enabling or Disabling Density Balance Adjustment Data
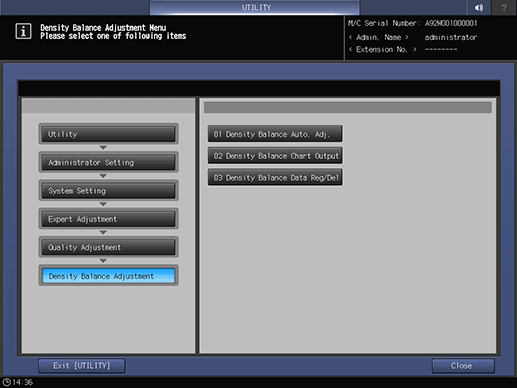
This section describes how to adjust the density balance controlled on the control panel.
Density Balance Adjustment allows to create density balance adjustment data for correcting the non-uniformity of density in the crosswise direction.
Three methods are available to register new density balance adjustment data in the crosswise direction as shown below.
How to scan the density balance chart for automatic adjustment->Scanning the density balance chart for automatic adjustment
How to register colorimetric data for automatic adjustment->Registering Colorimetric Data for Automatic Adjustment
How to enter the density balance adjustment value for manual adjustment ->Entering New Density Balance Adjustment Data for Manual Adjustment
The "crosswise direction" is the direction that intersects with the paper feed direction at right angles.
If necessary, you can manually adjust existing data, or duplicate/delete the adjustment value as well as set enable or disable the adjustment value.
Applied Density Balance Adjustment Data
This machine selects the density balance adjustment data to be applied in accordance with the following priority.
Priority 1: Screen > Priority 2: Paper Type > Priority 3: Weight > Priority 4: Registered Order
Tips
The density balance adjustment data that you want to apply to a job needs to be set to Enable.
For details about how to set to Enable, refer to Enabling or Disabling Density Balance Adjustment Data.If there is no density balance adjustment data for the screen that corresponds to a job, the job is output without correcting its density balance.
Priority 1: Screen
The density balance adjustment data for the screen that corresponds to the job is applied.
If there are two or more sets of density balance adjustment data for the screen that corresponds to the job, proceed to check Priority 2.
Priority 2: Paper Type
The density balance adjustment data that corresponds to the paper type of the job is applied.
If there are two or more sets of density balance adjustment data that correspond to the paper type of the job, or if there is none, proceed to check Priority 3.
Priority 3: Weight
The density balance adjustment data that corresponds to the weight of the job is applied.
If there are two or more sets of density balance adjustment data that correspond to the weight of the job, or if there is none, proceed to check Priority 4.
Priority 4: Registered Order
The density balance adjustment data with the smallest number in the registered order for the list of density balance adjustment data is applied.
Tips
If there is density balance adjustment data for the screen that corresponds to the job, the density balance adjustment data is applied even if it does not correspond to the paper type and weight. This is because "the screen that corresponds to" is essential to correct the density balance. If using a special paper such as a thick paper or embossed paper, it is recommended to register the density balance adjustment data not only for the screen but also for the same paper type and weight as the job. The corrective effect on the density balance improves.
Scanning the density balance chart for automatic adjustment
Output the density balance chart from the machine to carry out colorimetry using the scan function.
This operation is the same as that in Adjustment - Quality Adjustment - Density Balance Auto. Adj., accessing from the MACHINE screen.
Tips
When Integrated Color Care Unit IQ-501 is installed on the machine, the automatic adjustment result list is displayed.
Follow the procedure on Displaying the [Administrator Setting Menu] Screen to display the Administrator Setting Menu screen.
Press System Setting on the Administrator Setting Menu screen, and then press Expert Adjustment, Quality Adjustment, Density Balance Adjustment, and Density Balance Auto. Adj. in sequence.

The Density Balance Auto. Adjustment screen is displayed.
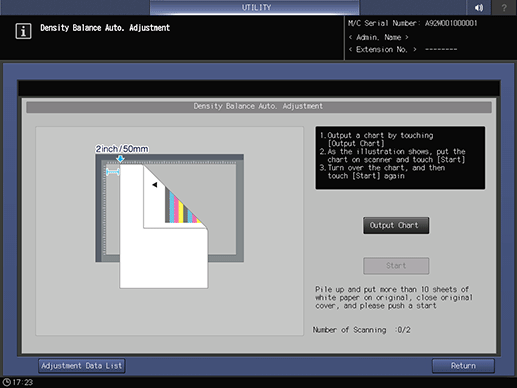
supplementary explanationFor details about subsequent operations, refer to [Density Balance Auto. Adj.].
Registering Colorimetric Data for Automatic Adjustment
The colorimetric data can be created and measured by the following procedure.
Output the density balance chart from the machine.
supplementary explanationFor details, refer to Outputting the Density Balance Chart.
Measure colorimetric data for the density balance chart using the spectrophotometer.
supplementary explanationFor details, refer to Registering Colorimetric Data for Automatic Adjustment.
Register the colorimetric data in the machine.
supplementary explanationFor details, refer to Registering Colorimetric Data in the Machine.
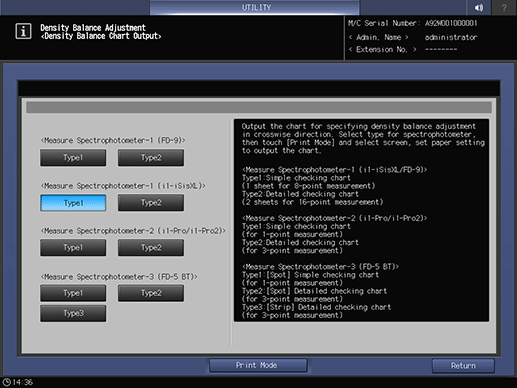
Outputting the Density Balance Chart
There are four types of spectrophotometers to read the chart.
i1-iSisXL
FD-9
i1-Pro/i1-Pro2
FD-5 BTOutput a chart to which the screen type that has been set by the machine was applied.
Before outputting the chart, an appropriate screen and paper must be selected.
Reference
The screen type can be changed in UTILITY. For details, refer to [Custom Screen].
Follow the procedure on Displaying the [Administrator Setting Menu] Screen to display the Administrator Setting Menu screen.
Press System Setting on the Administrator Setting Menu screen, and then press Expert Adjustment, Quality Adjustment, Density Balance Adjustment, and Density Balance Chart Output in sequence.

Select the desired spectrophotometer, and press Print Mode.
Press Quality Adj..

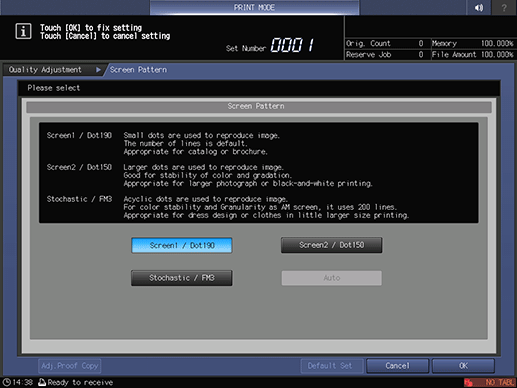
Press right on the right side of Screen Pattern to display the desired screen.
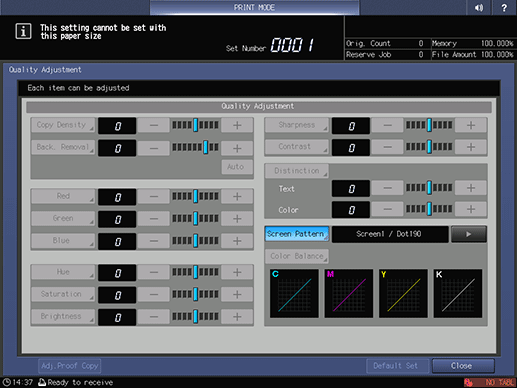
supplementary explanationIf necessary, you can press Screen Pattern to display the Screen Pattern screen and select any screen. Select a screen, and press OK.
supplementary explanationPress Close on the Quality Adjustment screen.
Select a paper size for the chart.
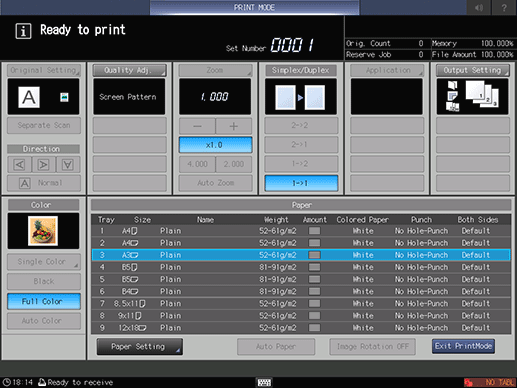
supplementary explanationLoad 12 18 short edge feed, SRA3 short edge feed, 11 17 short edge feed, or A3 short edge feed paper in a tray, then select that tray.
Press Start on the control panel.
A test chart is printed.
Press Exit PrintMode.
The screen returns to the Density Balance Chart Output screen.
Press Return.
The screen returns to the Density Balance Adjustment Menu screen.
Measuring the Colorimetric Data for Density Balance Chart Using the Spectrophotometer
This section describes how to create the colorimetric data using the spectrophotometer.
Prepare spectrophotometer i1-iSisXL, i1-Pro/i1-Pro2, FD-5 BT, or FD-9 as well as the computer connected to the spectrophotometer, and USB flash drive. USB flash drive formatted in FAT or FAT 32 file system can be detected on the machine. USB flash drive with the U3 platform or security feature cannot be used.
If registering via Web, prepare a computer that is connected with this machine via network instead of a USB flash drive.Use the ProfileMaker Measure Tool when the Spectrophotometer i1-iSisXL or i1-Pro/i1-Pro2 is used. Use Color Care measure or FD-S2w when the Spectrophotometer FD-5 BT is used. For the Spectrophotometer FD-9, use FD-S2w.
When the ProfileMaker Measure Tool is used, the message This application will run in a limited demonstration mode. A hardware dongle is required to activate all functions. is displayed. However, the tool can be operated without the hardware dongle.
When operating the ProfileMaker Measure Tool on a computer, click Open to select a script file corresponding to the chart size. For details about the script file, contact your service representative.
The following describes how to save colorimetric data of the spectrophotometer.
To enter the density balance chart for i1-Pro/i1-Pro2, use a computer to enter the number of row and column of color chips printed on the chart before measuring each type. All color chips which are boxed (printed) must be measured.
When the measurement using the ProfileMaker Measure Tool is completed, click Close on the computer screen to display another window. On the screen, always click File from the tool bar and save as a new file. You can also do the same by pressing the shortcut key, Ctrl+S. The data saved by clicking Export Lab... cannot be recognized on the machine.
Specify the file name of the colorimetric data using the following texts up to 40 one-byte characters.
(Up to 14 characters of identifying information printed on the chart)_(up to 22 characters of user-customized information).txtWhen the colorimetric data is registered, (up to 22 characters of user-customized information) are displayed as Adj. Data Profile Name.
To save the colorimetric data on a USB flash drive, set the path /C6100/ADJUST_DATA to the drive, and save the data in the lowest folder that is the ADJUST_DATA folder.
When using Care measure or FD-S2w, refer to the user's guide supplied with Care measure or FD-S2w.
Tips
For details about how to use the spectrophotometer, refer to the user's guide supplied with the spectrophotometer.
Registering Colorimetric Data in the Machine
Register colorimetric data in the machine.
Two methods are available to register colorimetric data.
Registering colorimetric data using a USB flash drive
Registering colorimetric data via Web
Maximum 10 colorimetric data items can be registered.
If necessary, you can overwrite, synthesize, or delete existing data. When overwritten, the existing data (former data) is replaced by newly created colorimetric data (new data). When synthesized, the new data is merged with the former data to be registered. To synthesize data, the new data and former data must have the same screen type, paper type, and weight.
When registering colorimetric data, the following error messages may be displayed.
Deal with problems as instructed in the messages.
Error Message | Error Message |
|---|---|
Data Error | File Name Error |
Number-of-Data Error | File Data Error The selected file has incorrect data |
Data Saving Error |
Registering the colorimetric data to the machine
Use the spectrophotometer to read the density balance chart that has been output in accordance with the procedure Outputting the Density Balance Chart so that colorimetric data is created.
Specify the desired name to the colorimetric data.
supplementary explanationEnter (Up to 14 characters of identifying information printed on the chart)_(up to 22 characters of user-customized information).txt as a file name.
Set the path /C6100/ADJUST_DATA to a USB flash drive, and save the colorimetric data in the lowest folder.
supplementary explanationThe colorimetric data cannot be recognized on the machine with any path other than that specified. Be sure to set the designated path to save the data.
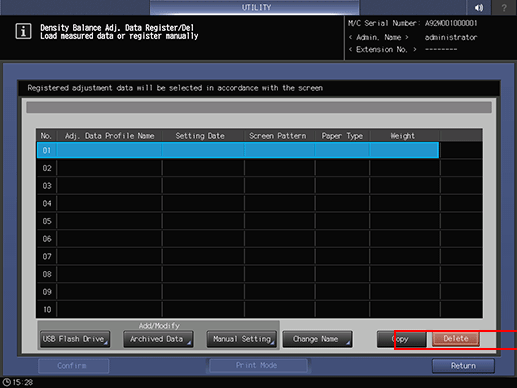
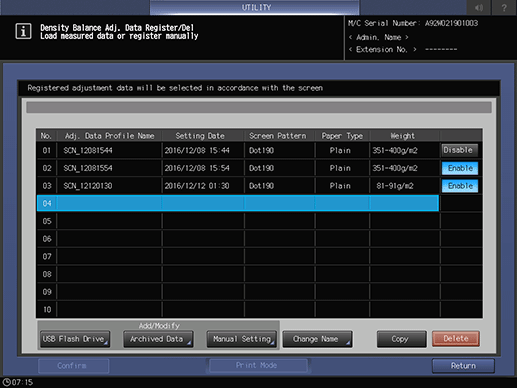
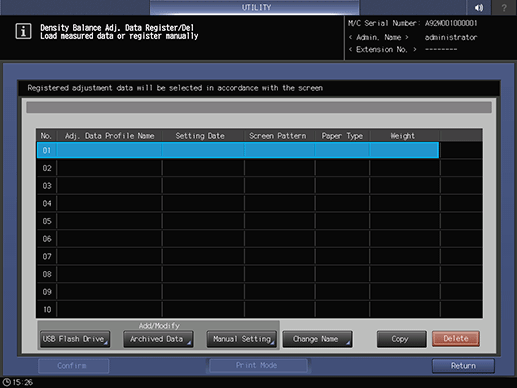
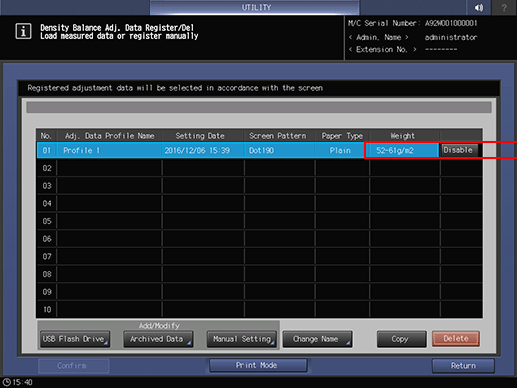
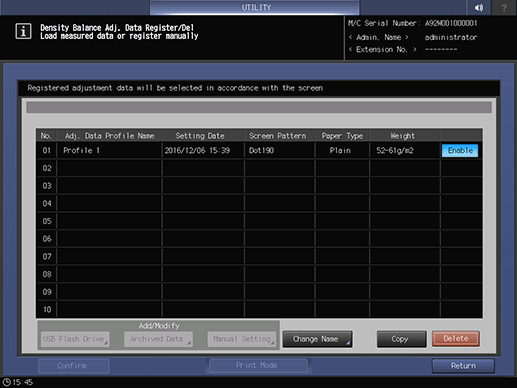
Press Density Balance Data Reg/Del on the Density Balance Adjustment Menu screen to display the Density Balance Adj. Data Register/Del screen.
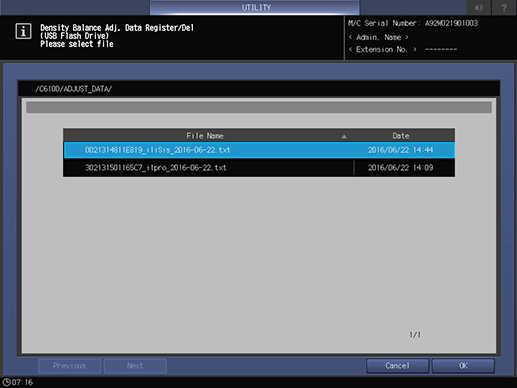
Select any one row in the list of 10 profiles, and press USB Flash Drive.
supplementary explanationNo more than 10 pieces of data can be registered, however, the data can be overwritten. If desired, select the data to be overwritten.
The colorimetric data can be synthesized and registered. To synthesize data, select the row having the same screen type, paper type, and weight.
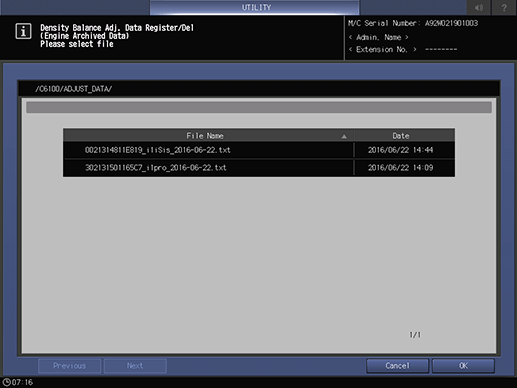
A dialog is displayed to prompt you to connect the USB flash drive.
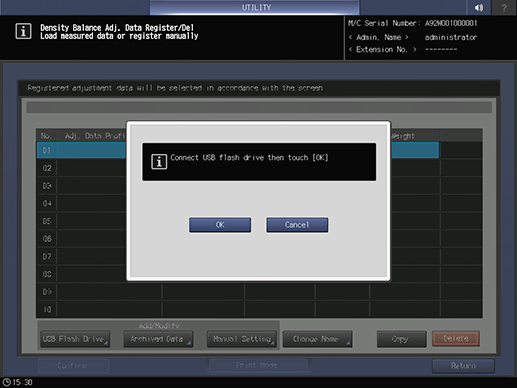
Connect the USB flash drive, in which the colorimetric data is stored, to the USB port of the machine.
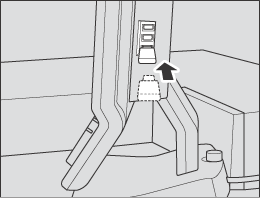
supplementary explanationThis port is available for low-power devices only. Please provide an external supply of power for devices that require a large amount of power.
Press OK.
The file name of the colorimetric data is displayed on the registration screen.
Select the file name of the data to be registered, then press OK.
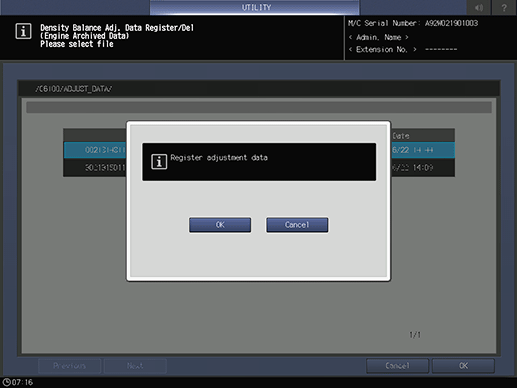
With a row of the existing data selected in step 5, a confirmation dialog is displayed.
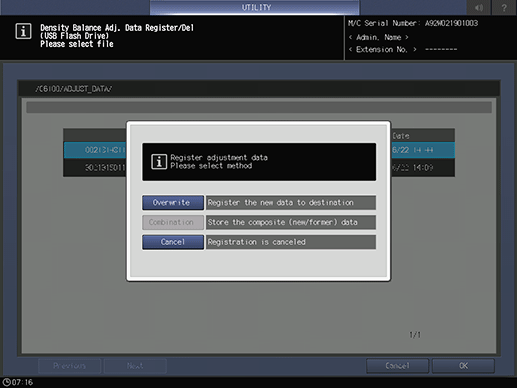
supplementary explanationTo select a row of the existing data to replace it with the new data, press Overwrite.
supplementary explanationTo synthesize the selected data with the new data, press Combination. If conditions for screen type, paper type, or weight do not correspond to each other, Combination dims.
supplementary explanationTo stop overwriting or synthesizing the data, press Cancel.
To register the adjustment data, press OK.
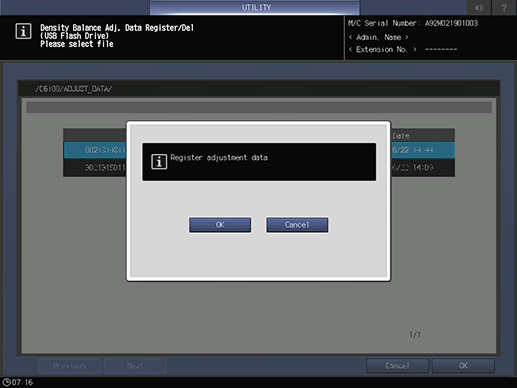
supplementary explanationTo cancel the registration, press Cancel.
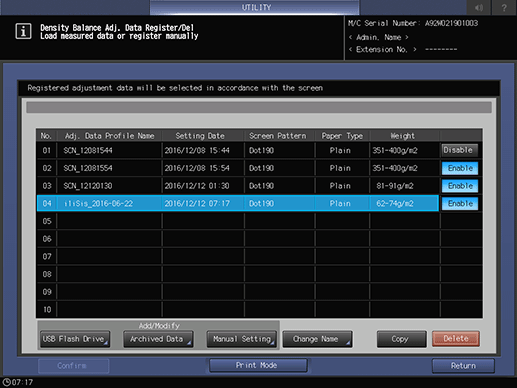
The Density Balance Adj. Data Register/Del screen is displayed, showing (up to 22 characters of user-customized information) specified in step 2 as Adj. Data Profile Name.
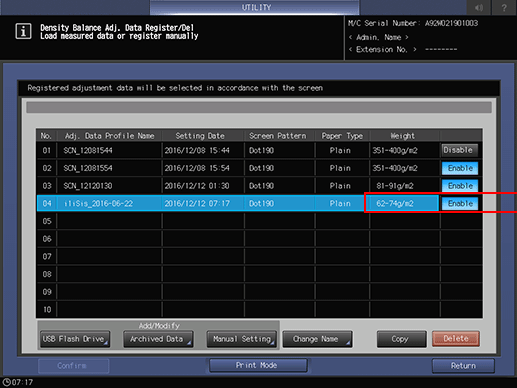
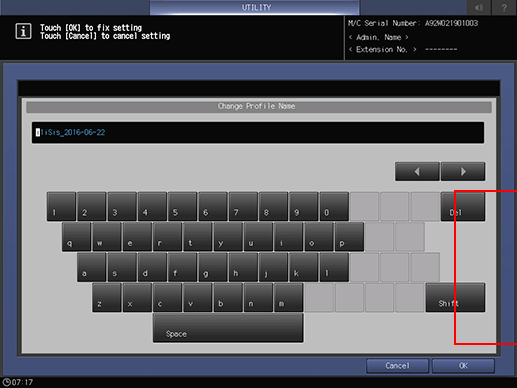
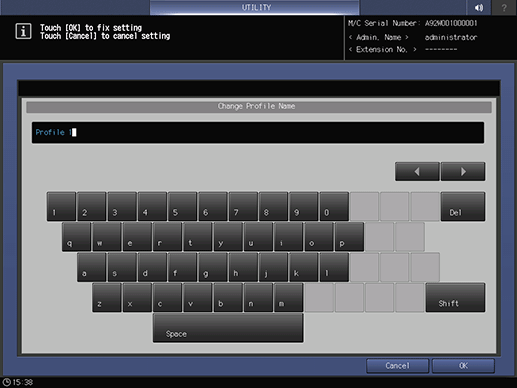
supplementary explanationYou can change the Adj. Data Profile Name, if desired. Press Change Name to display the Change Profile Name screen. Enter the desired profile name, then press OK.
Press Return.
The screen returns to the Density Balance Adjustment Menu screen.
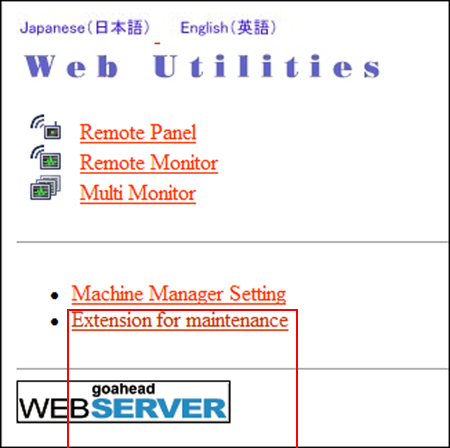
Registering colorimetric data (via Web Utilities)
To register colorimetric data in the machine via Web, configure a setting to access to Web Utilities from the computer connected to the machine via the network.
NOTICE
Do not turn the power off or on during this work.
Use the spectrophotometer to read the density balance chart that has been output in accordance with the procedure Outputting the Density Balance Chart so that colorimetric data is created.
Specify the desired name to the colorimetric data.
supplementary explanationEnter (Up to 14 characters of identifying information printed on the chart)_(up to 22 characters of user-customized information).txt as a file name.
Access to Web Utilities (URL shown below) from the computer connected to the machine via the network.
http://a.b.c.d:30091/
supplementary explanationEnter the IP address of the machine into a.b.c.d.
Click Machine Manager Setting, and enter the administrator ID and password.
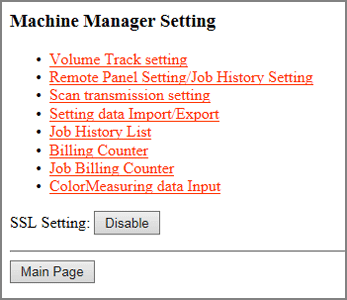
Click on ColorMeasuring data Input.
Enter the file name for colorimetric data into File Name, click Browse on the side of the file path, and select the colorimetric data saved in the computer.
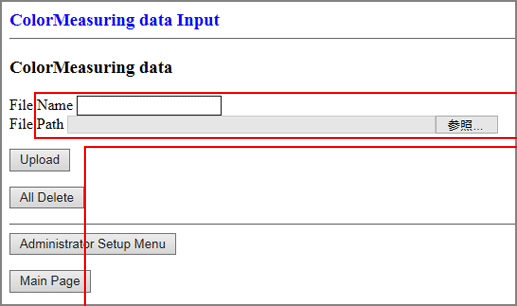
Click Upload.
Colorimetric data is saved in the machine.
supplementary explanationIf there are two or more sets of colorimetric data, repeat step 6 and 7.
Press Density Balance Data Reg/Del on the Density Balance Adjustment Menu screen to display the Density Balance Adj. Data Register/Del screen.
Select any one row in the list of 10 profiles, and press Archived Data.
supplementary explanationNo more than 10 pieces of data can be registered, however, the data can be overwritten. If desired, select the data to be overwritten.
supplementary explanationThe colorimetric data can be synthesized and registered. To synthesize data, select the row having the same screen type, paper type, and weight.
The file name of the colorimetric data is displayed.
Select the file name of the data to be registered, then press OK.

To register the adjustment data, press OK.
supplementary explanationTo cancel the registration, press Cancel.
The adjustment data is registered.
Press Return.
The screen returns to the Density Balance Adjustment Menu screen.
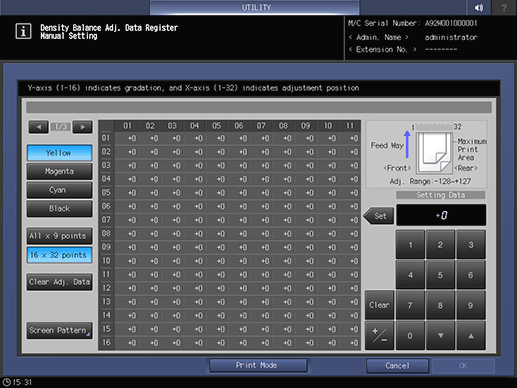
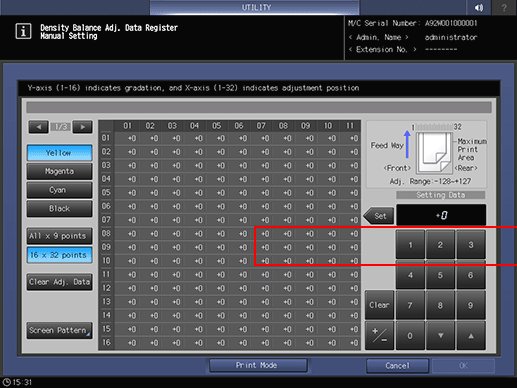
Entering New Density Balance Adjustment Data for Manual Adjustment
Enter new density balance adjustment data to adjust the balance manually.
Objects of Adjustment: 9 points for All x 9 points mode; 512 points for 16 x 32 points mode
Adjustment Range: -128 to +127For manual setting of the density balance adjustment, the following two modes, All x 9 points and 16 x 32 points, are provided.
Use All x 9 points to enter the density value into 9 points out of 32 points dividing the crosswise direction, so that the machine automatically determines the density value in surrounding area.
Use 16 x 32 points to manually enter the adjustment data into a total of 512 points; 32 points in crosswise direction, and 16 points in feeding direction.
This setting can be made individually for each of predefined screen types.
Reference
The screen type can be changed in UTILITY. For details, refer to [Custom Screen].
Follow the procedure on Displaying the [Administrator Setting Menu] Screen to display the Administrator Setting Menu screen.
Press System Setting on the Administrator Setting Menu screen, and then press Expert Adjustment, Quality Adjustment, Density Balance Adjustment, and Density Balance Data Reg/Del in sequence.
Select any one row in the list, and press Manual Setting.
supplementary explanationNo more than 10 pieces of data can be registered, however, the data can be overwritten. If desired, select the data to be overwritten.
The Density Balance Adj. Data Register screen is displayed.
supplementary explanationIf the existing data is selected, the registered density balance adjustment data is displayed.
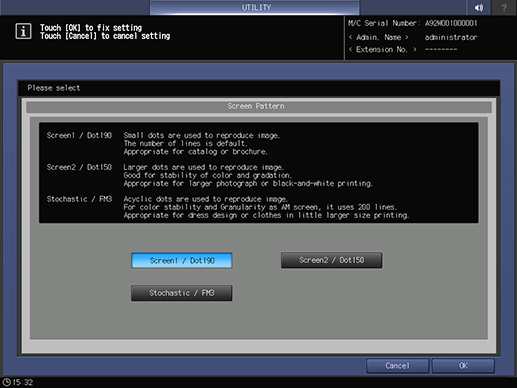
Press Screen Pattern.
Select the screen to apply density balance data to, and press OK.
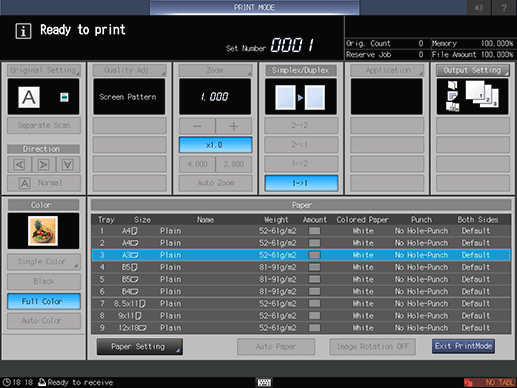
Press Print Mode.
Select the paper size.

supplementary explanationLoad 12 18 short edge feed, SRA3 short edge feed, 11 17 short edge feed, or A3 short edge feed paper in a tray, then select that tray.
Press Start on the control panel.
supplementary explanationThe machine outputs a chart with its density balance adjusted.
Review the chart.
Press Exit PrintMode to return to the Density Balance Adj. Data Register screen.
Select either All x 9 points or 16 x 32 points.
When All x 9 points is selected
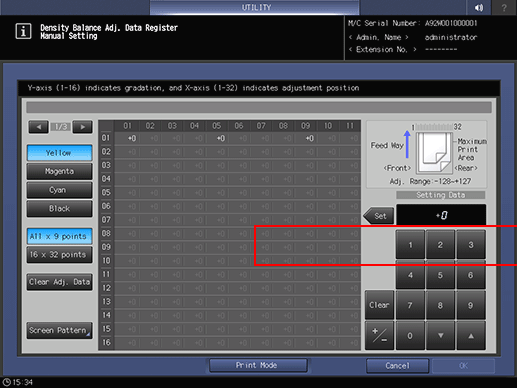
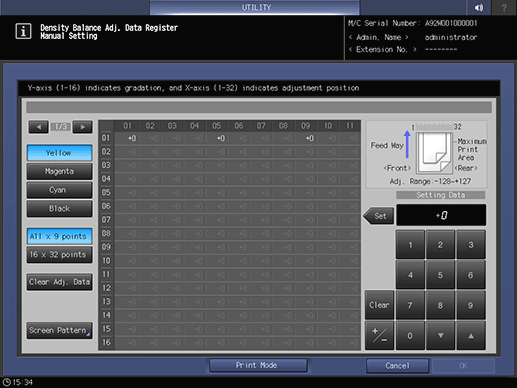
When All x 9 points is selected in Step 11, enter the desired adjustment value in the following 9 points taken out from 01 to 32 on the X-axis: 01, 05, 09, 13, 17, 21, 25, 29, 32.
When 16 x 32 points is selected in step 11, enter the adjustment value into your desired points selected from a total of 512 points; 32 points in the crosswise direction, and 16 points in the paper feed direction.supplementary explanationUse and right as needed to display the desired point on the X-axis.
supplementary explanationIf 16 32 points is selected, pressing the top row of the X-axis can select all the lower columns, and you can enter the same value collectively.
supplementary explanationUse +/- to specify the value to be positive or negative. Press Clear to set the value at "0."
supplementary explanationPress Set.
supplementary explanationTo clear the adjustment data, press Clear Adj. Data. The adjustment data return to "0" at all points.
NOTICE
Clear Adj. Data sets "0" for the adjustment data at the selected point as well as for the adjustment data for all points in addition to the adjustment value of selected points. Be careful when using this key.
Press Print Mode.
Select the paper size.
supplementary explanationLoad 12 18 short edge feed, SRA3 short edge feed, 11 17 short edge feed, or A3 short edge feed paper in a tray, then select that tray.
Press Start on the control panel.
The machine outputs a chart with its density balance adjusted.
Review the chart.
Press Exit PrintMode to return to the Density Balance Adj. Data Register screen.
When the adjustment is completed, press OK on the Density Balance Adj. Data Register screen.
The screen returns to the Density Balance Adj. Data Register/Del screen and NEW PROFILE in Adj. Data Profile Name is displayed.
supplementary explanationIf a chart for confirmation is not output, the density balance adjustment data is not changed or registered even if the OK on the Density Balance Adj. Data Register screen. Be sure to output a chart after making an adjustment, then press OK.
Press Change Name.
The Change Profile Name screen is displayed.
supplementary explanationEnter the desired profile name, then press OK.
Press Return.
The screen returns to the Density Balance Adjustment Menu screen.
Manually Adjusting the Existing Density Balance Adjustment Data
Manually adjust the existing density balance adjustment data.
Objects of Adjustment: 9 points for All x 9 points; and 512 points for 16 x 32 points
Adjustment Range: -128 to +127For manual setting of the density balance adjustment, the following two modes, All x 9 points and 16 x 32 points, are provided.
Use All x 9 points to enter the density value into 9 points out of 32 points dividing the crosswise direction, so that the machine automatically determines the density value in surrounding area.
Use 16 x 32 points to manually enter the density data into a total of 512 points; 32 points in crosswise direction, and 16 points in feeding direction.
This setting can be made individually for each of predefined screen types.
Reference
The screen type can be changed in UTILITY. For details, refer to [Custom Screen].
Follow the procedure on Displaying the [Administrator Setting Menu] Screen to display the Administrator Setting Menu screen.
Press System Setting on the Administrator Setting Menu screen, and then press Expert Adjustment, Quality Adjustment, Density Balance Adjustment, and Density Balance Data Reg/Del in sequence.
The Density Balance Adj. Data Register/Del screen is displayed.
Select the row of the existing data to be edited from the list, and press Manual Setting.
Select either All x 9 points or 16 x 32 points.
Press Screen Pattern.
Select the screen to apply density balance data to, and press OK.
supplementary explanationIf the data to be edited is the colorimetric data measured with the spectrophotometer, the screen type cannot be changed. The Screen Pattern key is grayed out to show inactivity.
When All x 9 points is selected in Step 4, enter the desired adjustment value in the following 9 points taken out from 01 to 32 on the X-axis: 01, 05, 09, 13, 17, 21, 25, 29, 32.
When 16 x 32 points is selected in step 4, enter the adjustment value into your desired points selected from a total of 512 points; 32 points in the crosswise direction, and 16 points in the paper feed direction.supplementary explanationUse and right as needed to display the desired point on the X-axis.
supplementary explanationIf 16 x 32 points is selected, pressing the top row of the X-axis can select all the lower columns, and you can enter the same value collectively.
supplementary explanationUse +/- to specify the value to be positive or negative. Press Clear to set the value at "0."
supplementary explanationPress Set.
supplementary explanationTo clear the adjustment data, press Clear Adj. Data. The adjustment data return to "0" at all points.
NOTICE
Clear Adj. Data sets "0" for the adjustment data at the selected point as well as for the adjustment data for all points in addition to the adjustment value of selected points. Be careful when using this key.
Press Print Mode.
Select the paper size.
supplementary explanationLoad 12 18 short edge feed, SRA3 short edge feed, 11 17 short edge feed, or A3 short edge feed paper in a tray, then select that tray.
Press Start on the control panel.
The machine outputs a chart with its density balance adjusted.
Press Exit PrintMode to return to the Density Balance Adj. Data Register screen.
Check the chart output in step 10, then repeat steps 4 to 11 until the desired density balance is obtained.
When the adjustment is completed, press OK on the Density Balance Adj. Data Register screen.
The screen returns to the Density Balance Adj. Data Register/Del screen.
supplementary explanationWithout OK pressed after the chart is printed, the colorimetric data is not changed and registered. Be sure to press OK.
To change the profile name, press Change Name.
The Change Profile Name screen is displayed.
supplementary explanationEnter the desired profile name, then press OK.

Press Return.
The screen returns to the Density Balance Adjustment Menu screen.
Duplicating or Deleting Density Balance Adjustment Data
Follow the procedure below to duplicate or delete the density balance data.
Copy is not available if 10 pieces of adjustment data has already been registered. Delete one from the list, if you need to copy.
Follow the procedure on Displaying the [Administrator Setting Menu] Screen to display the Administrator Setting Menu screen.
Press System Setting on the Administrator Setting Menu screen, and then press Expert Adjustment, Quality Adjustment, Density Balance Adjustment, and Density Balance Data Reg/Del in sequence.
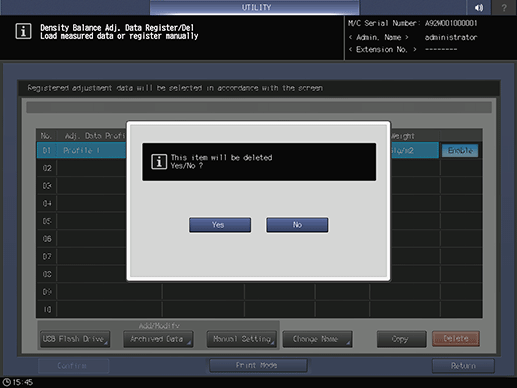
Select any one from the list of 10 profiles. To delete adjustment data, press Delete. To duplicate adjustment data, press Copy.
supplementary explanationPressing Delete displays the confirmation screen. Pressing Yes deletes the selected row.
supplementary explanationThe duplicated data can be modified manually. For details, refer to Manually Adjusting the Existing Density Balance Adjustment Data.
Press Return.
The screen returns to the Density Balance Adjustment Menu screen.
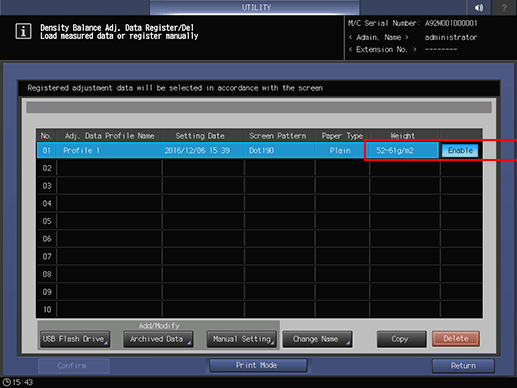
Enabling or Disabling Density Balance Adjustment Data
Enable or disable density balance adjustment data.
Setting Enable is allowed for only one among multiple pieces of adjustment data specified for the same screen type, paper type, and weight. The data set to Enable is effective when the adjusted screen type is used for output.
The density balance data being grayed out on the list do not function even if Enable is selected. This is because the screen type of dimmed data is not the same as that currently specified for the machine. If you select the same screen type as that displayed on the list in UTILITY, the dimmed data returns to the normal display, and it functions normally if you select Enable. For details about how to change the screen type, refer to [Custom Screen].
Follow the procedure on Displaying the [Administrator Setting Menu] Screen to display the Administrator Setting Menu screen.
Press System Setting on the Administrator Setting Menu screen, and then press Expert Adjustment, Quality Adjustment, Density Balance Adjustment, and Density Balance Data Reg/Del in sequence.
Press either Enable or Disable in the right side of the screen.
supplementary explanationIf multiple pieces of adjustment data are set for the same screen type, paper type, and weight, set Enable for the desired one. Others are automatically set to Disable.
Press Return.
The screen returns to the Density Balance Adjustment Menu screen.