
Date/Time Setting
Set the current date and time for built-in clock of the machine, and specify whether or not to activate the Daylight Saving Time function. With Daylight Saving Time activated, the time lag can be specified as desired. Also, use Time Zone to specify the time difference from the universal time. The Daylight Saving Time is deactivated as default.
Tips
The date and time will be used in the audit log which records events related to security management. Be sure to set a correct date and time to ensure the accuracy of the audit log.
Follow the procedure on Displaying the [User Setting Menu] Screen to display the User Setting Menu screen.
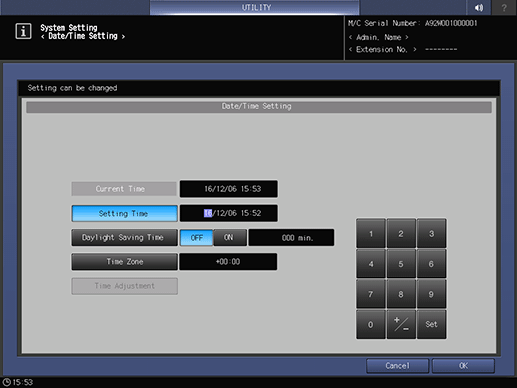
Press System Setting on the User Setting Menu screen, and then press Date/Time Setting.

Set the current date and time for built-in clock of the machine.
The screen shows the current setting of time in the following order:
- Metric area: Day, Month, Year, Time (24-hour format)
- Inch area: Month, Day, Year, Time (24-hour format)
supplementary explanationEnter a numeric value from the keypad on the screen.
supplementary explanationIf you enter a value out of the range and press OK, the message The set-up value is invalid The proper value was set up is displayed and the entered value is changed to a value within the range automatically.
supplementary explanationPress Set in the lower right corner of the touch panel keypad to fix the entry. The highlighted area shifts to the right.
Set the Daylight Saving Time.
The Daylight Saving Time is deactivated as default.
supplementary explanationPress ON to the right of Daylight Saving Time to set the Daylight Saving Time. Daylight Saving Time is highlighted on the screen.
supplementary explanationUse the touch panel keypad to enter the time to gain.
supplementary explanationPress Set in the lower right corner of the touch panel keypad to fix the entry.
Specify the time difference from the standard time.
This gives the time difference information at the same time when an E-mail is received. The time difference is predefined for each country or region.
supplementary explanationPress Time Zone, then enter the time difference from the touch panel keypad. (For example, enter "-0600" for six hours later than the universal time.)
supplementary explanationPress +/- to display "+" for a local time earlier than the universal time, or "-" for a later local time.
supplementary explanationPress Set in the lower right corner of the touch panel keypad to fix the entry.
Press OK to complete the setting.
supplementary explanationTo cancel the change, press Cancel. In either case, the screen returns to the System Setting Menu screen.