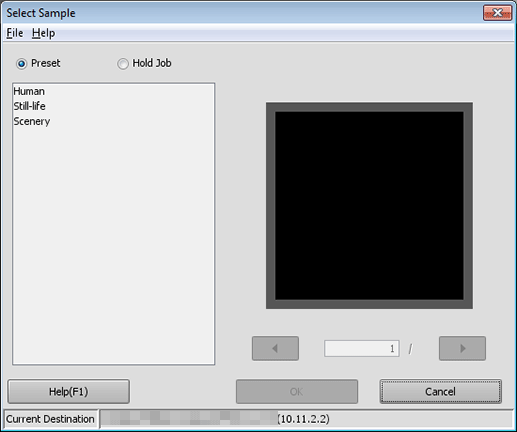
Select Sample Screen
About Select Sample screen
After you apply the adjusted tone curve to the sample picture, you can check the conditions of Before Adjustment and After Adjustment. You can select the image which was set at factory shipping, as the sample picture.
This section describes how to select the sample picture.
The sample picture is selected on Select Sample screen.
For details, refer to Selecting an Image.
The Select Sample screen is composed as follows;

Configuration
Name | Description |
|---|---|
Preset | Allows you to use the image which was set at factory shipping, as a sample picture. |
Hold Job | Allows you to use a hold job in the image controller which is connected currently, as the sample. You cannot select a job whose job ticket is edited on the touch panel. Hold (Without RIP) is not displayed in the list. For details about how to create a hold job, refer to the following pages. - Overview of Job Management with HDD - Overview of Job Holding and HDD Storage - Store Setting: Holding the Scanned Copy Job on this Machine or Saving it on the HDD |
(list) | According to the selection of Preset/Hold Job, displays a list of preset images or a list of hold jobs (file name and registration date/time) in the image controller which is connected currently. Secure Print jobs are not displayed. |
(image preview area) | Displays the image selected from the list. |
<, (input box), > | When multiple images are included in the Hold job of the image controller, click the button to display the previous image or the next image. Or, displays the image on the preview area when the number of it is entered into the input box. This function is only available when Hold Job is selected. |
OK | Uses the selected image as the sample picture. Select Sample screen is closed to return to Tone Curve Adjustment screen. Displays the selected image in Before Adjustment and After Adjustment. |
Cancel | Discards the current settings and closes Select Sample screen to return to Tone Curve Adjustment screen. |
Help | Displays the Help of this screen. |
Menu
The menu items of the Select Sample screen are as follows;
Menu | Menu Items | Description |
|---|---|---|
File | Connect Printer | Displays the Connect Printer screen when connecting to another image controller. For details about the operation procedure, refer to Switch the Image Controller to Connect. |
Reload | Reloads the information of the image controller connected currently. | |
Cancel | Discards the current settings, and closes the screen. | |
Help | Help | Displays the Help of this screen. |
Version Information | Displays the version of Color Centro. |