
Tone Curve Adjustment Screen
About Tone Curve Adjustment screen
The tone curve adjustment function of Color Centro uses Tone Curve Adjustment screen.
To display this screen, click Tone Curve Adjustment on the Color Centro screen. To close this screen, select Close from File menu.
The Tone Curve Adjustment screen is composed as follows;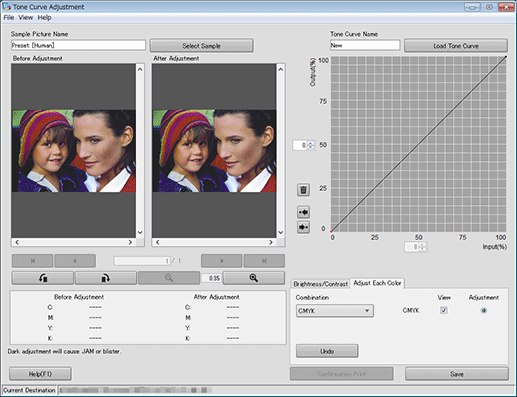
Structure of Screen
Name | Description |
|---|---|
Sample Picture Name | Displays the name of the sample picture selected using Select Sample. From subsequent launches, the name of the sample picture selected previously is displayed. |
Select Sample | Allows you to select a sample picture from the Select Sample screen. |
Tone Curve Name | Displays the name of the tone curve read using Load Tone Curve. |
Load Tone Curve | Allows you to select a tone curve to be read from the Tone Curve Management screen. You can also perform tone curve management operations. |
Before Adjustment | Displays the picture image from before adjusting the tone curve. |
After Adjustment | Displays the picture image from after adjusting the tone curve. Every adjustment is reflected on the screen immediately. |
| When multiple images are included in the Hold job of the image controller selected on the Select Sample screen, click the button to display the first image, the previous image, the next image, and the last image. This function is available, only when Hold Job is selected on the Select Sample screen. |
| Turns the picture image 90 degrees counter-clockwise. |
| Turns the picture image 90 degrees clockwise. |
| Displays the picture image in reduced size. You can scale down the image size until the whole image appears. |
Zoom | Displays the zoom level to display the picture image. |
| Displays enlarged picture image. Enlargement factor can be chosen from the four steps: x2, x4, x8 and x16. |
CMYK value | Displays CMYK values of the cursor position when the mouse cursor is on the image of either Before Adjustment or After Adjustment. |
Graph | Displays the tone curve to which the adjustment in the Brightness/Contrast tab and the setting in the Adjust Each Color tab are applied. Selecting the Adjust Each Color tab allows you to adjust the tone curve on a graph. |
Vertical axis box | Displays the output density (%) of the selected point on the curve view area. You can specify the value to move the selected point. |
| Deletes the currently selected point (active point). |
| Selects the adjustment point that is one before the active point. |
| Selects the adjustment point that is one after the active point. |
Horizontal axis box | Displays the input density (%) of the selected point on the curve view area. You can specify the value to move the selected point. |
Brightness/Contrast Tab | Adjusts the brightness and contrast.Adjustment of Tone Curves: Brightness and Contrast |
Brightness/Contrast Tab - Undo | Cancels the currently edited tone curve. Data is returned to the state it was in when it was last saved. |
Adjust Each Color Tab | Select the desired one of the following functions.
|
Adjust Each Color Tab - Undo | Cancels the currently edited tone curve. Data is returned to the state it was in when it was last saved. |
Cancel Page Tone Curve | Clears the page tone curve. This function is effective when you are adjusting a page with the page tone curve applied. Even if there is, in the job, a page that has a page tone curve applied, it is not effective when a page with no page tone curve applied is opened. |
Confirmation Print | Adopts the setting and execute printing to confirm the result of adjustment. This function is available, only when Hold Job is selected on the Select Sample screen. |
Save | Saves the result of adjustment. This button is displayed and this function is available, only when Preset is selected on the Select Sample screen. |
Apply | Applies the adjusted tone curves to the job. This button is displayed and this function is available, only when Hold Job is selected on the Select Sample screen. |
Help | Displays the Help of this screen. |
 ,
, ,
, ,
,


Screen Menu
The menu items of the Tone Curve Adjustment screen are as follows;
Menu | Menu Items | Description |
|---|---|---|
File | New Tone Curve | Creates the new tone curve. |
Tone Curve Management | Allows you to select a tone curve to be read from the Tone Curve Management screen. You can also perform tone curve management operations. | |
Select Sample | Allows you to select a sample picture from the Select Sample screen. | |
Confirmation Print | Adopts the setting and execute printing to confirm the result of adjustment. This function is available, only when Hold Job is selected on the Select Sample screen. | |
Save the tone curve | Saves the result of adjustment. | |
Apply | Applies the adjusted tone curves to the job. This function is available, only when Hold Job is selected on the Select Sample screen. | |
Close | Close this screen and exits this function. | |
View | Previous Page | It is available when multiple images are included in the job of the image controller selected on Select Sample screen. Displays the image of the previous page. |
Next Page | It is available when multiple images are included in the job of the image controller selected on Select Sample screen. Displays the image of the next page. | |
First Page | It is available when multiple images are included in the job of the image controller selected on Select Sample screen. Displays the image of the first page. | |
Last Page | It is available when multiple images are included in the job of the image controller selected on Select Sample screen. Displays the image of the last page. | |
Rotation (Counterclockwise) | Turns the picture image 90 degrees counter-clockwise. | |
Rotation (Clockwise) | Turns the picture image 90 degrees clockwise. | |
Scale Up | Displays enlarged picture image. Enlargement factor can be chosen from the four steps: x2, x4, x8 and x16. | |
Scale Down | Displays the picture image in reduced size. You can scale down the image size until the whole image appears. | |
Display only before adjustment | Displays only the images that are from Before Adjustment. | |
Display only after adjustment | Displays only the images that are from After Adjustment. | |
Display before and after the adjustment | Displays the images from both Before Adjustment and After Adjustment. | |
The warning dialog is not displayed. | This is effective only when the screen is launched from Job Centro. You select whether or not to display a warning message. The warning message is displayed, when you open a job on Color Centro and the job has tone curve settings that are different between objects. The objects are Image and Text/Graphics. (By using a Plug-in driver or the like, you can set a tone curve for each object in the job.) A change in the tone curve is reflected in the entire image, not just the object. Use this function with a good understanding of the above aspects. | |
Help | Help | Displays the Help of this screen. |
Version Information | Displays the version of Color Centro. |