
- Home
- Menu
× Menu Useful Software If you have a problem…
- FAQ
- Troubleshooting
Menu
Color Centro
- Overview of Color Centro
- Color Centro Specifications
- Settings of this machine
- Installing and Uninstalling Color Centro
- Before Installing Color Centro
- Installation of Color Centro
- Uninstalling Color Centro
- Connecting Color Centro
- Start Color Centro
- [Connect Printer] Screen
- [Color Centro] Screen
- Exit from Color Centro
- Calibration
- Tone Curve Adjustment
- Overview of Tone Curve Adjustment
- [Tone Curve Adjustment] Screen
- [Select Sample] Screen
- [Tone Curve Management] Screen
- Tone Curve Adjustment Flow
- Selecting an Image
- Confirming an Image
- Create Tone Curves
- Load Tone Curves
- Adjustment of Tone Curves: Brightness and Contrast
- Adjust the Tone Curve: Each Color
- Confirming the Result of the Adjustment
- Canceling the Adjustment
- Save the Tone Curves
- Management of Tone Curves
- Color Configuration Management
- Overview of Color Configuration
- [Color Configuration Management] Screen
- Color Configuration Management Flow
- Create a Color Configuration
- Editing and Registering a Color Configuration
- Specify a Default Profile Set and Paper Type Default
- Changing the Color Conversion Setting
- Management of Color Configurations
- Creation of a Profile Set
- Editing a Profile in a Profile Set
- Improvement of Accuracy of a Profile Set
- Adjustment of Color Conversion of a Profile Set
- Management of Profile Sets
- Color Default Settings
- [Color Default Settings] Screen
- Color Default Setting Flow
- Confirming the Color Configuration Default
- Changing the Default RGB Color Conversion Setting
- Changing the Default CMYK Color Conversion Setting
- Changing the Default Printer Profile Setting
- Changing the Default Color Conversion Setting
- Registering Settings
- Resetting
- Specify Information of a Job and a Color Bar
- Spot Color
- [Spot Color] Screen
- Initializing the [Spot Color] screen
- [Spot Color Table Management] Screen
- Spot Color Management Flow
- Create a Spot Color Table
- Load a Spot Color Table
- Creating a Spot Color
- Spot Color Adjustment
- Management of Spot Colors
- Save a Spot Color Table
- Management of Spot Color Tables
- Alternative Color Management
- [Alternative Color Management] Screen
- Alternative Color Management Flow
- Creating an Alternative Color
- Alternative Color Management
- Register an Alternative Color Table
- Profile Management
- [Profile Management] Screen
- CMYK Target Profile: Creation
- Printer Profile: Creation
- RGB-CMYK Device Link Profile: Creation
- RGB-CMYK Device Link Profile: Editing
- CMYK-CMYK Device Link Profile: Creation
- CMYK-CMYK Device Link Profile: Editing
- Management of RGB Source Profiles
- Management of CMYK Target Profiles
- Management of Printer Profiles
- Management of RGB-CMYK Device Link Profiles
- Management of CMYK-CMYK Device Link Profiles
- Other Functions
Specify Information of a Job and a Color Bar
This section describes how to configure items to be printed outside the image area.
Click File - Color Verification.
Color Verification screen appears.
Click The Color Setting Information, then select items.
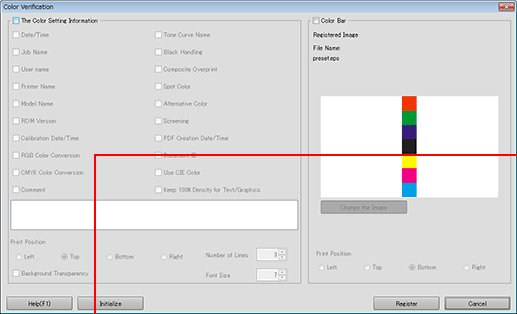
supplementary explanationTo specify a printing position, select the radio button in Print Position.
supplementary explanationTo specify the number of printing lines, select the number in Number of Lines. (1 to 5)
supplementary explanationTo change the font size, specify the numeric value in Font Size.
Select Color Bar.
supplementary explanationThe image that is registered as the color bar is displayed.
supplementary explanationTo use another file, click Change the Image and then specify an eps file.
supplementary explanationTo specify the print position, select an option button in Print Position.
Click Register.
The setting is registered in the image controller.
Color Verification is closed to return to Color Default Settings screen.
supplementary explanationTo cancel the setting and return to the default, click Initialize.