
Adjusting Point Color and Profile Curve
Adjusting a point color
You can execute the point color adjustment for each CMYK/RGB object (CMYK/RGB Image, CMYK/RGB Graphic and CMYK/RGB Text).
Click Adjust of the object to execute the point color adjustment.
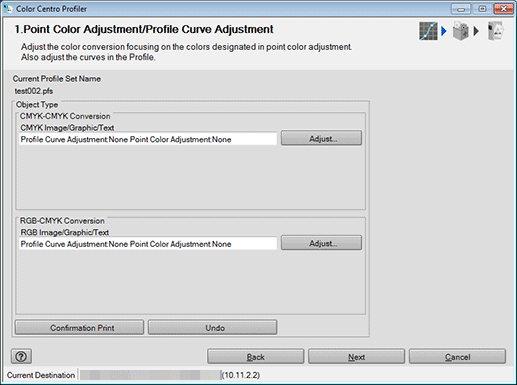
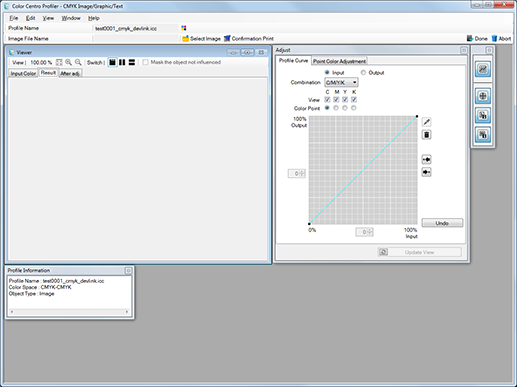
The Adjust screen is displayed.
Adjust the point color.

supplementary explanationFor details about the operation procedure, refer to Adjusting Point Color and Profile Curve.
Repeat from Step 1 to Step 2 for other objects.
The Point Color Adjustment/Profile Curve Adjustment screen returns.
Click Confirmation Print for the test printing.
Confirmation Print screen appears.
Click Print for the test printing.
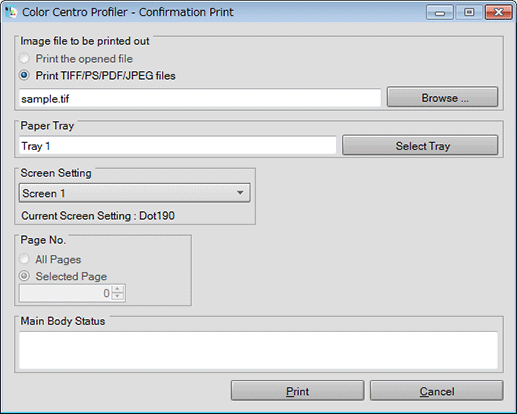
supplementary explanationClick Browse to display the screen to select the image for printing.
supplementary explanationClick Select Tray to display the screen to specify the tray used by confirmation printing.
supplementary explanationFrom Screen Setting, select the screen setting used by confirmation printing.
supplementary explanationSpecify the Page No..
supplementary explanationWhen you select Cancel, the Confirmation Print screen closes and the screen returns to the Adjust screen.
Confirm the result of test printing and click OK.
The Adjust screen closes, and the screen returns to the Point Color Adjustment/Profile Curve Adjustment screen.
Click Next.
Profile is calculated and generated.
After completing calculation, the Complete Profile screen appears.
Click Finish.
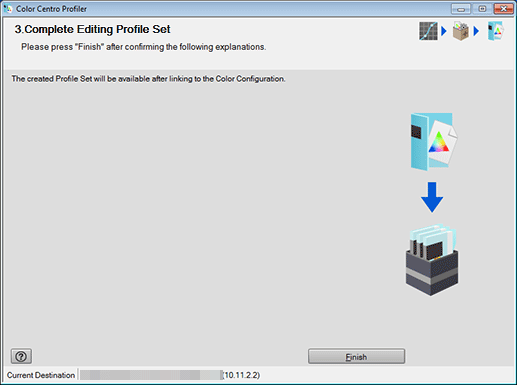
The wizard is completed.
Color Centro Profiler screen returns.
On Color Centro Profiler screen, from the File menu, select Exit.
Color Configuration Management screen returns.
Adjust a Profile Curve
You can execute the profile curve adjustment for each CMYK/RGB object (CMYK/RGB Image, CMYK/RGB Graphic and CMYK/RGB Text).
Click Adjust of the object to execute the profile curve adjustment.
The Adjust screen is displayed.
Adjust the profile curve.
supplementary explanationFor details about the operation procedure, refer to Adjusting Point Color and Profile Curve.
Repeat from Step 1 to Step 2 for other objects.
The Point Color Adjustment/Profile Curve Adjustment screen returns.
Click Confirmation Print for the test printing.
Confirmation Print screen appears.
Click Print for the test printing.
supplementary explanationClick Browse to display the screen to select the image for printing.
supplementary explanationClick Select Tray to display the screen to specify the tray used by confirmation printing.
supplementary explanationFrom Screen Setting, select the screen setting used by confirmation printing.
supplementary explanationSpecify the Page No..
supplementary explanationWhen you select Cancel, the Confirmation Print screen closes and the screen returns to the Adjust screen.
Confirm the result of test printing and click OK.
The Adjust screen closes, and the screen returns to the Point Color Adjustment/Profile Curve Adjustment screen.
Click Next.
Profile is calculated and generated.
After completing calculation, the Complete Profile screen appears.
Click Finish.
The wizard is completed.
Color Centro Profiler screen returns.
On Color Centro Profiler screen, from the File menu, select Exit.
Color Configuration Management screen returns.