
Executing Exact Color Calibration
This section describes how to perform calibration with Exact Color.
For details about Exact Color, refer to the following.
On the Calibration Manager screen, click Execute Wizard of Exact Color.
The Operation steps screen is displayed.
supplementary explanationIf Execute Wizard of Exact Color is not displayed on the screen, click Show Exact Color to display it.
Click Next.
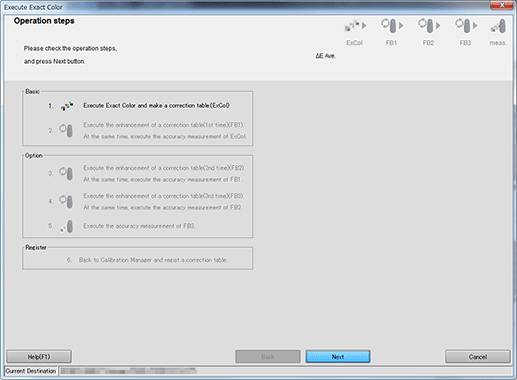
The screen to execute calibration with Exact Color is displayed. "FB" stands for "feedback", and "FB1" means the first feedback.
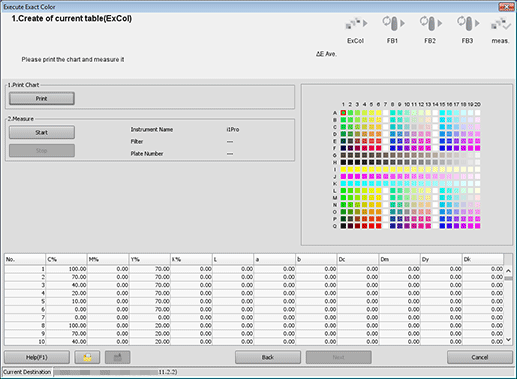
Click Print.
The Print Chart screen is displayed.
Set the number of copies and select a paper tray.
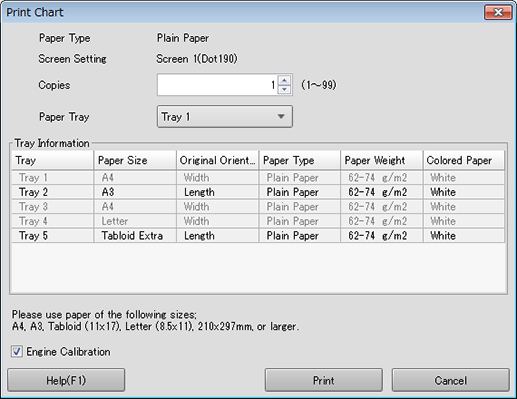
supplementary explanationFor the number of copies, set a value between 1 and 99 inclusive.
supplementary explanationTo perform Engine Calibration, select the check box.
Click Print.
Chart printing is executed. After the printing, the screen for Exact Color adjustment returns.
Connect the instrument to the computer and click Start.
Click OK on the Calibration of Measurement Instrument screen, and then follow the instructions.
Click OK on the Measurement Start screen and follow the instructions.
A measurement starts.
After finishing the measurement, the result of the measurement is displayed in the list, and patches are colored in the preview area.
supplementary explanationAn operation screen for the colorimeter appears. Follow the instructions on the windows that follow.
supplementary explanationIf you measure a wrong line, a warning message appears. You can select either to try again with the correct line or to proceed to the next line.
supplementary explanationTo stop the measurement, click Stop.
supplementary explanationAfter the acquirement of measurement data, OK becomes available.
supplementary explanationBefore measurement, patches are displayed in gray, but after the measurement, patches are displayed in color.
supplementary explanationThe value of each patch appears in the measurement result list.
supplementary explanationWhen you click a color patch of the preview area, the corresponding line is selected in the measurement result list. On the other hand, when you select the line in the measurement result list, the corresponding color patch is selected in the preview area.
supplementary explanationIf necessary, you can also click
 or
or  to save the measurement result to the local disk or load the saved measurement result.
Click Next.
The Operation steps screen is displayed.
Click OK to exit the wizard.
To continue measurement with an option, click Next.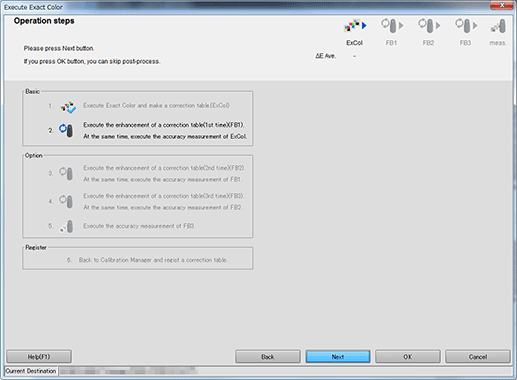
If you click OK, the Operation steps screen closes, and the measurement result is reflected in the list on the Calibration Manager screen.
Clicking Next continues measurement.
supplementary explanationTo close the Confirmation of procedure screen without saving the measurement result, select Cancel. The screen returns to the Calibration Manager screen.
supplementary explanationThe list on the Calibration Manager screen displays all measurement results until the Calibration Manager screen is closed or reset.
supplementary explanationThe results of all executed Exact Color adjustments and accuracy measurements are reflected in the Calibration Manager screen.
supplementary explanationIf necessary, you can also click
or to save the measurement result to the local disk or load the saved measurement result.
On the Calibration Manager screen, click Register the selected result. and register the Exact Color adjustment table.
Click OK on the confirmation message.
Tips
Repeating the chart printing and measurement can improve accuracy.