
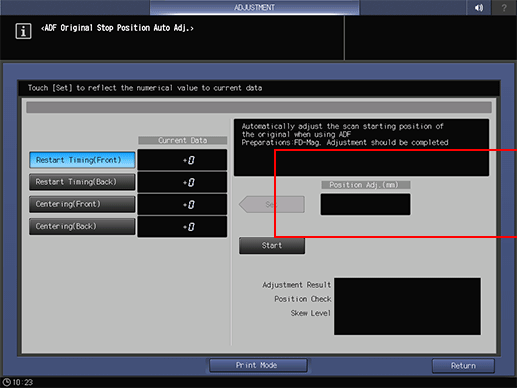
ADF Orig. Stop Pos. Auto
Automatically adjust the position to start scanning on the ADF and the image position in crosswise direction.
Objects of Adjustment: Restart Timing (Front), Restart Timing (Back), Centering (Front), Centering (Back)
NOTICE
Adjust the scanning start position after you have completed Adjustment - ADF Adjustment - FD-Mag. Adjustment. Adjust the image position in crosswise direction after completing Adjustment - Machine Adjustment - Printer Adjustment - Centering Adjustment.
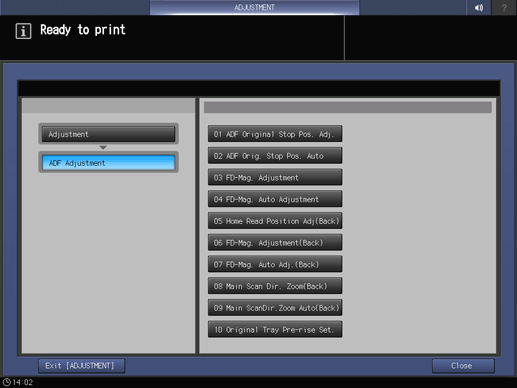
Press Adjustment on the MACHINE screen to display the Adjustment Menu screen.
Press ADF Adjustment and ADF Orig. Stop Pos. Auto in sequence.
Press any of Restart Timing(Front), Restart Timing(Back), Centering(Front), and Centering(Back) buttons.
supplementary explanationAll items must be adjusted.
Place the test chart on the ADF tray, and press Start.
supplementary explanationIf you selected Restart Timing(Front) or Centering(Front) in step 3, face the test chart surface upward and place it in the ADF tray.
supplementary explanationIf you selected Restart Timing(Back) or Centering(Back) in step 3, face the test chart surface downward and place it in the ADF tray.
Automatic adjustment is performed, and its result is displayed.
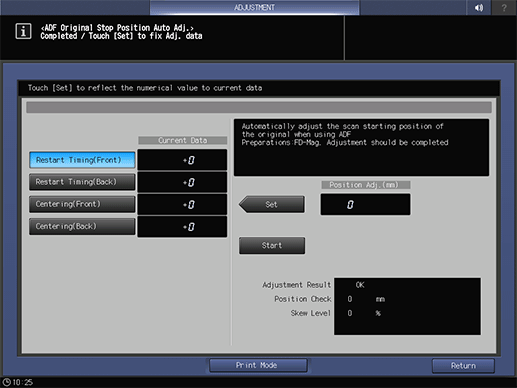
supplementary explanationIf it ends successfully, Adjustment Result indicates OK. If it ends abnormally, NG is displayed. Adjust it using the ADF Original Stop Pos. Adj. function.
supplementary explanationSkew Level is displayed only when you have selected the Restart Timing(Front) in step 3.
Make sure that the adjustment result is OK, and press Set.
supplementary explanationThe Position Adj. (mm) value is reflected on Current Data.
Press Return.
The screen returns to the ADF Adjustment Menu screen.