
Image Distinction Level
In many cases, originals include both photo and text in one page. The text areas of such originals are normally printed in black.
A color printer, however, inevitably uses not only the black toner but cyan, magenta, and yellow in layers to reproduce the black text in the color mode.
Also, using the screen method, the color printer may add colors in large or bold characters to reproduce the text in the same way as photos.
To reduce such cases in copying, the machine detects and determines the text area and photo portion while scanning originals. Then, it reproduces the black text area in single color using the black toner, and the photo portion in full color using the screen method.
This function also allows you to obtain the optimum copy results by modifying the standard for image distinction according to the character size of the text or its proportion in the whole original. For this adjustment, two items are provided; Text/Photo and Color Text.
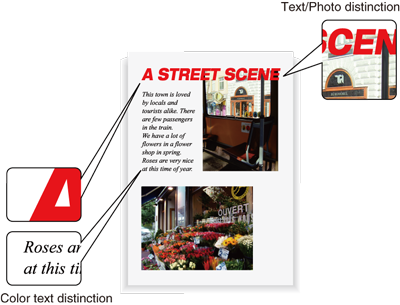
preconditionText/Photo changes the ratio of detecting the text area of the original.
preconditionColor Text changes the proportion in detecting that the original text is black or colored.
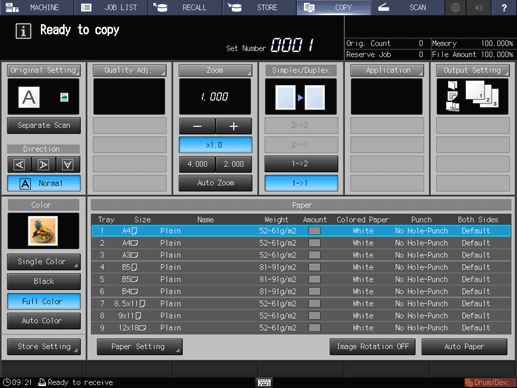
Press the COPY tab to display the COPY screen.
Press Quality Adj. on the COPY screen.
Position the original.
supplementary explanationPrepare an original for adjusting Image Distinction, and position it into the ADF or on the original glass.
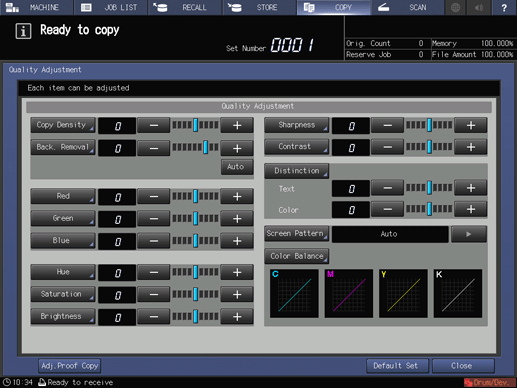
Make an adjustment for Image Distinction on the Quality Adjustment screen.
Use - and + on the right side of Text to specify the desired level for Text/Photo distinction. Specify a negative level to increase the proportion of photo, or a positive level to increase the proportion of text.
Use - and + on the right side of Color to specify the desired level for Color Text distinction. Specify a negative level to increase the proportion of black text, or a positive level to increase the proportion of colored text.
supplementary explanationTo make the adjustment for Image Distinction on the Distinction screen, proceed to step 5.
supplementary explanationTo resume the standard level, select 0.
supplementary explanationTo output a sample copy to check the adjustment result, proceed to step 6.
supplementary explanationTo complete the adjustment, proceed to step 7.
supplementary explanationIf you press Default Set on the Quality Adjustment screen, all adjustment items are returned to the standard level.
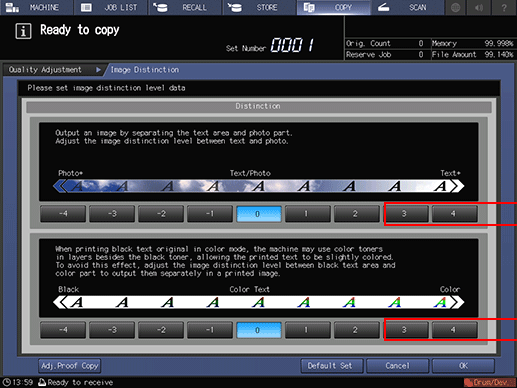
Make an adjustment for Image Distinction on the Distinction screen.
Press Distinction to display the Image Distinction screen.
Select one from -1 to -4 under Text/Photo to increase the proportion of photo in Text/Photo detection.
Select one from 1 to 4 under Text/Photo to increase the proportion of text in Text/Photo detection.
Select one from -1 to -4 under Color Text to increase the proportion of black text in Color Text distinction.
Select one from 1 to 4 under Color Text to increase the proportion of colored text in Color Text distinction.
supplementary explanationTo resume the standard level, select 0.
supplementary explanationTo resume the standard level and return to the Quality Adjustment screen, press Default Set.
supplementary explanationTo output a sample copy to check the adjustment result, proceed to step 6.
supplementary explanationTo complete the adjustment, press OK and proceed to step 7.
Output a sample copy.
After making the desired adjustment, press Adj.Proof Copy on the Quality Adjustment screen, Adj.Proof Copy on the Image Distinction screen, or Proof Copy on the control panel. Check the adjustment result with output image.
supplementary explanationRepeat steps from 3 to 6 until the desired result is obtained.
Press Close on the Quality Adjustment screen.
The screen returns to the COPY screen. The Image Distinction indication can be found under Quality Adj. on the COPY screen.