
Spine Corner Forming Pos.
Adjust the cover paper using Perfect Binder PB-503.
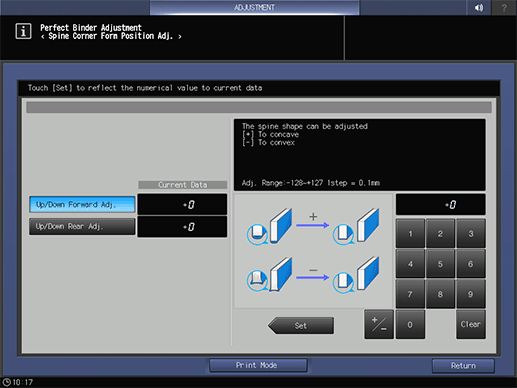
Objects of Adjustment: Up/Down Forward Adj. (Front), Up/Down Rear Adj. (Rear)
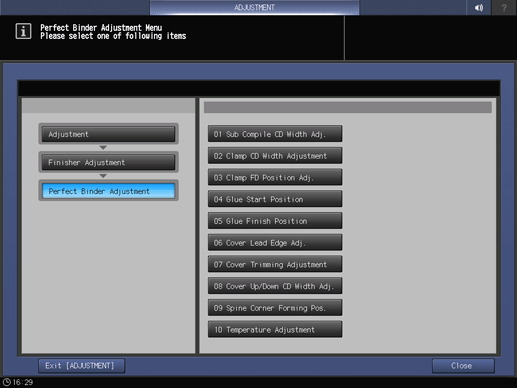
Press Adjustment on the MACHINE screen to display the Adjustment Menu screen.
Press Finisher Adjustment, Perfect Binder Adjustment, and Spine Corner Forming Pos. in sequence.
Load cover paper in either Perfect Binder Cover Tray or any other tray.
Load paper for body sets in the desired tray.
Press Print Mode.
Select the tray loaded with paper for body sets.
Press Start on the control panel.
A sample pattern of perfect-bound book is printed.
Check that the spine corner of the cover paper is formed uniformly against the horizontal scanning direction.

If any adjustment is required, press Exit PrintMode to return to the Spine Corner Form Position Adj. screen.
Select either Up/Down Forward Adj. or Up/Down Rear Adj..
Use the touch panel keypad to enter the set value.
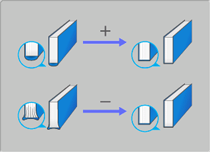
supplementary explanationUse +/- to specify the value to be positive or negative.
supplementary explanationPress Set to change the Current Value.
supplementary explanationAdjustment Range: -128 ([-] To convex) to +127 ([+] To concave) (1 step = 0.1 mm)
Repeat steps 5 to 11 until the desired result is obtained.
Press Return.
The screen returns to the Perfect Binder Adjustment Menu screen.