
Description of Setup Buttons
Page Margin[Copy]
To display:
- [Copy]
- [Application]
- [Layout]
- [Page Margin]
- [Layout]
- [Application]
Select a paper binding position and adjust the binding width (margin) for copying.
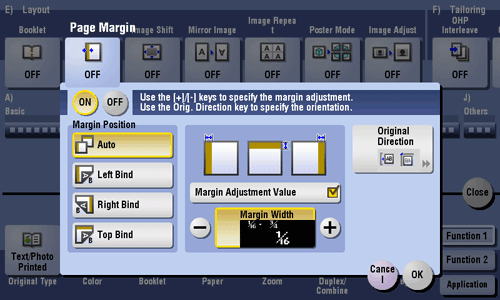
Page Margin
To display:
- [Copy]
- [Application]
- [Layout]
- [Page Margin]
- [Layout]
- [Application]
Select a paper binding position and adjust the binding width (margin) for copying.

| Settings | Description |
|---|---|
[ON]/[OFF] | Select [ON] to set a page margin. |
[Margin Position] | Select the paper binding position.
|
[Margin Adjustment Value] | Adjust page the margin in the range 1/16 inch to 3/4 inch (0.1 mm to 20.0 mm). Adjust it by tapping [+]/[-] for the inch area, or by tapping [+]/[-] or pressing the Keypad for the centimeter area. |
[Original Direction] | Specify the orientation of the loaded original. This machine copies in the same direction as for the original so that the front and back sides of paper do not turn upside down. |
Page Margin [Box]
Page Number[Scan/Fax]
To display:
- [Scan/Fax]
- [Application]
- [Stamp/Composition]
- [Page Number]
- [Stamp/Composition]
- [Application]
Select the stamping position and format, and add page and chapter numbers. Page and chapter numbers are printed on all pages.
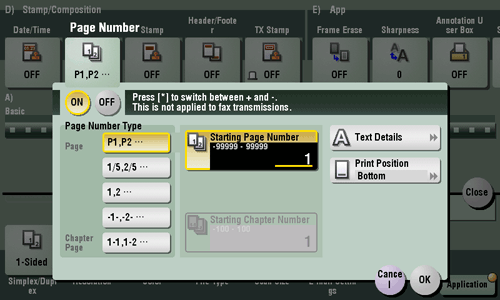
Page Number
To display:
- [Scan/Fax]
- [Application]
- [Stamp/Composition]
- [Page Number]
- [Stamp/Composition]
- [Application]
Select the stamping position and format, and add page and chapter numbers. Page and chapter numbers are printed on all pages.

| Settings | Description |
|---|---|
[ON]/[OFF] | Select [ON] to print page numbers. |
[Page Number Type] | Select the format of the page number. |
[Starting Page Number] | Enter the starting page number to be printed on the first page. For example, to print page numbers from the third page of the original, enter "-1". The first page of the original is counted as "-1", and the second page as "0", and the third page is counted as "1". In [Starting Page Number], a page number is printed on pages 1 and later. If "2" is entered, page numbers are printed from the first page of the original as "2, 3", etc. in order. The "-" (minus sign) changes to + each time you press *. |
[Starting Chapter Number] | Enter the starting chapter number if an original is divided into chapters, and you want to print chapter numbers from the second chapter. You can specify chapter numbers only when you have selected [Chapter Page] in [Page Number Type]. |
[Text Details] | If necessary, select the print size, font, and text color. |
[Print Position] | If necessary, select the print position of the text. You can more finely adjust the print position in [Adjust Position]. |
Page Number[Copy]
To display:
- [Copy]
- [Application]
- [Stamp/Composition]
- [Page Number]
- [Stamp/Composition]
- [Application]
Select the stamping position and format, and add page and chapter numbers on copied sheets. Page and chapter numbers are printed on all pages.
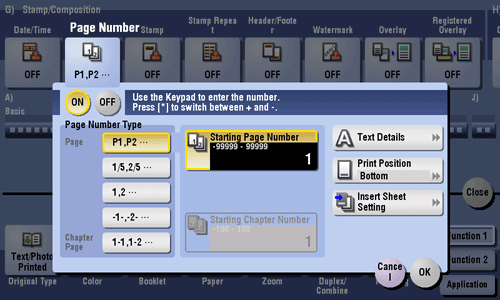
Page Number
To display:
- [Copy]
- [Application]
- [Stamp/Composition]
- [Page Number]
- [Stamp/Composition]
- [Application]
Select the stamping position and format, and add page and chapter numbers on copied sheets. Page and chapter numbers are printed on all pages.

| Settings | Description |
|---|---|
[ON]/[OFF] | Select [ON] to print a page number. |
[Page Number Type] | Select the format of the page number. |
[Starting Page Number] | Enter the starting page number to be printed on the first page. For example, to print page numbers from the third page of the original, enter "-1". The first page of the original is counted as "-1", and the second page as "0", and the third page is counted as "1". In [Starting Page Number], a page number is printed on pages 1 and later. If "2" is entered, page numbers are printed from the first page of the original as "2, 3", etc. in order."-" (minus sign) changes to + each time you tap *. |
[Starting Chapter Number] | Enter the starting chapter number if an original is divided into chapters, and you want to print chapter numbers from the second chapter. You can specify chapter numbers only when you have selected [Chapter Page] in [Page Number Type]. For example, to print chapter numbers from the third chapter, enter "-1". The first chapter of the original is counted as "-1", the second chapter as "0", and the third chapter is counted as "1". In [Starting Chapter Number], chapter number is printed on the chapters that are count as 1 and later. If "2" is entered, number is printed from the first page of the first chapter of the original as "2-1, 2-2"."-" (minus sign) changes to + each time you tap *. |
[Text Details] | If necessary, select the print size, font, and text color. |
[Print Position] | If necessary, select the print position of the text. You can adjust the print position in [Adjust Position] more closely. |
[Insert Sheet Setting] | When you insert sheets using the Cover Sheet function of Insert Sheet function, specify whether or not to print a page number on the inserted sheet.
|
Page Number [Box]
Page Separation[Copy]
To display:
- [Copy]
- [Application]
- [No. of Originals]
- [Page Separation]
- [No. of Originals]
- [Application]
Split the left- and right-hand pages of two-page spreads for copying.
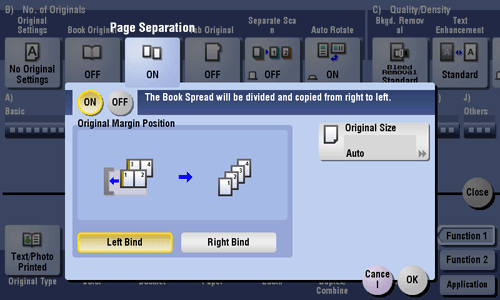
Page Separation
To display:
- [Copy]
- [Application]
- [No. of Originals]
- [Page Separation]
- [No. of Originals]
- [Application]
Split the left- and right-hand pages of two-page spreads for copying.

| Settings | Description |
|---|---|
[ON]/[OFF] | Select [ON] to specify Book Separation. |
[Original Margin Position] | Select the two-page spread binding position from [Left Bind] and [Right Bind]. |
[Original Size] | If the size of the original is not detected correctly, select a key indicating the size of the original to be scanned. If the machine cannot detect the size of irregular sized originals or photos, manually specify the size. |
Tips
- You can only use the ADF for loading originals.
- You can print on 2 sheets of paper for 1-sided copy and the front and back sides of paper for 2-sided copy.
Paper[Copy]
To display:
- [Copy]
- [Paper]
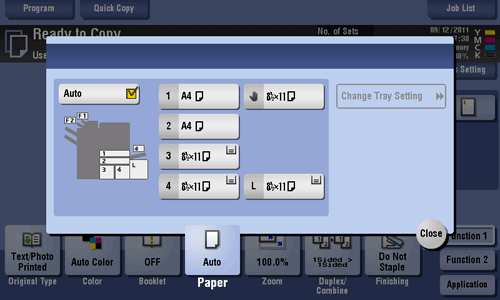
Select the paper size and type for copying. You can also change the size and type settings of the paper loaded in paper trays.
For details on the available paper types, refer to Here.
Paper
To display:
- [Copy]
- [Paper]
Select the paper size and type for copying. You can also change the size and type settings of the paper loaded in paper trays.
For details on the available paper types, refer to Here.

| Settings | Description |
|---|---|
[Auto] | Tap this button to automatically select paper fitting the size of the original when making a copy. |
[1] - [4] | Tap this button to specify paper loaded into any of Tray 1 to Tray 4 and make a copy. |
[  ] ] | Tap this button to copy onto the paper loaded into the Bypass Tray. |
[L] | Press this button to copy onto the paper loaded into the Large Capacity Unit. |
[Change Tray Setting] | If necessary, change the size and type settings of the paper loaded into the selected paper tray.
|
Tips
- To load paper into the Large Capacity Unit, the optional Large Capacity Unit is required.
Paper[Box]
To display:
- [Box]
- [System]
- [External Memory]
- Select the file
- [Print]
- [Paper]
- [Print]
- Select the file
- [External Memory]
- [System]
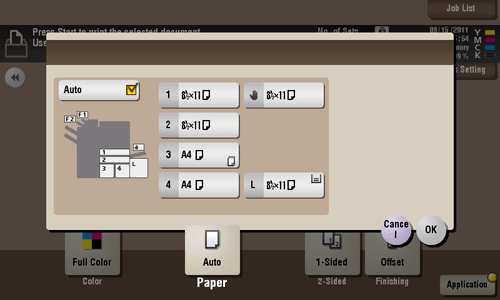
Select a paper size and type and print a file.
Paper
To display:
- [Box]
- [System]
- [External Memory]
- Select the file
- [Print]
- [Paper]
- [Print]
- Select the file
- [External Memory]
- [System]
Select a paper size and type and print a file.

| Settings | Description |
|---|---|
[Auto] | Press this button to automatically select optimum sized paper for the original before printing. |
[1] to [4], [L] | Specify paper for printing. |
[  ] ] | Press this button to print onto the paper loaded into the Bypass Tray. |
Password Copy[Copy]
To display:
- [Copy]
- [Application]
- [Copy Security]
- [Password Copy]
- [Copy Security]
- [Application]
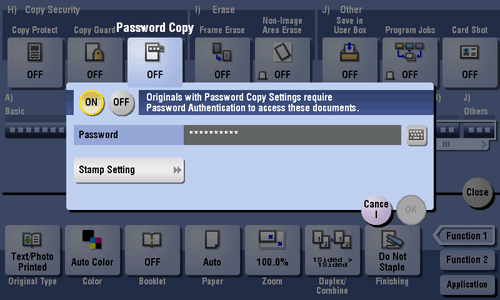
Password Copy is a copy protection function that prints concealed security watermarks such as "Private" or a date in the background to prevent unauthorized copying, and embeds a password for the password copy function on all printed sheets.
Password Copy
To display:
- [Copy]
- [Application]
- [Copy Security]
- [Password Copy]
- [Copy Security]
- [Application]
Password Copy is a copy protection function that prints concealed security watermarks such as "Private" or a date in the background to prevent unauthorized copying, and embeds a password for the password copy function on all printed sheets.

| Settings | Description | |
|---|---|---|
[ON]/[OFF] | Select [ON] to embed a password. | |
[Password] | Enter the password to restrict copying. | |
[Stamp Setting] | Set a stamp to be printed on each paper. | |
[Stamp Text] | Select a stamp used. The date and time can also be printed.
| |
[Stamp Selection] | The registration status of the stamp is displayed. | |
[Detail Setting] | If necessary, select the print size and text color. | |
[Password Copy] | Specify the contract of password copy guard pattern if necessary. | |
[Background Pattern] | Select a background pattern. | |
Tips
- You can use the Password Copy function when the optional Security Kit is installed and the Password Copy function is enabled on this machine. For details on how to enable the Password Copy function, refer to Here.
- The Password Copy function does not support color paper, envelopes and transparencies.
Password Copy [Box]
Password Encrypted PDF[Box]
To display:
- [Box]
- [System]
- [Password Encrypted PDF]
- [System]
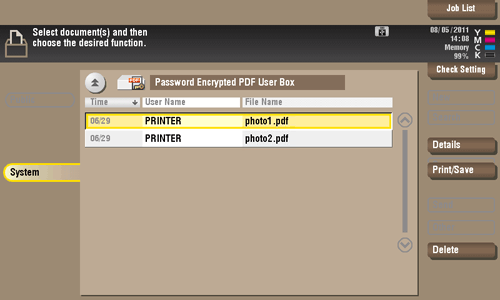
When a password protected PDF file is printed out or stored in the User Box by using the Direct Print function or from a USB memory or a Bluetooth device, the file is stored in the Password Encrypted PDF User Box. Once you have opened the User Box, you can select a PDF file stored in the User Box to preview and print it out. Also, you can store the file in or delete it from the User Box.
When printing or saving a PDF file, you will need to enter a password that was set for the file.
Password Encrypted PDF
To display:
- [Box]
- [System]
- [Password Encrypted PDF]
- [System]
When a password protected PDF file is printed out or stored in the User Box by using the Direct Print function or from a USB memory or a Bluetooth device, the file is stored in the Password Encrypted PDF User Box. Once you have opened the User Box, you can select a PDF file stored in the User Box to preview and print it out. Also, you can store the file in or delete it from the User Box.
When printing or saving a PDF file, you will need to enter a password that was set for the file.

| Settings | Description |
|---|---|
[Details] | You can check the file registration information. |
[Print/Save] | You can enter the password for the PDF file, and print the file or save it in a User Box. |
[Delete] | Deletes a file. |
Password TX[Scan/Fax]
To display:
- [Scan/Fax]
- [Application]
- [Fax Setting]
- [Password TX]
- [Fax Setting]
- [Application]
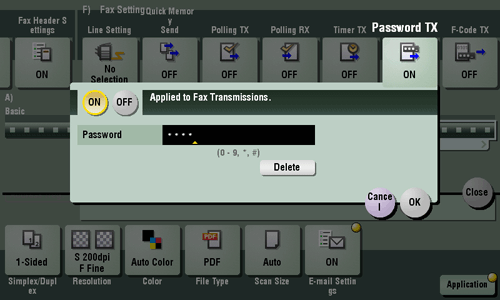
A fax is sent with a password to a device for which fax destinations are restricted by passwords (Closed Network RX enabled).
Password TX
To display:
- [Scan/Fax]
- [Application]
- [Fax Setting]
- [Password TX]
- [Fax Setting]
- [Application]
A fax is sent with a password to a device for which fax destinations are restricted by passwords (Closed Network RX enabled).

| Settings | Description |
|---|---|
[ON]/[OFF] | Select [ON] to specify Password TX. |
[Password] | Enter the password for Closed Network RX programmed for the destination using the Keypad. |
Password TX (Public/Personal/Group) (Send)[Box]
To display:
- [Box]
- Select a User Box
- [Open]
- Select the file
- [Send]
- [Application]
- [Fax Setting]
- [Password TX]
- [Fax Setting]
- [Application]
- [Send]
- Select the file
- [Open]
- Select a User Box
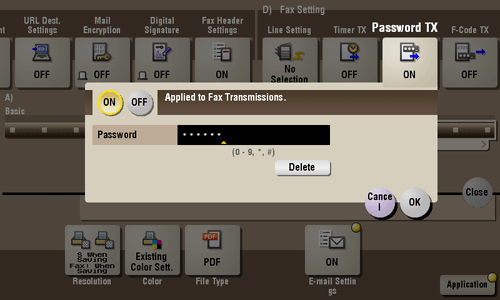
A fax is sent with a password to a device for which fax destinations are restricted by passwords (Closed Network RX enabled).
Password TX (Public/Personal/Group) (Send)
To display:
- [Box]
- Select a User Box
- [Open]
- Select the file
- [Send]
- [Application]
- [Fax Setting]
- [Password TX]
- [Fax Setting]
- [Application]
- [Send]
- Select the file
- [Open]
- Select a User Box
A fax is sent with a password to a device for which fax destinations are restricted by passwords (Closed Network RX enabled).

| Settings | Description |
|---|---|
[ON]/[OFF] | Select [ON] to specify Password TX. |
[Password] | Enter the password for Closed area RX programmed for the destination using the Keypad. |
PC (SMB)[Scan/Fax]
To display:
- [Scan/Fax]
- [Direct Input]
- [PC (SMB)]
- [Direct Input]
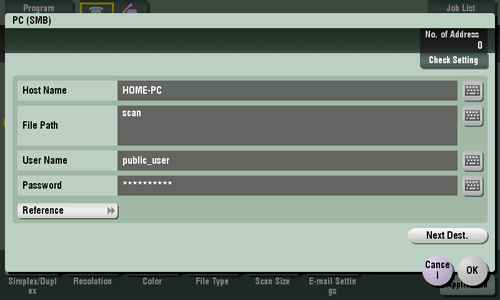
Enter a destination computer name (host name) or IP address when scanned original data is sent to a share folder of a computer on the network.
When specifying multiple destinations, tap [Next Dest.] to add destinations.
PC (SMB)
To display:
- [Scan/Fax]
- [Direct Input]
- [PC (SMB)]
- [Direct Input]
Enter a destination computer name (host name) or IP address when scanned original data is sent to a share folder of a computer on the network.
When specifying multiple destinations, tap [Next Dest.] to add destinations.

| Settings | Description |
|---|---|
[Host Name] | Enter a computer name (host name) or IP address as a destination with up to 253 bytes.
|
[File Path] | Enter the shared folder name of the computer specified in [Host Name] with up to 255 bytes. The shared folder name is generally referred to as a shared name.
When specifying a folder in the shared folder, insert a symbol, "\", between the folder names.
|
[User Name] | Using up to 64 characters, enter the name of a user, who has privileges to access the folder specified in [File Path].
|
[Password] | Enter the password of the user specified in [User Name]. |
[Reference] | On the Touch Panel, search for a computer to send a file to, and select a target shared folder. When the authentication screen appears, enter the name and password of a user who has privileges to access the selected folder. After authentication, [Host Name] or [File Path] is entered automatically. The Reference function may fail under the following conditions.
|
PC [Box]
PDF Detail Setting[Scan/Fax]
To display:
- [Scan/Fax]
- [File Type]
- [PDF Detail Setting]
- [File Type]
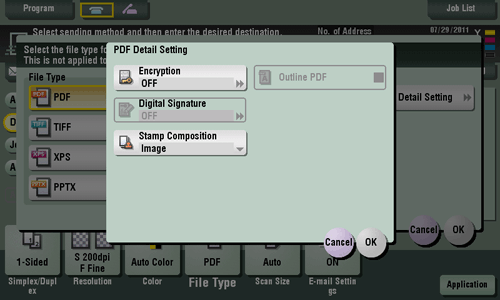
If [PDF] or [Compact PDF] is selected for file format, you can configure the PDF option settings.
PDF Detail Setting
To display:
- [Scan/Fax]
- [File Type]
- [PDF Detail Setting]
- [File Type]
If [PDF] or [Compact PDF] is selected for file format, you can configure the PDF option settings.

| Settings | Description |
|---|---|
[Encryption] | Select [ON] to encrypt a file. Enter the password to restrict access to the file. To specify permissions for printing and editing PDFs more in detail, enter an authorization password, then specify [Encryption Level], [Printing Allowed], [Copy Contents], and [Changes Allowed]. For details, refer to Here. |
[Digital Signature] | Select [ON] to add a digital signature (certificate) of this machine to a PDF file, and select [SHA1] or [SHA256] as the encryption level of the signature. You can certify the author of a PDF, and prevent forgery or unauthorized modification. This function is enabled when a certification is registered on this machine. |
[Stamp Composition] | Specify this option to print date/time, page number, and header/footer on a PDF. Select [Text] if you want to compose the text to be printed on a PDF as text. If you select [Image], the text will be composed as an image. |
[Outline PDF] | Specify this option to save a file in compact PDF format. If you select the check box of [Outline PDF], the text portion of the original is extracted and converted to a vector image. |
PDF Detail Setting [Box]
Personal[Box]
To display:
- [Box]
- [Personal]
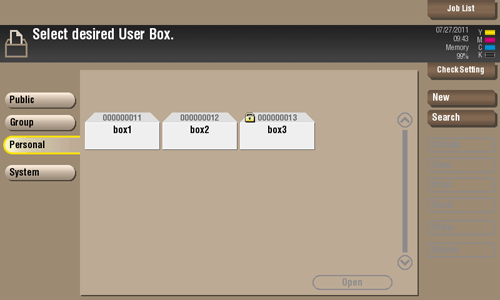
The Personal User Box is displayed.
To access a file in this User Box, select the desired User Box, then tap [Open].
Personal
To display:
- [Box]
- [Personal]
The Personal User Box is displayed.
To access a file in this User Box, select the desired User Box, then tap [Open].
Tips
- You can also open the desired User Box by tapping it twice.

Polling RX[Scan/Fax]
To display:
- [Scan/Fax]
- [Application]
- [Fax Setting]
- [Polling RX]
- [Fax Setting]
- [Application]
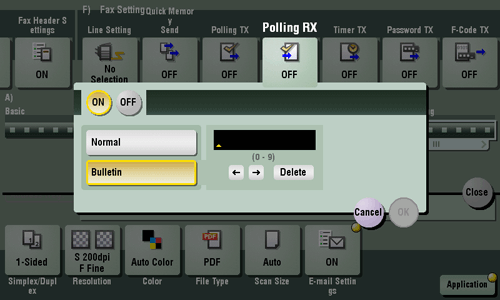
Retrieve a file stored in the destination machine upon a request sent from this machine (polling request).
Polling RX
To display:
- [Scan/Fax]
- [Application]
- [Fax Setting]
- [Polling RX]
- [Fax Setting]
- [Application]
Retrieve a file stored in the destination machine upon a request sent from this machine (polling request).

| Settings | Description |
|---|---|
[ON]/[OFF] | Select [ON] to specify Polling RX. |
[Normal] | Select this option to receive a file stored for polling. |
[Bulletin] | Select this option to receive a file stored in a Bulletin User Box. Enter the user box number of the Bulletin Board User Box in the destination machine in which your desired file is stored using the Keypad. |
Polling TX[Scan/Fax]
To display:
- [Scan/Fax]
- [Application]
- [Fax Setting]
- [Polling TX]
- [Fax Setting]
- [Application]
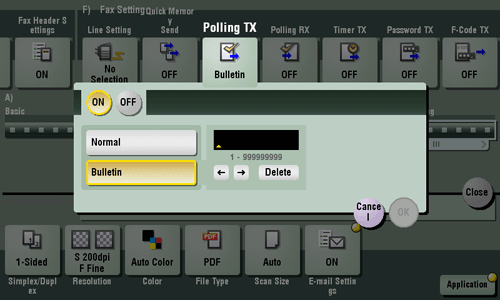
Use the Polling TX function to register files for polling with a Polling TX User Box of this machine.
Polling TX
To display:
- [Scan/Fax]
- [Application]
- [Fax Setting]
- [Polling TX]
- [Fax Setting]
- [Application]
Use the Polling TX function to register files for polling with a Polling TX User Box of this machine.

| Settings | Description |
|---|---|
[ON]/[OFF] | Select [ON] to specify Polling TX. |
[Normal] | Select this option to register a file for polling in the Polling TX User Box. The Polling TX User Box can have only one file. |
[Bulletin] | Select this option to register a file for polling in the Bulletin Board User Box. Enter the registration number of the Bulletin Board User Box you want to create using the Keypad. The Bulletin Board User Box can have only one file. You can create up to 10 Bulletin Board User Boxes. They can be used depending on the intended use. |
Reference
- To use a Bulletin User Box, it must be created in advance. For details on the registration procedure, refer to Here.
Polling TX[Box]
To display:
- [Box]
- [System]
- [Polling TX]
- [System]
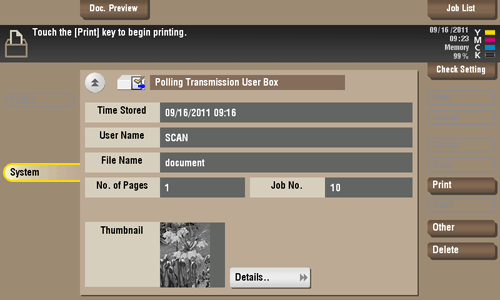
The fax documents required for polling are stored in the Polling Transmission User Box. Once you have opened the User Box, you can select a fax document stored in the User Box and preview, print out, or delete it.
If the fax documents are stored in the Polling TX User Box, recipients can be polled and receive fax documents from this box when necessary.
Polling TX
To display:
- [Box]
- [System]
- [Polling TX]
- [System]
The fax documents required for polling are stored in the Polling Transmission User Box. Once you have opened the User Box, you can select a fax document stored in the User Box and preview, print out, or delete it.
If the fax documents are stored in the Polling TX User Box, recipients can be polled and receive fax documents from this box when necessary.

| Settings | Description |
|---|---|
[Details..] | Previews the file.
|
[Print] | Prints the selected file. |
[Other] | Stores file as an overlay image. |
[Delete] | Deletes a file. |
Poster Mode[Copy]
To display:
- [Copy]
- [Application]
- [Layout]
- [Poster Mode]
- [Layout]
- [Application]
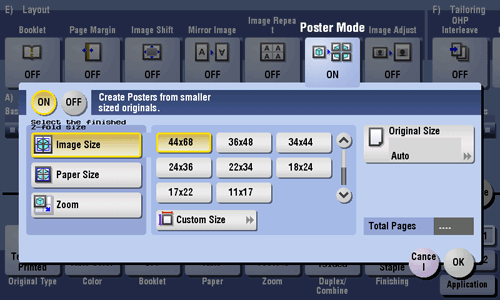
The original image is enlarged, divided, and printed on multiple sheets. When you join the printed sheets, you will create a large poster.
Poster Mode
To display:
- [Copy]
- [Application]
- [Layout]
- [Poster Mode]
- [Layout]
- [Application]
The original image is enlarged, divided, and printed on multiple sheets. When you join the printed sheets, you will create a large poster.

| Settings | Description |
|---|---|
[ON]/[OFF] | Select [ON] to specify Poster Mode. |
[Select the finished Z-fold Size] | Specify the finished size by using any of [Image Size], [Paper Size] and [Zoom].
|
[Original Size] | If the size of the original is not detected correctly, select a key indicating the size of the original to be scanned. If the machine cannot detect the size of irregular sized originals or photos, manually specify the size. |
[Total Pages] | When you have selected other than [Auto] in [Original Size], the number of sheets to be output is displayed. |
Print [Box]
Program Jobs[Copy]
To display:
- [Copy]
- [Application]
- [Others]
- [Program Jobs]
- [Others]
- [Application]
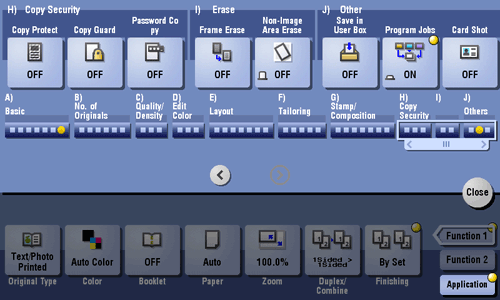
Originals are scanned with different settings for each set, and copied collectively. Use this function when various types of originals are mixed, such as 1-sided original to be printed on one side of paper, and 2-sided original to be copied by enlarging.
Program Jobs
To display:
- [Copy]
- [Application]
- [Others]
- [Program Jobs]
- [Others]
- [Application]
Originals are scanned with different settings for each set, and copied collectively. Use this function when various types of originals are mixed, such as 1-sided original to be printed on one side of paper, and 2-sided original to be copied by enlarging.

Reference
- For details about the operation procedure of [Program Jobs], refer to Here.
Proof Print[Box]
To display:
- [Box]
- [System]
- [File Re-TX]
- Select the file
- [Proof Print]
- Select the file
- [File Re-TX]
- [System]
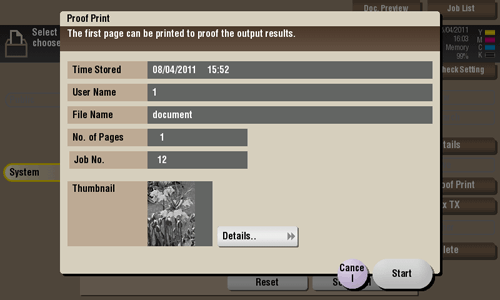
You can print only the first page of selected file for its preview.
Proof Print
To display:
- [Box]
- [System]
- [File Re-TX]
- Select the file
- [Proof Print]
- Select the file
- [File Re-TX]
- [System]
You can print only the first page of selected file for its preview.

| Settings | Description |
|---|---|
[Details..] | You can rotate a page or delete a page by checking the file preview. |
Public[Box]
To display:
- [Box]
- [Public]
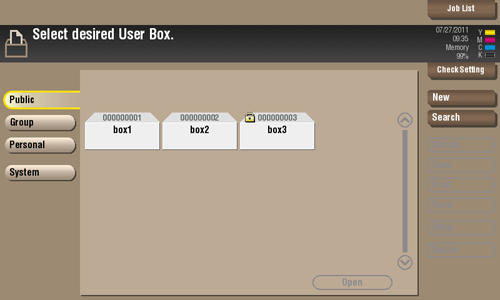
The Public User Box is displayed.
To access a file in a User Box, select the desired User Box, then tap [Open].
Public
To display:
- [Box]
- [Public]
The Public User Box is displayed.
To access a file in a User Box, select the desired User Box, then tap [Open].
Tips
- You can also open the desired User Box by tapping it twice.
