
Description of Setup Buttons
Fax[Scan/Fax]
To display:
- [Scan/Fax]
- [Direct Input]
- [Fax]
- [Direct Input]
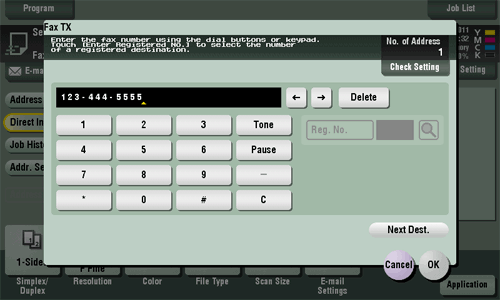
Enter a destination fax number when scanned original data is sent by fax. When specifying multiple destinations, tap [Next Dest.] to add destinations.
Tapping [Reg. No.] allows you to specify a fax destination by a registered number.
Fax
To display:
- [Scan/Fax]
- [Direct Input]
- [Fax]
- [Direct Input]
Enter a destination fax number when scanned original data is sent by fax. When specifying multiple destinations, tap [Next Dest.] to add destinations.
Tapping [Reg. No.] allows you to specify a fax destination by a registered number.
Fax Header Settings[Scan/Fax]
To display:
- [Scan/Fax]
- [Application]
- [App]
- [Fax Header Settings]
- [App]
- [Application]
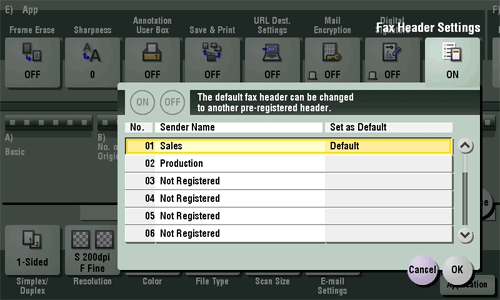
Normally, the default sender name is added. However, you can use different sender names depending as necessary.
If you want to use a sender name that is different from the default name, select a new sender name you want to use, then tap [OK].
Fax Header Settings
To display:
- [Scan/Fax]
- [Application]
- [App]
- [Fax Header Settings]
- [App]
- [Application]
Normally, the default sender name is added. However, you can use different sender names depending as necessary.
If you want to use a sender name that is different from the default name, select a new sender name you want to use, then tap [OK].
Fax Header Settings [Box]
Fax TX[Box]
To display:
- [Box]
- [System]
- [File Re-TX]
- Select the file
- [Fax TX]
- Select the file
- [File Re-TX]
- [System]
Set the destination and other settings to retransmit the selected file.
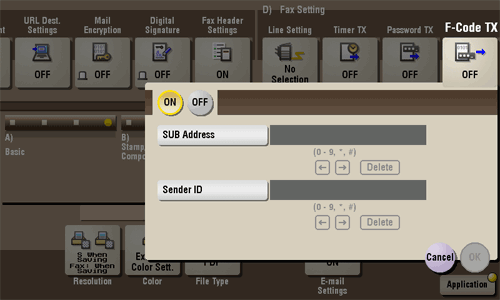
F-Code TX[Scan/Fax]
To display:
- [Scan/Fax]
- [Application]
- [Fax Setting]
- [F-Code TX]
- [Fax Setting]
- [Application]
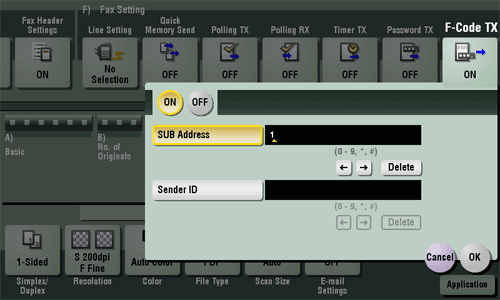
To use Confidential TX or Relay Distribution, enter an F code (SUB address and sender ID) and send it.
F code is a communication procedure that is standardized by CIAJ (Communications and Information Network Association of Japan). Confidential TX and Relay Distribution are available if a remote machine supports F-code communications.
F-Code TX
To display:
- [Scan/Fax]
- [Application]
- [Fax Setting]
- [F-Code TX]
- [Fax Setting]
- [Application]
To use Confidential TX or Relay Distribution, enter an F code (SUB address and sender ID) and send it.
F code is a communication procedure that is standardized by CIAJ (Communications and Information Network Association of Japan). Confidential TX and Relay Distribution are available if a remote machine supports F-code communications.
| Settings | Description |
|---|---|
[ON]/[OFF] | Select [ON] to specify F-Code TX. |
[SUB Address] | Enter a SUB address.
|
[Sender ID] | Enter a sender ID.
|
F-Code TX (Public/Personal/Group) (Send)[Box]
To display:
- [Box]
- Select a User Box
- [Open]
- Select the file
- [Send]
- [Application]
- [Fax Setting]
- [F-Code TX]
- [Fax Setting]
- [Application]
- [Send]
- Select the file
- [Open]
- Select a User Box
To use Confidential TX or Relay Distribution, enter an F code (SUB address and sender ID) and send it.
F code is a communication procedure that is standardized by CIAJ (Communications and Information Network Association of Japan). Confidential TX and Relay Distribution are available if a remote machine supports F-code communications.
F-Code TX (Public/Personal/Group) (Send)
To display:
- [Box]
- Select a User Box
- [Open]
- Select the file
- [Send]
- [Application]
- [Fax Setting]
- [F-Code TX]
- [Fax Setting]
- [Application]
- [Send]
- Select the file
- [Open]
- Select a User Box
To use Confidential TX or Relay Distribution, enter an F code (SUB address and sender ID) and send it.
F code is a communication procedure that is standardized by CIAJ (Communications and Information Network Association of Japan). Confidential TX and Relay Distribution are available if a remote machine supports F-code communications.
| Settings | Description |
|---|---|
[ON]/[OFF] | Select [ON] to specify F-Code TX. |
[SUB Address] | Enter an SUB address.
|
[Sender ID] | Enter a sender ID.
|
File Name [Box]
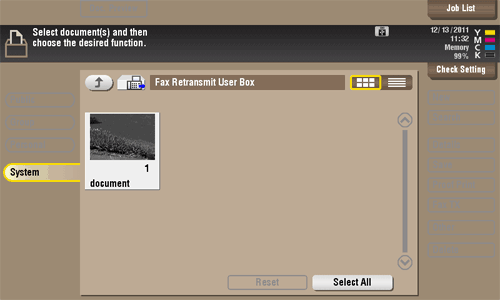
File Re-TX[Box]
To display:
- [Box]
- [System]
- [File Re-TX]
- [System]
When the recipient is busy and if communication cannot be established, undeliverable fax documents are stored in the Fax Retransmit User Box. Once you have opened the User Box, you can select a fax document stored in the User Box and preview, print out, send, or delete it.
Fax transmission is attempted for the number of times set by Auto Redialing function. If those attempts have failed, the fax document is stored in the Fax Retransmit User Box.
File Type[Scan/Fax]
To display:
- [Scan/Fax]
- [File Type]
Select the file type used for saving the scanned original data.
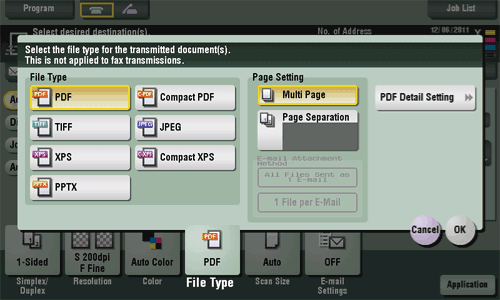
File Type
To display:
- [Scan/Fax]
- [File Type]
Select the file type used for saving the scanned original data.
| Settings | Description |
|---|---|
[File Type] | Select the file type to be saved from the following:
|
[Page Setting] | Select a unit of pages to be saved in a file if the original contains multiple pages.
|
[E-mail Attachment Method] | You can select the E-mail attachment method when [Scan Setting] is set to [Page Separation].
|
[PDF Detail Setting] | If [PDF] or [Compact PDF] is selected for file format, you can configure the PDF option settings. You can enhance security by attaching a digital signature that identifies the author of the file, by file encryption, etc. For details, refer to Here. |
File Type [Box]
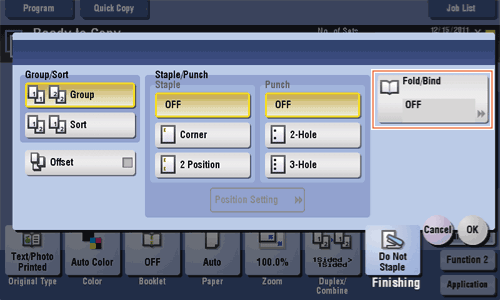
Finishing[Copy]
To display:
- [Copy]
- [Finishing]
Specify how to feed out copied sheets of paper.
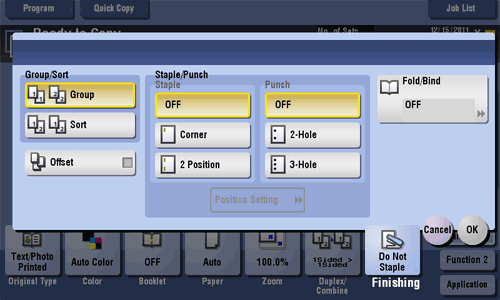
Finishing
To display:
- [Copy]
- [Finishing]
Specify how to feed out copied sheets of paper.
| Settings | Description |
|---|---|
[Group/Sort] | Select the output method when printing multiple sets of copies. For details, refer to Here. |
[Offset] | Select this item when sorting by the number of copies or by page to feed out paper. For details, refer to Here. |
[Staple] | Select the binding positions for sheet stapling. For details, refer to Here. |
[Punch] | Select binding positions when punching sheets. For details, refer to Here. |
[Fold/Bind] | Select how to fold or bind paper. For details, refer to Here. |
Finishing [Box]
Fold/Bind[Copy]
To display:
- [Copy]
- [Finishing]
- [Fold/Bind]
- [Finishing]
Select how to fold or bind paper.
Fold/Bind
To display:
- [Copy]
- [Finishing]
- [Fold/Bind]
- [Finishing]
Select how to fold or bind paper.
| Settings | Description |
|---|---|
[Half-Fold] | Feeds out a copied sheet by folding it in two. For details, refer to Here. |
[Center Staple & Fold] | Staples and feeds out a printed sheet by folding it in two. For details, refer to Here. |
[Tri-Fold] | Feeds out a copied sheet by folding it in three. For details, refer to Here. |
[Z-Fold] | Z-folds the long side of a copied sheet before feeding it out. For details, refer to Here. |
Tips
- To use the Half-Fold/Bind function:
- The Finisher FS-534 and Saddle Stitcher SD-511 are required.
- The Finisher FS-535 and Saddle Stitcher SD-512 are required (bizhub C554 only).
- To use the Tri-Fold function:
- The Finisher FS-534 and Saddle Stitcher SD-511 are required.
- The Finisher FS-535 and Saddle Stitcher SD-512 are required (bizhub C554 only).
- To use the Z-Fold function:
- The Finisher FS-535 and Z Folding Unit ZU-606 are required (bizhub C554 only).
Fold/Bind [Box]
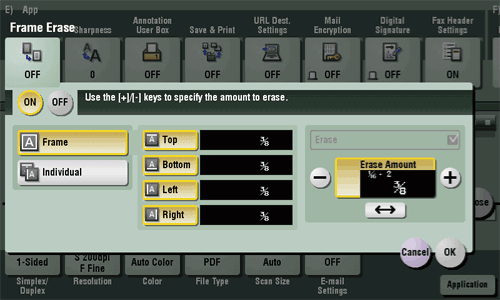
Frame Erase[Scan/Fax]
To display:
- [Scan/Fax]
- [Application]
- [App]
- [Frame Erase]
- [App]
- [Application]
Erases the four sides of the original to the same width. You can also erase the four sides of the original to different widths.
Frame Erase
To display:
- [Scan/Fax]
- [Application]
- [App]
- [Frame Erase]
- [App]
- [Application]
Erases the four sides of the original to the same width. You can also erase the four sides of the original to different widths.
| Settings | Description |
|---|---|
[ON]/[OFF] | Select [ON] to specify Frame Erase. |
[Frame] | Select this option to erase the four sides of the original to the same width. In [Erase Amount], tap [+]/[-] for the inch area, or tap [+]/[-] or press the Keypad for the centimeter area to specify the width of the area to be erased. |
[Individual] | Select this option to erase the four sides of the original to different widths. Select a side ([Top], [Bottom], [Left] or [Right]) and specify the width of the area in [Erase Amount] by tapping [+]/[-] for an inch area and by tapping [+]/[-] or pressing the Keypad for a centimeter area. Likewise, specify the width for all the other sides one by one. If you do not want to erase the side, cancel the setting for [Erase]. |
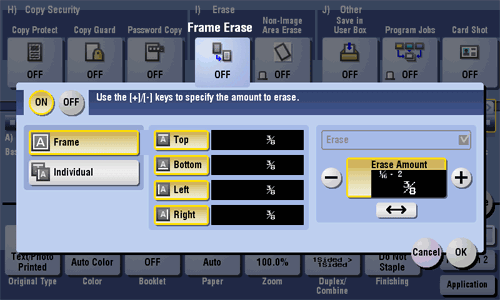
Frame Erase[Copy]
To display:
- [Copy]
- [Application]
- [Erase]
- [Frame Erase]
- [Erase]
- [Application]
Erases the four sides of the original by the same width amount. You can also erase the four sides of the original to different widths.
Frame Erase
To display:
- [Copy]
- [Application]
- [Erase]
- [Frame Erase]
- [Erase]
- [Application]
Erases the four sides of the original by the same width amount. You can also erase the four sides of the original to different widths.
| Settings | Description |
|---|---|
[ON]/[OFF] | Select [ON] to specify Frame Erase. |
[Frame] | Select this option to erase the four sides of the original to the same width. In [Erase Amount], tap [+]/[-] for the inch area, or tap [+]/[-] or press the Keypad for the centimeter area to specify the width of the area to be erased. |
[Individual] | Select this option to erase the four sides of the original to different widths. Select a side ([Top], [Bottom], [Left], or [Right]) and specify the width of the area by tapping [+]/[-] for the inch area, or by tapping [+]/[-] or pressing the Keypad in [Erase Amount] for the centimeter area. Likewise, specify the width for all the other sides one by one. If you do not want to erase the side, cancel the setting for [Erase]. |
Frame Erase [Box]
FTP[Scan/Fax]
To display:
- [Scan/Fax]
- [Direct Input]
- [FTP]
- [Direct Input]
Enter a destination FTP server host name or IP address when scanned original data is sent to a FTP server.
When specifying multiple destinations, tap [Next Dest.] to add destinations.

FTP
To display:
- [Scan/Fax]
- [Direct Input]
- [FTP]
- [Direct Input]
Enter a destination FTP server host name or IP address when scanned original data is sent to a FTP server.
When specifying multiple destinations, tap [Next Dest.] to add destinations.
| Settings | Description |
|---|---|
[Host Name] | Enter the host name or IP address of the destination FTP server with up to 63 bytes.
|
[File Path] | Enter the name of a destination folder in the FTP server specified in [Host Name] with up to 127 bytes.
When not specifying a file path, enter "/". |
[User Name] | If authentication is required in the destination FTP server, enter the login-enabled user name (using up to 64 characters).
|
[Anonymous] | When authentication is not required for the destination FTP server, select this item. |
[Password] | Enter the password of the user specified in [User Name]. |
[Port Number] | If necessary, change the port number. In normal circumstances, you can use the original port number. |
[Proxy] | When a proxy server is used in your environment, select this item. |
[PASV] | When a PASV server is used in your environment, select this item. |