
Description of Setup Buttons (Administrator Settings)
Half-Fold Position[Utility]
To display:
- [Utility]
- [Administrator Settings]
- [System Settings]
- [Expert Adjustment]
- [Finisher Adjustment]
- [Half-Fold Position]
- [Finisher Adjustment]
- [Expert Adjustment]
- [System Settings]
- [Administrator Settings]
If the half-fold position is not on the exact center of the paper, use this option to align the fold on the center.
Copy after configuration, then repeat adjustments as required.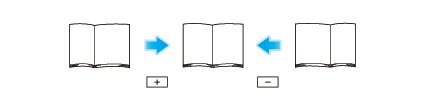
| Settings | Description |
|---|---|
[Paper Size] | Select the size of paper that is used to adjust the fold position. |
[Adjust Value] | Enter an adjustment value between -10.0 mm and 10.0 mm by tapping [-] and [+].
[0.0 mm] is specified by default. |
Tips
- This item is available when the Finisher FS-534 and Saddle Stitcher SD-511 are installed.
- This item is available when the Finisher FS-535 and Saddle Stitcher SD-512 are installed (bizhub C554 only).
- Adjust the half-fold position before adjusting the center staple position.
- Make adjustment while checking paper folded at a displaced position.
- The value you set by selecting [All] in [Paper Size] will be added to the setting for each paper size.
- For adjustments to put the fold position parallel with the left edge of paper, contact your service representative for instructions.
HDD Encryption Setting[Utility]
To display:
- [Utility]
- [Administrator Settings]
- [Security Settings]
- [HDD Settings]
- [HDD Encryption Setting]
- [HDD Settings]
- [Security Settings]
- [Administrator Settings]
Encrypts all data saved on the hard disk for protection purposes.
To lock the hard disk with a password, enter a password to lock it (in 20 characters, case sensitive).
Be sure to keep the encryption passphrase you have entered carefully so that you do not forget them.
HDD Lock Password[Utility]
To display:
- [Utility]
- [Administrator Settings]
- [Security Settings]
- [HDD Settings]
- [HDD Lock Password]
- [HDD Settings]
- [Security Settings]
- [Administrator Settings]
Protects saved data by locking the hard disk using a password.
To encrypt the data on the hard disk, enter an encryption passphrase (in 20 characters, case sensitive).
Be sure to keep the password you have entered carefully so that you do not forget them. Should the password be lost, it takes a major recovery work to restore it.
If a password is already set, you can change or cancel it.
HDD Settings[Utility]
To display:
- [Utility]
- [Administrator Settings]
- [Security Settings]
- [HDD Settings]
- [Security Settings]
- [Administrator Settings]
Manages the hard disk of this machine. Prevents leakage of personal and corporate information by protecting data in the hard disk against erasure and protecting the hard disk with password and encryption.
| Settings | Description |
|---|---|
[Check HDD Capacity] | Enables you to check the used space, total space and available space on the hard disk. |
[Overwrite HDD Data] | This machine temporarily stores image data on the hard disk or in the memory during scanning and printing. When the stored data are no longer needed, you can delete them by overwriting with certain data. For details, refer to Here. |
[Overwrite All Data] | When disposing of this machine or returning it to a leasing business, use this function to delete all data saved on the hard disk by overwriting. This function also resets all passwords to the factory settings. Prior to performing this operation, contact your service representative. For details, refer to Here. |
[HDD Lock Password] | Protects saved data by locking the hard disk using a password. Be sure to keep the password you have entered carefully so that you do not forget them. Should the password be lost, it takes a major recovery work to restore it. For details, refer to Here. |
[Format HDD] | Formats the hard disk. Retrieve any data needed from the hard disk beforehand. For details, refer to Here. |
[HDD Encryption Setting] | Encrypts all data saved on the hard disk for protection purposes. Be sure to keep the encryption passphrase you have entered carefully so that you do not forget them. For details, refer to Here. |
Header Information[Utility]
To display:
- [Utility]
- [Administrator Settings]
- [Fax Settings]
- [Header Information]
- [Fax Settings]
- [Administrator Settings]
Register the machine name, your company name (sender name), and the fax number that are to be printed as sender information when faxes are transmitted.
| Settings | Description |
|---|---|
[Sender] | Register machine name, company name (sender name), and others that is to be printed as Header Position. Up to 20 sender names can be registered.You can use different names for different purposes. For details on settings, refer to Here. |
[Sender Fax No.] | Enter the fax number of this machine (a number containing up to 20 digits, with available symbols being #, *, + and space). For details on settings, refer to Here. |
Header Position[Utility]
To display:
- [Utility]
- [Administrator Settings]
- [Fax Settings]
- [Header/Footer Position]
- [Header Position]
- [Header/Footer Position]
- [Fax Settings]
- [Administrator Settings]
Specify the position at which a Header Position is printed on a fax.
| Settings | Description |
|---|---|
[Inside Body Text] | Prints the sender information inside the original image. Part of the original image may be cut off. |
[Outside Body Text] | Prints the sender information outside the original image. [Outside Body Text] is selected by default. |
[OFF] | Prints nothing for sender information. |
Header/Footer Position[Utility]
To display:
- [Utility]
- [Administrator Settings]
- [Fax Settings]
- [Header/Footer Position]
- [Fax Settings]
- [Administrator Settings]
Specify the format of Header Position to be printed on a fax. Select whether to print reception information (date, time, and reception number) on faxes received on this machine.
| Settings | Description |
|---|---|
[Header Position] | Specify the position at which a Header Position is printed on a fax. For details on settings, refer to Here. |
[TTI Print Position and Character Size] | Select the size of characters used for printing sender information. For details on settings, refer to Here. |
[Print Receiver's Name] | Select whether to print a destination fax number as Header Position. For details on settings, refer to Here. |
[Footer Position] | Select whether to print reception information (date, time, and reception number) on faxes received on this machine. For details on settings, refer to Here. |
Tips
- In the North American and Hong Kong models, [Print Receiver's Name] is hidden.
Header/Footer Settings[Utility]
To display:
- [Utility]
- [Administrator Settings]
- [System Settings]
- [Stamp Settings]
- [Header/Footer Settings]
- [New]
- [Header/Footer Settings]
- [Stamp Settings]
- [System Settings]
- [Administrator Settings]
You can register header/footer programs, and change or delete registered programs.
| Settings | Description |
|---|---|
[Name] | Enter the name of header/footer program (using up to 16 characters). When selecting a header or footer, give it a name that helps you easily identify it. |
[Header Settings] | Select whether to print a header. To print it, specify what to print.
[Do Not Print] is specified by default. |
[Footer Settings] | Select whether to print a footer. To print it, specify what to print.
[Do Not Print] is specified by default. |
[Pages] | Select to print the header/footer on all pages or only on the first page. [All Pages] is selected by default. |
[Text Details] | Select the size, font, and color of the text to be printed. |
Tips
- To check or edit a header/footer program you registered, select it, then tap [Check/Edit].
- To delete a header/footer program you registered, select it, then tap [Delete].
Hide Personal Information (MIB)[Utility]
To display:
- [Utility]
- [Administrator Settings]
- [Security Settings]
- [Security Details]
- [Hide Personal Information (MIB)]
- [Security Details]
- [Security Settings]
- [Administrator Settings]
Specify whether or not to display the file name, destination, and User Box name and number of the MIB information.
[ON] (hide) is specified by default.
High Resolution[Utility]
To display:
- [Utility]
- [Administrator Settings]
- [Fax Settings]
- [Fax Print Quality Settings]
- [High Resolution]
- [Fax Print Quality Settings]
- [Fax Settings]
- [Administrator Settings]
Select whether to give priority to image or speed when printing a high res-olution received fax.
If [Prioritize Quality] is selected, an image is corrected. Note that, for a high resolution fax, image correction is less effective relative to a low resolution fax.
[Prioritize Speed] is selected by default.
Horizontal Punch (Z-Fold) Position Adjustment[Utility]
To display:
- [Utility]
- [Administrator Settings]
- [System Settings]
- [Expert Adjustment]
- [Finisher Adjustment]
- [Horizontal Punch (Z-Fold) Position Adjustment]
- [Finisher Adjustment]
- [Expert Adjustment]
- [System Settings]
- [Administrator Settings]
If the positions of the punch holes on the paper are displaced sideways, use this option to adjust the punch hole positions.
Copy after configuration, then repeat adjustments as required.
| Settings | Description |
|---|---|
[-]/[+] | Enter an adjustment value between -5.0 and 5.0 mm by tapping [-] and [+].
[0.0 mm] is specified by default. |
Tips
- This adjustment is possible when the Finisher FS-535 and Z Folding Unit ZU-606 are installed in bizhub C554.
- Make adjustments while checking paper punched at a displaced position.
HTTP Server Settings[Utility]
To display:
- [Utility]
- [Administrator Settings]
- [Network Settings]
- [HTTP Server Settings]
- [Network Settings]
- [Administrator Settings]
Select whether to restrict the use of Web Connection, and configure your environment for IPP printing.
| Settings | Description |
|---|---|
[ON]/[OFF] | Select whether to use this machine as an HTTP server. [ON] is specified by default. |
[PSWC Settings] | Select whether to use Web Connection. [ON] is specified by default. |
[IPP Settings] | Select whether to use IPP. [ON] is specified by default. |
[Accept IPP Jobs] | Select whether to use IPP printing. [ON] is specified by default. |
[Support Information] | Select whether to allow the following IPP operations.
[ON] (Allow) is specified by default. |
[Printer Information] | If necessary, enter the printer information of this machine.
|
[IPP Authentication Settings] | Select whether to use the IPP authentication. [ON] is specified by default. |
[General Settings] | Select the IPP authentication method. [requesting-user-name] is specified by default. |
[User Name] | Enter a user name (using up to 20 characters). This entry is required if you have selected [basic] or [digest] for [General Settings]. |
[Password] | Enter the password of the user specified in [User Name]. This entry is required if you have selected [basic] or [digest] for [General Settings]. |
[realm] | If [digest] is selected for [General Settings], enter the domain (realm) (using up to 127 characters). |