
Description of Setup Buttons
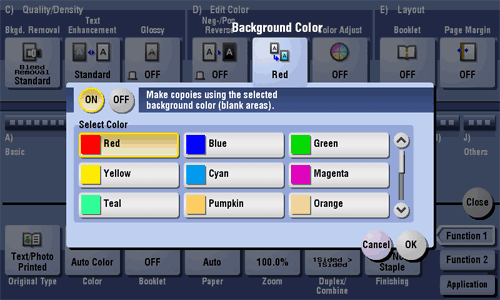
Background Color[Copy]
To display:
- [Copy]
- [Application]
- [Edit Color]
- [Background Color]
- [Edit Color]
- [Application]
Color the blank area of the original with a specified background color.
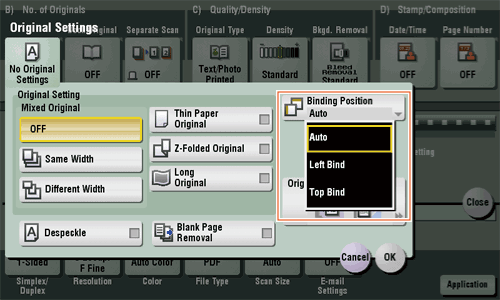
Binding Position[Scan/Fax]
To display:
- [Scan/Fax]
- [Application]
- [No. of Originals]
- [Original Settings]
- [Binding Position]
- [Original Settings]
- [No. of Originals]
- [Application]
When scanning a 2-sided original, select the original binding position to prevent the binding positions being reversed between the front and rear faces.
Binding Position
To display:
- [Scan/Fax]
- [Application]
- [No. of Originals]
- [Original Settings]
- [Binding Position]
- [Original Settings]
- [No. of Originals]
- [Application]
When scanning a 2-sided original, select the original binding position to prevent the binding positions being reversed between the front and rear faces.
| Settings | Description |
|---|---|
[Auto] | The binding position is automatically set. A page margin position along the long side of the paper is selected if the original length is 11-11/16 inches (297 mm) or less. A page margin along the short side of the paper is selected if the original length exceeds 11-11/16 inches (297 mm). |
[Left Bind] | Select this option when the binding position is set to the left of the original. |
[Top Bind] | Select this option when the binding position is set to the top of the original. |
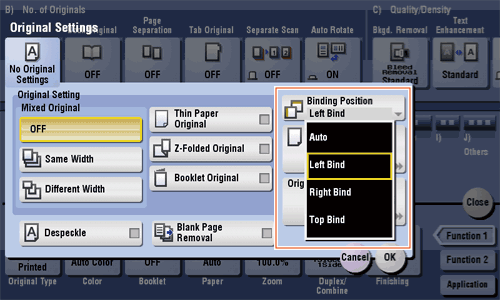
Binding Position[Copy]
To display:
- [Copy]
- [Application]
- [No. of Originals]
- [Original Settings]
- [Binding Position]
- [Original Settings]
- [No. of Originals]
- [Application]
Set the options to scan originals correctly based on their properties.
Binding Position
To display:
- [Copy]
- [Application]
- [No. of Originals]
- [Original Settings]
- [Binding Position]
- [Original Settings]
- [No. of Originals]
- [Application]
Set the options to scan originals correctly based on their properties.
| Settings | Description |
|---|---|
[Auto] | The binding position is automatically set. When the length of the long side of the original is 11-11/16 inches (297 mm) or less, the binding position is set to the long side of the paper. When the length of the long side of the original exceeds 11-11/16 inches (297 mm), the binding position is set to the short side of paper. |
[Left Bind] | Select this option when the binding position is set to the left of the original. |
[Right Bind] | Select this option when the binding position is set to the right of the original. |
[Top Bind] | Select this option when the binding position is set to the top of the original. |
Binding Position [Box]
Bkgd. Removal[Scan/Fax]
To display:
- [Scan/Fax]
- [Application]
- [Quality/Density]
- [Bkgd. Removal]
- [Quality/Density]
- [Application]
Adjust the density of the original with a colored background (newspaper, recycle paper, etc.) or the background of an original that is so thin that text or images on the back would also be scanned.
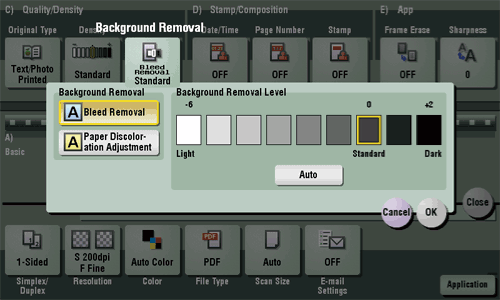
Bkgd. Removal
To display:
- [Scan/Fax]
- [Application]
- [Quality/Density]
- [Bkgd. Removal]
- [Quality/Density]
- [Application]
Adjust the density of the original with a colored background (newspaper, recycle paper, etc.) or the background of an original that is so thin that text or images on the back would also be scanned.
| Settings | Description |
|---|---|
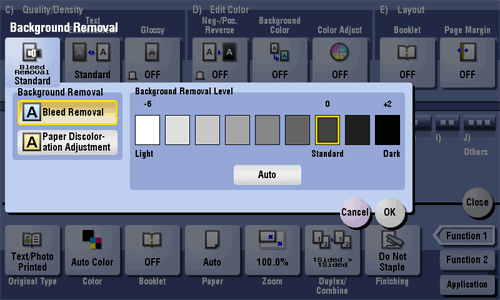
[Background Removal] | Press this button to scan a thin 2-sided original or an original with a colored background at the optimal level of image quality.
|
[Background Removal Level] | Press this button to adjust the density of the background color for an original that has a colored background. Selecting [Auto] automatically determines the density of the background color, and scans an original at the optimum background density level. |
Bkgd. Removal[Copy]
To display:
- [Copy]
- [Application]
- [Quality/Density]
- [Bkgd. Removal]
- [Quality/Density]
- [Application]
Adjust the density of the original with the colored background (newspaper, recycle paper, etc.) or the background of an original that is so thin that text or images on the back would be scanned.
Bkgd. Removal
To display:
- [Copy]
- [Application]
- [Quality/Density]
- [Bkgd. Removal]
- [Quality/Density]
- [Application]
Adjust the density of the original with the colored background (newspaper, recycle paper, etc.) or the background of an original that is so thin that text or images on the back would be scanned.
| Settings | Description |
|---|---|
[Background Removal] | Copy 2-sided originals made of thin paper and originals with colored background with optimal image quality.
|
[Background Removal Level] | Adjust the density of the background color for originals with a colored background. If [Auto] is selected, the density of the background color is determined automatically, and the original is copied at the optimal background density level. |
Bkgd. Removal [Box]
Blank Page Removal[Scan/Fax]
To display:
- [Scan/Fax]
- [Application]
- [No. of Originals]
- [Original Settings]
- [Blank Page Removal]
- [Original Settings]
- [No. of Originals]
- [Application]
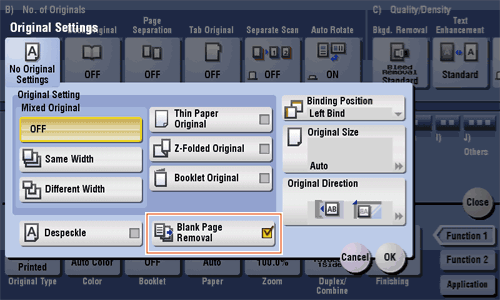
Blank pages contained in the original loaded into the ADF are skipped when the original is scanned.
Select this check box when scanning an original that contains blank pages. Any blank pages that are detected are not counted as original pages.

Blank Page Removal
To display:
- [Scan/Fax]
- [Application]
- [No. of Originals]
- [Original Settings]
- [Blank Page Removal]
- [Original Settings]
- [No. of Originals]
- [Application]
Blank pages contained in the original loaded into the ADF are skipped when the original is scanned.
Select this check box when scanning an original that contains blank pages. Any blank pages that are detected are not counted as original pages.
Blank Page Removal[Copy]
To display:
- [Copy]
- [Application]
- [No. of Originals]
- [Original Settings]
- [Blank Page Removal]
- [Original Settings]
- [No. of Originals]
- [Application]
Blank pages contained in the original loaded into the ADF are skipped when the original is scanned.
Select this check box when scanning an original which contains blank pages. Blank pages detected are not counted as original page.
Blank Page Removal
To display:
- [Copy]
- [Application]
- [No. of Originals]
- [Original Settings]
- [Blank Page Removal]
- [Original Settings]
- [No. of Originals]
- [Application]
Blank pages contained in the original loaded into the ADF are skipped when the original is scanned.
Select this check box when scanning an original which contains blank pages. Blank pages detected are not counted as original page.
Blank Page Removal [Box]
Blue[Copy]
To display:
- [Copy]
- [Application]
- [Edit Color]
- [Color Adjust]
- [Blue]
- [Color Adjust]
- [Edit Color]
- [Application]
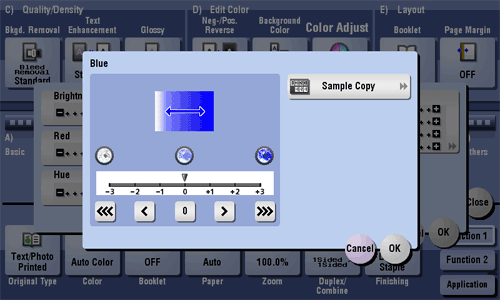
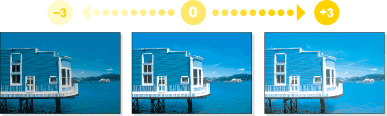
Adjust the intensity of blue.
Blue
To display:
- [Copy]
- [Application]
- [Edit Color]
- [Color Adjust]
- [Blue]
- [Color Adjust]
- [Edit Color]
- [Application]
Adjust the intensity of blue.
| Settings | Description |
|---|---|
[Sample Copy] | You can check the finishing by printing a sample copy. Place the original on the Original Glass, and tap [OK] or press Start. |
Tips
- Adjusting blue changes an image as shown in the following.
Book Original[Scan/Fax]
To display:
- [Scan/Fax]
- [Application]
- [No. of Originals]
- [Book Original]
- [No. of Originals]
- [Application]
You can scan two-page spreads such as books and catalogs separately into left and right pages, or scan then as one page.
If you place a book or catalog on the Original Glass, you do not need to close the ADF to scan it.

Book Original
To display:
- [Scan/Fax]
- [Application]
- [No. of Originals]
- [Book Original]
- [No. of Originals]
- [Application]
You can scan two-page spreads such as books and catalogs separately into left and right pages, or scan then as one page.
If you place a book or catalog on the Original Glass, you do not need to close the ADF to scan it.
| Settings | Description |
|---|---|
[ON]/[OFF] | Select [ON] to specify Book Original. |
[Output Method] | Specify the method to scan a two-page spread.
|
[Binding Position] | If [Separation], [Front Cover] or [Front & Back Covers] is selected for [Output Method], select the two-page spread binding position. Select [Left Bind] for two-page spreads of left binding, and [Right Bind] for two-page spreads of right binding. Note that if the binding position is incorrectly specified, the page order of the two-page spread is reversed between the left- and right-hand pages. |
[Frame Erase] | Erases the shadow of the surrounding that is created when the original cover cannot be closed properly due to the thickness of the original. You can erase the four sides of the original to the same width. Additionally, you can erase the four sides of the original to different widths.
|
[Center Erase] | Erases the shadow created in the center when the original cover cannot be closed correctly due to the thickness of the original. Specify the width of the area to erase by tapping [+]/[-] for the inch area, or by tapping [+]/[-] or pressing the Keypad for the centimeter area. |
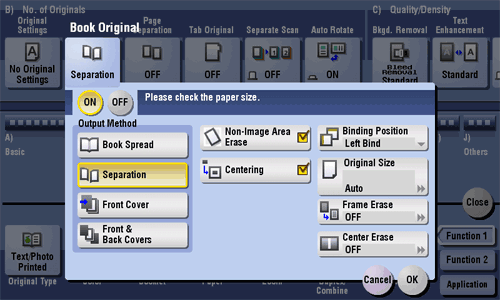
Book Original[Copy]
To display:
- [Copy]
- [Application]
- [No. of Originals]
- [Book Original]
- [No. of Originals]
- [Application]
You can copy two-page spreads such as books and catalogs separately into the left and right pages, or copy as one page.
Place a book or catalog on the Original Glass; you do not need to close the ADF to scan it.
Book Original
To display:
- [Copy]
- [Application]
- [No. of Originals]
- [Book Original]
- [No. of Originals]
- [Application]
You can copy two-page spreads such as books and catalogs separately into the left and right pages, or copy as one page.
Place a book or catalog on the Original Glass; you do not need to close the ADF to scan it.
| Settings | Description |
|---|---|
[ON]/[OFF] | Select [ON] to specify Book Original. |
[Output Method] | Select the copy method of two-page spreads.
|
[Non-Image Area Erase] | If you select Book Original, this item is set automatically. When making copies with the ADF open and the original placed on the Original Glass, the machine detects the outline of the original and erases the area outside the original. Cancel the setting if necessary. |
[Centering] | If you select Book Original, this item is set automatically. The original image is copied at the center of the page without enlarging it. Cancel the setting if necessary. |
[Binding Position] | If [Separation], [Front Cover] or [Front & Back Covers] is selected for [Output Method], select the spreading direction of the original to be scanned. Select [Left Bind] for two-page spreads of left binding, and [Right Bind] for two-page spreads of right binding. Note that if the binding position is incorrectly specified, the page order of the two-page spread is reversed between the left- and right-hand pages. |
[Original Size] | If the size of the original is not detected correctly, select a key indicating the size of the original to be scanned. |
[Frame Erase] | Erases the shadow of the surrounding that is created when the original cover cannot be closed properly due to the thickness of the original. You can erase the four sides of the original to the same width. Also, you can erase the four sides of the original to different widths.
|
[Center Erase] | Erases the shadow created in the center when the original cover cannot be closed properly due to the thickness of the original. Specify the width of the area to erase by tapping [+]/[-] for the inch area, or by tapping [+]/[-] or pressing the Keypad for the centimeter area. |
Book Original [Box]
Booklet[Copy]
To display (inch area):
- [Copy]
- [Booklet]
To display (centimeter area): [Copy] - [Application] - [Layout] - [Booklet]
The pages in the original data are arranged and spread in a booklet format and printed on both sides of sheets. You can also specify the binding position, or insert front and back covers.
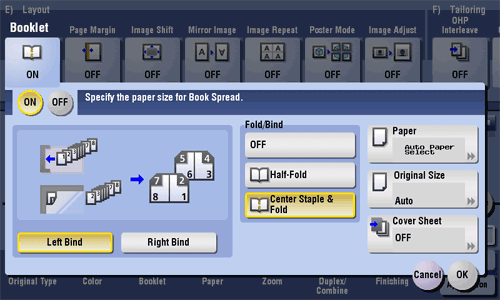
Booklet
To display (inch area):
- [Copy]
- [Booklet]
To display (centimeter area): [Copy] - [Application] - [Layout] - [Booklet]
The pages in the original data are arranged and spread in a booklet format and printed on both sides of sheets. You can also specify the binding position, or insert front and back covers.
| Settings | Description |
|---|---|
[ON]/[OFF] | Select [ON] to specify Booklet. |
[Left Bind]/[Right Bind] | Select the binding position of the copied sheets. |
[Fold/Bind] | Staples copy outputs in the center the paper or fold them in the center before discharging.
|
[Paper] | Select paper for copying. Select paper which corresponds to the size of a two-page spread of the booklet. |
[Original Size] | If the size of the original is not detected correctly, select a key indicating the size of the original to be scanned. If the machine cannot detect the size of irregular sized originals or photos, manually specify the size. |
[Cover Sheet] | Specify this option to insert a different sheet of paper from text pages as the front cover of a booklet.
|
Tips
- To use the Half-Fold/Bind function:
- The Finisher FS-534 and Saddle Stitcher SD-511 are required.
- The Finisher FS-535 and Saddle Stitcher SD-512 are required (bizhub C554 only).
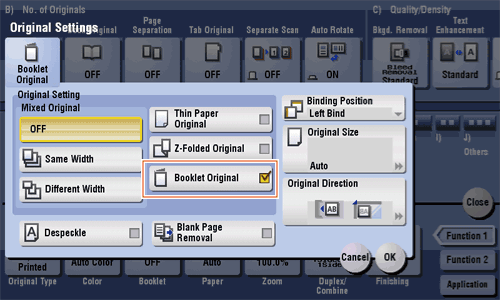
Booklet Original[Copy]
To display:
- [Copy]
- [Application]
- [No. of Originals]
- [Original Settings]
- [Booklet Original]
- [Original Settings]
- [No. of Originals]
- [Application]
Scan a catalog with the staples removed as a 2-sided original, make a 2-sided copy, and staple the center of the paper in the same manner as the original catalog.
Booklet Original
To display:
- [Copy]
- [Application]
- [No. of Originals]
- [Original Settings]
- [Booklet Original]
- [Original Settings]
- [No. of Originals]
- [Application]
Scan a catalog with the staples removed as a 2-sided original, make a 2-sided copy, and staple the center of the paper in the same manner as the original catalog.
Tips
- To configure [Booklet Original]:
- The Finisher FS-534 and Saddle Stitcher SD-511 are required.
- The Finisher FS-535 and Saddle Stitcher SD-512 are required (bizhub C554 only).
Reference
- For details on how to copy a booklet, refer to Here.
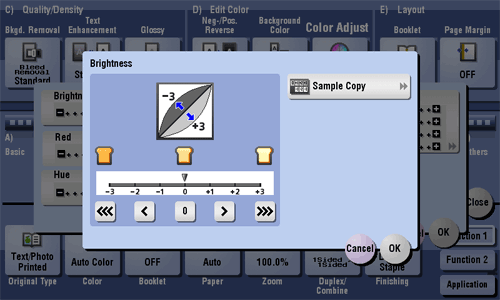
Brightness[Copy]
To display:
- [Copy]
- [Application]
- [Edit Color]
- [Color Adjust]
- [Brightness]
- [Color Adjust]
- [Edit Color]
- [Application]
Adjust the degree of brightness of original.
Brightness
To display:
- [Copy]
- [Application]
- [Edit Color]
- [Color Adjust]
- [Brightness]
- [Color Adjust]
- [Edit Color]
- [Application]
Adjust the degree of brightness of original.
| Settings | Description |
|---|---|
[Sample Copy] | You can check the finishing by printing a sample copy. Place the original on the Original Glass, and tap [OK] or press Start. |
Tips
- What is brightness?:
Colors consist of three elements, that is, hue, brightness, and saturation. These are referred to as three attributes of colors, and all colors are created by combinations of these elements.
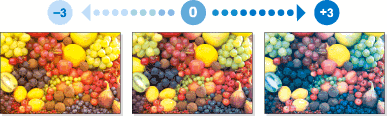
When a color is compared with others, the color can be regarded as brighter or darker because there is a degree of "brightness" in colors. For example, when comparing the yellow of a lemon and the yellow of a grapefruit, it is obvious that the yellow of the lemon is brighter. But what about when comparing the yellow of a lemon and the red of a bean? Obviously, the yellow of the lemon is brighter. "Brightness" is this degree of lightness that enables comparison regardless of the hue. - Adjusting brightness changes an image as shown in the following.
Bulletin[Box]
To display:
- [Box]
- [System]
- [Bulletin]
- [System]
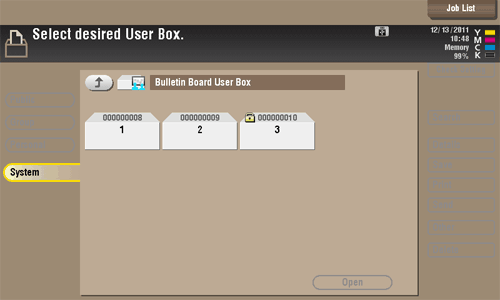
Multiple fax documents required for polling can be stored in the Bulletin Board User Box.
You can create and register up to 10 Bulletin Board User Boxes. Once you have opened the User Box, you can select a fax document stored in the User Box and preview, print out, or delete it.
If announcements and other fax documents are stored in Bulletin Board User Boxes by aim, and if recipients are notified of the related box numbers, users can select the required fax documents and be polled.
To access a file in this User Box, select the desired User Box, then tap [Open].

Bulletin
To display:
- [Box]
- [System]
- [Bulletin]
- [System]
Multiple fax documents required for polling can be stored in the Bulletin Board User Box.
You can create and register up to 10 Bulletin Board User Boxes. Once you have opened the User Box, you can select a fax document stored in the User Box and preview, print out, or delete it.
If announcements and other fax documents are stored in Bulletin Board User Boxes by aim, and if recipients are notified of the related box numbers, users can select the required fax documents and be polled.
To access a file in this User Box, select the desired User Box, then tap [Open].
Tips
- You can also open the desired User Box by tapping it twice.
| Settings | Description |
|---|---|
[Details..] | Previews the file.
|
[Print] | Prints the selected file. |
[Delete] | Delete the selected file. |