
Description of Setup Buttons
Offset[Copy]
To display:
- [Copy]
- [Finishing]
- [Offset]
- [Finishing]
Select this item when sorting by the number of copies or by page to feed out paper.
If the Finisher or Job Separator JS-506 is installed, the copies are fed out and stacked on top of each other with each copy or page set staggered to separate them.
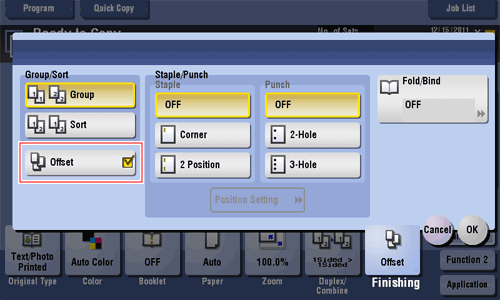
Offset
To display:
- [Copy]
- [Finishing]
- [Offset]
- [Finishing]
Select this item when sorting by the number of copies or by page to feed out paper.
If the Finisher or Job Separator JS-506 is installed, the copies are fed out and stacked on top of each other with each copy or page set staggered to separate them.
If the Finisher or Job Separator JS-506 is not installed, printed copies are fed out and sorted in an alternating crisscross pattern when the following conditions are satisfied.
- 8-1/2
 11, A4, or B5 paper is used.
 - Paper of the same size and type is loaded with the
 orientation in one paper tray and with the
  orientation in another tray
 - Auto Paper for the paper size setting is set.
Offset [Box]
OHP Interleave[Copy]
To display:
- [Copy]
- [Application]
- [Tailoring]
- [OHP Interleave]
- [Tailoring]
- [Application]
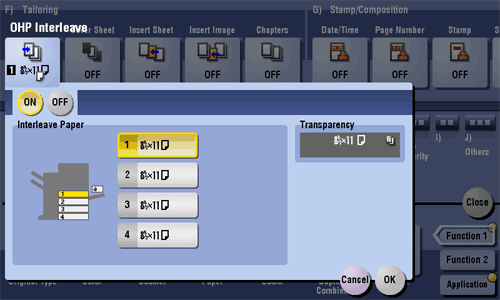
When copying onto multiple transparencies, you can insert the specified paper between the transparencies. These sheets of paper prevent the transparencies from sticking together due to heat generated during copying or static electricity.
OHP Interleave
To display:
- [Copy]
- [Application]
- [Tailoring]
- [OHP Interleave]
- [Tailoring]
- [Application]
When copying onto multiple transparencies, you can insert the specified paper between the transparencies. These sheets of paper prevent the transparencies from sticking together due to heat generated during copying or static electricity.
| Settings | Description |
|---|---|
[ON]/[OFF] | Select [ON] to specify OHP Interleave. |
[Interleave Paper] | Select the paper tray for the paper to be inserted between transparencies. The paper size of the transparencies loaded on the Bypass Tray is displayed in [Transparency]. Be sure to use the same size for loaded transparencies and the paper to be inserted. |
Tips
- You can only specify [Black] for copying onto transparencies.
- You can only specify 1 for the number of copies. The number value cannot be changed.
- The finishing function cannot be changed.
Reference
- Load transparencies into the Bypass Tray. For details on how to load transparencies, refer to Here.
Original > Output[Copy]
To display:
- [Copy]
- [Duplex/Combine]
- [Original > Output]
- [Duplex/Combine]
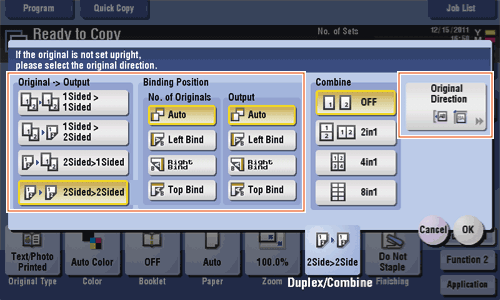
Copy an original onto both sides of paper.
Original > Output
To display:
- [Copy]
- [Duplex/Combine]
- [Original > Output]
- [Duplex/Combine]
Copy an original onto both sides of paper.
| Settings | Description | |
|---|---|---|
[Original > Output] | Select a combination of the original to be loaded (1-sided original or 2-sided original) and the copy method (1-sided copy or 2-sided copy). If you have selected other than [1Sided > 1Sided], also specify [Binding Position] and [Original Direction]. | |
[Binding Position] | Select the binding positions of the original and copy. | |
[No. of Originals] | Select the original binding position when loading a 2-sided original.
| |
[Output] | Select the binding position when printing on both sides of paper.
| |
[Original Direction] | Specify the orientation of the loaded original. | |
Reference
- For details about the operation procedure of [Original > Output], refer to Here.
Original Direction[Scan/Fax]
To display:
- [Scan/Fax]
- [Application]
- [No. of Originals]
- [Original Settings]
- [Original Direction]
- [Original Settings]
- [No. of Originals]
- [Application]
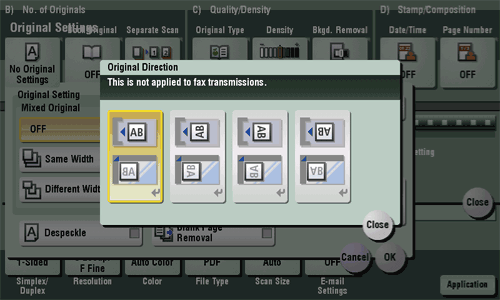
Specify the orientation of the loaded original.
Original Direction[Copy]
To display:
- [Copy]
- [Application]
- [No. of Originals]
- [Original Settings]
- [Original Direction]
- [Original Settings]
- [No. of Originals]
- [Application]
Specify the orientation of the loaded original.

Original Direction [Box]
Original Settings[Scan/Fax]
To display:
- [Scan/Fax]
- [Application]
- [No. of Originals]
- [Original Settings]
- [No. of Originals]
- [Application]
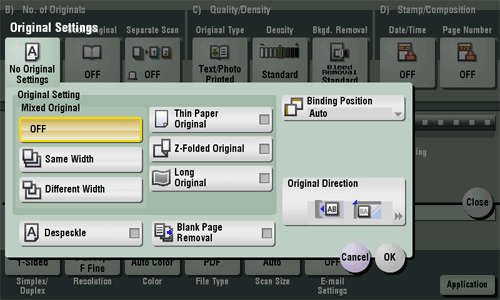
Configure the setting so as to scan originals accurately according to the properties of the originals to be loaded.
Original Settings
To display:
- [Scan/Fax]
- [Application]
- [No. of Originals]
- [Original Settings]
- [No. of Originals]
- [Application]
Configure the setting so as to scan originals accurately according to the properties of the originals to be loaded.
| Settings | Description |
|---|---|
[Original Setting] | Configure the setting so as to scan originals accurately according to the properties of the originals to be loaded.
|
[Despeckle] | Scan an original using the ADF while removing dust from the Slit Scan Glass. For details, refer to Here. |
[Blank Page Removal] | Blank pages contained in the original loaded into the ADF are skipped when the original is scanned. For details, refer to Here. |
[Binding Position] | When scanning a 2-sided original, select the original binding position to prevent the binding positions being reversed between the front and rear faces. For details, refer to Here. |
[Original Direction] | Specify the orientation of the loaded original. For details, refer to Here. |
Original Settings[Copy]
To display:
- [Copy]
- [Application]
- [No. of Originals]
- [Original Settings]
- [No. of Originals]
- [Application]
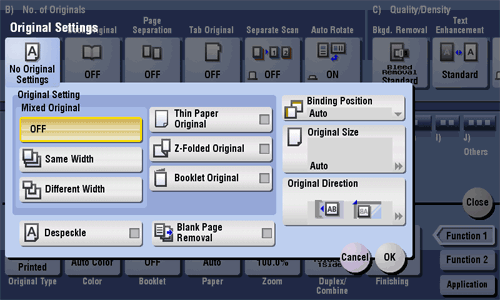
Set the options to scan originals correctly based on their properties.
Original Settings
To display:
- [Copy]
- [Application]
- [No. of Originals]
- [Original Settings]
- [No. of Originals]
- [Application]
Set the options to scan originals correctly based on their properties.
| Settings | Description |
|---|---|
[Original Setting] | Set the options to scan originals correctly based on their properties.
|
[Despeckle] | Scan originals using the ADF while removing dust on the Slit Scan Glass. For details, refer to Here. |
[Blank Page Removal] | Blank pages contained in the original loaded into the ADF are skipped when the original is scanned. For details, refer to Here. |
[Binding Position] | When scanning a 2-sided original, select the original binding position to prevent the binding positions be reversed between the front and rear faces. For details, refer to Here. |
[Original Size] | If the size of the original is not detected correctly, select a key indicating the size of the original to be scanned. For details, refer to Here. |
[Original Direction] | Specify the orientation of the loaded original. For details, refer to Here. |
Original Settings [Box]
Original Size[Copy]
To display:
- [Copy]
- [Application]
- [No. of Originals]
- [Original Settings]
- [Original Size]
- [Original Settings]
- [No. of Originals]
- [Application]
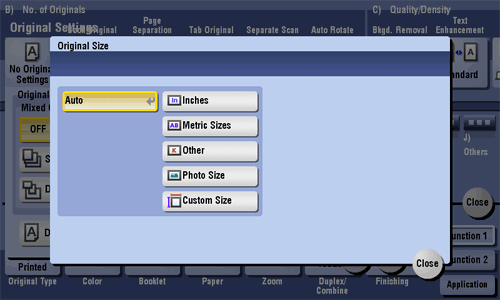
If the size of the original is not detected correctly, select a key indicating the size of the original to be scanned. If the machine cannot detect the size of irregular sized originals or photos, manually specify the size.
Original Type[Scan/Fax]
To display:
- [Scan/Fax]
- [Application]
- [Quality/Density]
- [Original Type]
- [Quality/Density]
- [Application]
Select the appropriate image quality level for the original and scan at the optimal level of image quality.
Original Type
To display:
- [Scan/Fax]
- [Application]
- [Quality/Density]
- [Original Type]
- [Quality/Density]
- [Application]
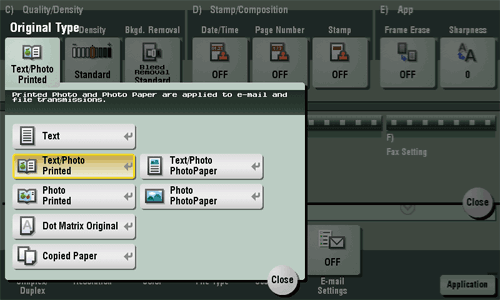
Select the appropriate image quality level for the original and scan at the optimal level of image quality.
| Settings | Description |
|---|---|
[Text] | Press this button to scan an original that consists primarily of text at the optimum level of image quality. Sharpen the edges of text to improve legibility. |
[Text/Photo Printed] | Press this button to scan an original containing of text and photos at the optimum level of image quality. Sharpen the edges of text, and smoothen photos. Select this option to scan printed originals such as brochures and catalogs. |
[Text/Photo PhotoPaper] | Press this button to scan an original containing of text and photos at the optimum level of image quality. Sharpen the edges of text, and smoothen photos. Select this option to scan originals in that include photos printed on photographic paper. |
[Photo Printed] | Press this button to scan an original consisting of only photos at the optimum image quality level. Select this option to scan printed originals such as brochures and catalogs. |
[Photo PhotoPaper] | Press this button to scan an original consisting of only photos at the optimum image quality level. Select this option to scan originals printed on photographic paper. |
[Dot Matrix Original] | Press this button to scan an original that consists primarily of thin or faint text at the optimum level of image quality. Darken the text to improve legibility. |
[Copied Paper] | Press this button to scan originals containing uniform density and that are printed on copier or printer, at the optimum level of image quality. |
Original Type[Copy]
To display:
- [Copy]
- [Original Type]
Select the optimum settings for the original to copy it in the optimum image quality.
Original Type
To display:
- [Copy]
- [Original Type]
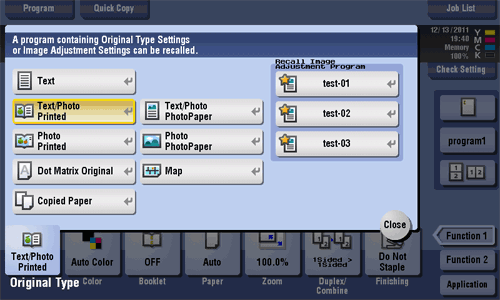
Select the optimum settings for the original to copy it in the optimum image quality.
| Settings | Description |
|---|---|
[Text] | Copy originals primarily containing text at the optimum image quality level. Sharpen the edges of text to improve legibility. |
[Text/Photo Printed] | Copy the original, which consists of text and photos, at the optimum image quality level. Sharpen the edges of text, and smoothen the photos. Select this option to scan printed originals such as brochures and catalogs. |
[Text/Photo PhotoPaper] | Copy the original, which consists of text and photos, at the optimum image quality level. Sharpen the edges of text, and smoothen the photos. Select this option for scanning originals in which photos are printed on photographic paper. |
[Photo Printed] | Press this button to copy an original consisting of only photos at the optimum image quality level. Select this option to scan printed originals such as brochures and catalogs. |
[Photo PhotoPaper] | Press this button to copy an original consisting of only photos at the optimum image quality level. Select this option for scanning originals printed on photographic paper. |
[Dot Matrix Original] | Copy an original, that primarily consists of text such as thin or faint characters, at the optimum image quality level. Darken the text to improve legibility. |
[Map] | Copy an origin that has a colored background such as a map or an image drawn with a pencil or containing thin colored lines, at the optimum image quality level. A sharp copy image is produced. |
[Copied Paper] | Copy an original, which has been output with an even density from the copier or printer, at the optimum image quality level. |
[Recall Image Adjustment Program] | Call the image quality adjustment program. The registered content of program is applied. For image adjustment program, you can register the settings of [Original Type], [Density], [Bkgd. Removal], [Text Enhancement], [Neg-/Pos. Reverse], [Background Color], [Color Adjust], and [Mirror Image]. For details on how to register, refer to Here. |
Original Type [Box]
Other [Box]
Overlay[Copy]
To display:
- [Copy]
- [Application]
- [Stamp/Composition]
- [Overlay]
- [Stamp/Composition]
- [Application]
The original image scanned in the first page is overlaid on the originals scanned in the subsequent pages.
Overlay
To display:
- [Copy]
- [Application]
- [Stamp/Composition]
- [Overlay]
- [Stamp/Composition]
- [Application]
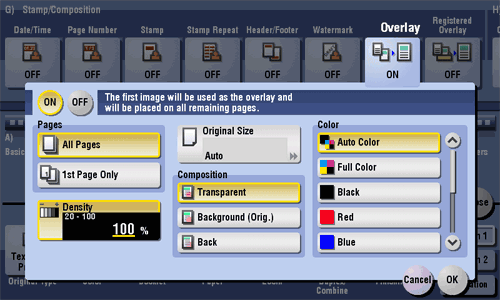
The original image scanned in the first page is overlaid on the originals scanned in the subsequent pages.
| Settings | Description |
|---|---|
[ON]/[OFF] | Select [ON] to compose an overlay image. |
[Pages] | Select the range of pages on which an overlay image is composed. |
[Density] | If necessary, adjust the density of the overlay image to be composed. |
[Original Size] | If the size of the original is not detected correctly, select a key indicating the size of the original to be scanned. If the machine cannot detect the size of irregular sized originals or photos, manually specify the size. |
[Composition] | Select how to compose an overlay image.
|
[Color] | If necessary, select the print color of the overlay image to be composed. |