
Description of Setup Buttons
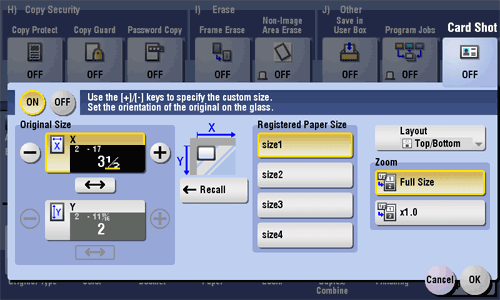
Card Shot[Copy]
To display:
- [Copy]
- [Application]
- [Others]
- [Card Shot]
- [Others]
- [Application]
When you want to copy cards, you can arrange the front and back sides of the card on the same side of a single page and print them onto one sheet.
Card Shot
To display:
- [Copy]
- [Application]
- [Others]
- [Card Shot]
- [Others]
- [Application]
When you want to copy cards, you can arrange the front and back sides of the card on the same side of a single page and print them onto one sheet.
| Settings | Description |
|---|---|
[ON]/[OFF] | Select [ON] to specify Card Shot. |
[Original Size] | Specify the size of the card to copy by tapping [+]/[-] for the inch area, or by tapping [+]/[-] or pressing the Keypad for the centimeter area. From the [Registered Paper Size], you can recall a size previously stored and specify the size. |
[Layout] | Select the layout for arranging the front side and back side of the card on the paper from [Top/Bottom], [Left/Right (Top Half)], and [Left/Right]. |
[Zoom] | Select a zoom ratio for copying.
|
Reference
- For details about the operation procedure of [Card Shot], refer to Here.
Center Staple & Fold[Copy]
To display:
- [Copy]
- [Finishing]
- [Fold/Bind]
- [Center Staple & Fold]
- [Fold/Bind]
- [Finishing]
Staples and feeds out a printed sheet by folding it in two.
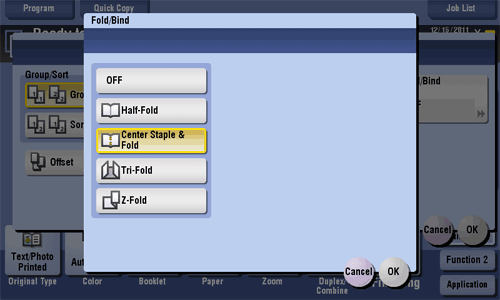
Center Staple & Fold
To display:
- [Copy]
- [Finishing]
- [Fold/Bind]
- [Center Staple & Fold]
- [Fold/Bind]
- [Finishing]
Staples and feeds out a printed sheet by folding it in two.
Tips
- To use the Center Staple & Fold function:
- The Finisher FS-534 and Saddle Stitcher SD-511 are required.
- The Finisher FS-535 and Saddle Stitcher SD-512 are required (bizhub C554 only).
- The [Booklet] option is turned [ON] at the same time.
Center Staple & Fold [Box]
Chapters[Copy]
To display:
- [Copy]
- [Application]
- [Tailoring]
- [Chapters]
- [Tailoring]
- [Application]
When an original is copied onto both sides of sheets of paper, the first page of each chapter is always printed on the front side of paper.

Chapters
To display:
- [Copy]
- [Application]
- [Tailoring]
- [Chapters]
- [Tailoring]
- [Application]
When an original is copied onto both sides of sheets of paper, the first page of each chapter is always printed on the front side of paper.
| Settings | Description |
|---|---|
[ON]/[OFF] | Press [ON] to set the Chapters option. |
[Chapter Position] | Specify the chapter page to be printed on the front side.
|
[Insert Chapter] | Select whether to use the same page or a different page for the chapter and the text.
|
[Chapter Paper] | If [Insert Chapter] is set to [Copy Insert], select the paper tray where the Chapter Paper is stacked. If the chapter paper and text paper differ, use the same size of paper and stack them in the correct direction. |
Tips
- When the Chapters function is specified, [1Sided > 2Sided] of [Duplex/Combine] is automatically set. To scan a 2-sided original, select [2Sided > 2Sided].
Chapters [Box]
Color[Scan/Fax]
To display:
- [Scan/Fax]
- [Color]
Select the color mode to scan originals.

Color
To display:
- [Scan/Fax]
- [Color]
Select the color mode to scan originals.
| Settings | Description |
|---|---|
[Auto Color] | Scan by automatically selecting either [Full Color] or [Gray Scale] according to the original color. |
[Full Color] | Scan in full color, regardless of whether the original is in color or in black and white. Select this option to scan originals of other than black and white and scan-ning color photos. |
[Gray Scale] | Scan in gray scale, regardless of whether the original is in color or in black and white. Select this option to scan originals with many halftones, such as black and white photos. |
[Black] | Scan originals in white and black, no shades of gray. Select this option to scan originals with distinct black and white areas, such as line drawings. |
Color[Copy]
To display:
- [Copy]
- [Color]
Select a color for copying.
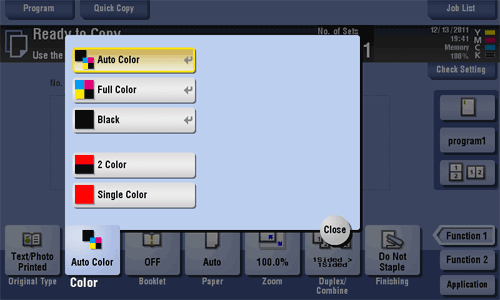
Color
To display:
- [Copy]
- [Color]
Select a color for copying.
| Settings | Description |
|---|---|
[Auto Color] | The machine automatically selects [Full Color] or [Black] according to the color of the scanned original when copying. |
[Full Color] | Print the copy in full color, regardless of whether the scanned original is in color or in black and white. |
[Black] | Print the copy in black and white, regardless of whether the scanned original is in color or in black and white. |
[2 Color] | Copy in the specified two colors. This will produce a lower cost color copy than one printed in full color. In the scanned original, an area judged to be color is copied with the specified color, and an area judged to be black is copied in black. |
[Single Color] | Copy in the specified single color. This will produce a lower cost color copy than one printed in full color. The original is copied by converting the color differences (apparent color densities) and the gradation levels into density differences of the single color. If you set [Average Density], the original is copied by converting the gradation levels into density differences of the single color regardless of the original color. |
Color [Box]
Color Adjust[Copy]
To display:
- [Copy]
- [Application]
- [Edit Color]
- [Color Adjust]
- [Edit Color]
- [Application]
Adjust the color quality of the original for copying. You can check the finishing by printing a sample copy.
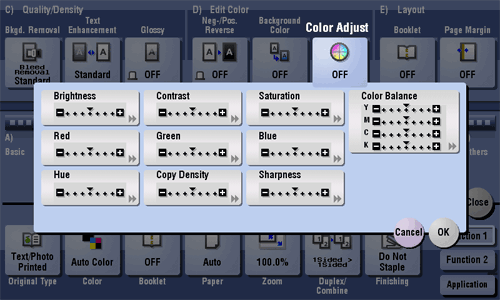
Color Adjust
To display:
- [Copy]
- [Application]
- [Edit Color]
- [Color Adjust]
- [Edit Color]
- [Application]
Adjust the color quality of the original for copying. You can check the finishing by printing a sample copy.
| Settings | Description |
|---|---|
[Brightness] | Adjust the brightness level. |
[Contrast] | Adjust the shading of an image. |
[Saturation] | Adjust the saturation level. |
[Red] | Adjust the intensity of red. |
[Green] | Adjust the intensity of green. |
[Blue] | Adjust the intensity of blue. |
[Hue] | Adjust the hue. The hue refers to a color trend relative to discrete colors such as red, blue and yellow. By adjusting the hue, the image can attain more reddish or bluish tone, for example. |
[Copy Density] | Adjust the copy density. |
[Sharpness] | Sharpen the edges of the image to improve legibility. Smoothen the rough contour or sharpen the blurred image. |
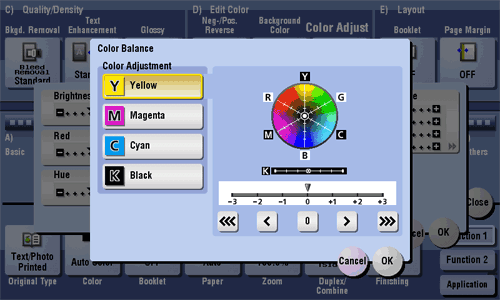
[Color Balance] | Adjust the density for yellow (Y), magenta (M), cyan (C), and black (K). By changing the amount of each of the four toners, tints in the copy can be adjusted. |
Color Balance[Copy]
To display:
- [Copy]
- [Application]
- [Edit Color]
- [Color Adjust]
- [Color Balance]
- [Color Adjust]
- [Edit Color]
- [Application]
Adjust the density for yellow (Y), magenta (M), cyan (C), and black (K). By changing the amount of each of the four toners, tints in the copy can be adjusted.
Color Balance
To display:
- [Copy]
- [Application]
- [Edit Color]
- [Color Adjust]
- [Color Balance]
- [Color Adjust]
- [Edit Color]
- [Application]
Adjust the density for yellow (Y), magenta (M), cyan (C), and black (K). By changing the amount of each of the four toners, tints in the copy can be adjusted.
Tips
- Adjusting color balance changes an image as shown in the following.
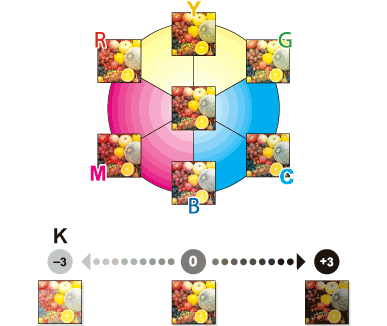
- To enhance red, increase the density of yellow and magenta, or decrease the density of cyan.
- To enhance green, increase the density of yellow and cyan, or decrease the density of magenta.
- To enhance blue, increase the density of magenta and cyan, or decrease the density of yellow.
- To enhance yellow, increase the density of yellow, or decrease the density of magenta and cyan.
- To enhance black, increase the density of black.
Combination (External Memory) (Print)[Box]
To display:
- [Box]
- [System]
- [External Memory]
- Select the file
- [Print]
- [Application]
- [Basic]
- [Combination]
- [Basic]
- [Application]
- [Print]
- Select the file
- [External Memory]
- [System]
Set the print options to combine multiple pages of a PDF file, XPS file, or OpenXML file into a single page and to print it out.

Combination (External Memory) (Print)
To display:
- [Box]
- [System]
- [External Memory]
- Select the file
- [Print]
- [Application]
- [Basic]
- [Combination]
- [Basic]
- [Application]
- [Print]
- Select the file
- [External Memory]
- [System]
Set the print options to combine multiple pages of a PDF file, XPS file, or OpenXML file into a single page and to print it out.
| Settings | Description |
|---|---|
[ON]/[OFF] | Select [ON] to combine pages. |
[No. of Page Combinations] | Specify the number of lines and columns (using p to 5 lines  5 columns) of the original images to be placed on a single page. 5 columns) of the original images to be placed on a single page. |
[Direction] | Select the page layout of either [Horizontal] or [Vertical] layout. |
[Direction] | Set the layout of original images to be placed. |
[Layout Settings] | Set a space between images, a zoom ratio of images, and page margin.
|
Combine[Copy]
To display:
- [Copy]
- [Duplex/Combine]
- [Combine]
- [Duplex/Combine]
Select the number of original pages to be copied on a single page.
If [4in1] or [8in1] is selected, you can select the combined page layout from [Horizontal] or [Vertical].

Combine
To display:
- [Copy]
- [Duplex/Combine]
- [Combine]
- [Duplex/Combine]
Select the number of original pages to be copied on a single page.
If [4in1] or [8in1] is selected, you can select the combined page layout from [Horizontal] or [Vertical].
Reference
- For details about the operation procedure of [Combine], refer to Here.
Combine[Box]
To display:
- [Box]
- Select a User Box
- [Open]
- Select multiple files
- [Other]
- [Combine]
- [Other]
- Select multiple files
- [Open]
- Select a User Box
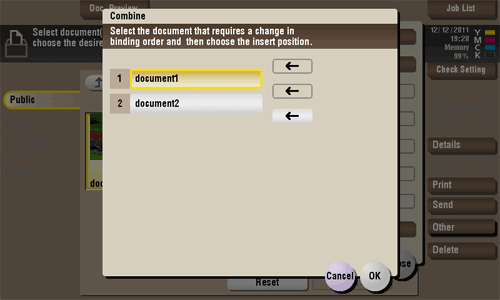
You can combine multiple files into a single file and print them at the same time.
Set the print sequence (combine) and tap [OK], then the option settings screen for printing will be displayed.
Combine [Box]
Combine TX[Box]
To display:
- [Box]
- Select a User Box
- [Open]
- Select multiple files
- [Other]
- [Combine TX]
- [Other]
- Select multiple files
- [Open]
- Select a User Box
You can combine multiple files into a single file and send them at the same time.
Set the sending sequence (combine) and tap [OK], then the option settings screen for file transferring will be displayed.

Contrast[Copy]
To display:
- [Copy]
- [Application]
- [Edit Color]
- [Color Adjust]
- [Contrast]
- [Color Adjust]
- [Edit Color]
- [Application]
Adjust the shading of an image.
Lower contrast makes the image softer and smoother while higher contrast makes it sharper.

Contrast
To display:
- [Copy]
- [Application]
- [Edit Color]
- [Color Adjust]
- [Contrast]
- [Color Adjust]
- [Edit Color]
- [Application]
Adjust the shading of an image.
Lower contrast makes the image softer and smoother while higher contrast makes it sharper.
| Settings | Description |
|---|---|
[Sample Copy] | You can check the finishing by printing a sample copy. Place the original on the Original Glass, and tap [OK] or press Start. |
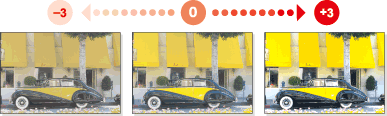
Tips
- Adjusting contrast changes an image as shown in the following.
Copy[Box]
To display:
- [Box]
- Select a User Box
- [Open]
- Select the file
- [Other]
- [Copy]
- [Other]
- Select the file
- [Open]
- Select a User Box
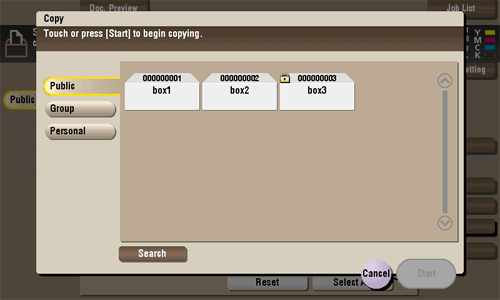
You can select a file and copy it to another User Box. Select the destination Public, Personal or Group User Box.
Copy
To display:
- [Box]
- Select a User Box
- [Open]
- Select the file
- [Other]
- [Copy]
- [Other]
- Select the file
- [Open]
- Select a User Box
You can select a file and copy it to another User Box. Select the destination Public, Personal or Group User Box.
| Settings | Description |
|---|---|
[Search] | This window is used to search for a User Box. The User Boxes are displayed based on search characters you have specified during box registration. You can also specify a User Box number directly from the Keypad. |
Copy Density[Copy]
To display:
- [Copy]
- [Application]
- [Edit Color]
- [Color Adjust]
- [Copy Density]
- [Color Adjust]
- [Edit Color]
- [Application]
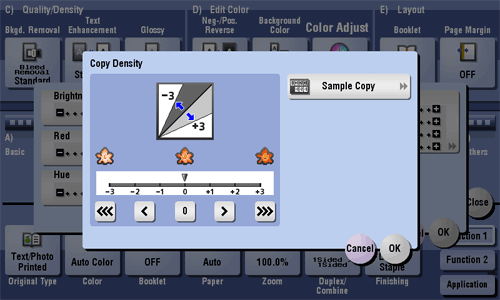
Adjust the copy density.
Copy Density
To display:
- [Copy]
- [Application]
- [Edit Color]
- [Color Adjust]
- [Copy Density]
- [Color Adjust]
- [Edit Color]
- [Application]
Adjust the copy density.
| Settings | Description |
|---|---|
[Sample Copy] | You can check the finishing by printing a sample copy. Place the original on the Original Glass, and tap [OK] or press Start. |
Tips
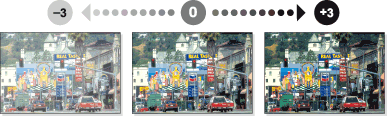
- Adjusting copy density changes an image as shown in the following.
Copy Guard[Copy]
To display:
- [Copy]
- [Application]
- [Copy Security]
- [Copy Guard]
- [Copy Security]
- [Application]
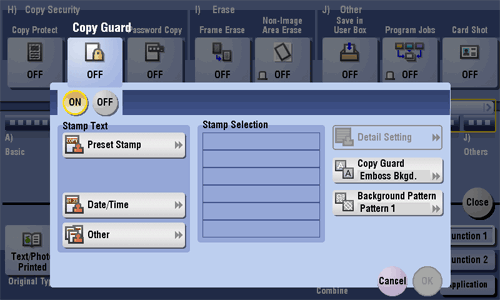
Copy Guard is a copy protection function that prints concealed security watermarks such as "Private" or a date in the background to prevent unauthorized copying, and embeds a copy restriction pattern on all printed sheets.
Copy Guard
To display:
- [Copy]
- [Application]
- [Copy Security]
- [Copy Guard]
- [Copy Security]
- [Application]
Copy Guard is a copy protection function that prints concealed security watermarks such as "Private" or a date in the background to prevent unauthorized copying, and embeds a copy restriction pattern on all printed sheets.
| Settings | Description |
|---|---|
[ON]/[OFF] | Select [ON] to embed a copy guard pattern. |
[Stamp Text] | Select a stamp used. The date and time can also be printed.
|
[Stamp Selection] | The registration status of the stamp is displayed. |
[Detail Setting] | If necessary, select the print size and text color. |
[Copy Guard] | Specify the contract of copy guard pattern if necessary. |
[Background Pattern] | Select a background pattern. |
Tips
- You can use the Copy Guard function when the Security Kit is installed and the Copy Guard function is enabled on this machine. For details on how to enable the Copy Guard function, refer to Here.
- The Copy Guard function does not support color paper, envelopes and transparencies.
Copy Guard [Box]
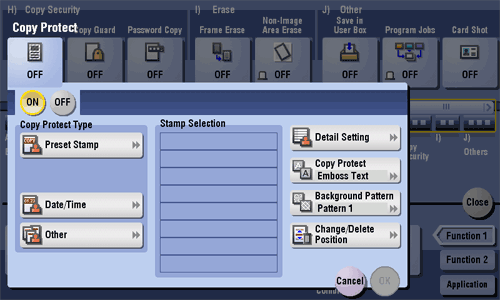
Copy Protect[Copy]
To display:
- [Copy]
- [Application]
- [Copy Security]
- [Copy Protect]
- [Copy Security]
- [Application]
Text such as "Copy" and "Private" are printed in the background pattern as concealed text.
Copy Protect
To display:
- [Copy]
- [Application]
- [Copy Security]
- [Copy Protect]
- [Copy Security]
- [Application]
Text such as "Copy" and "Private" are printed in the background pattern as concealed text.
| Settings | Description |
|---|---|
[ON]/[OFF] | Select [ON] to print the copy protection text. |
[Copy Protect Type] | Select a stamp used. The date and time can also be printed.
|
[Stamp Selection] | The registration status of the stamp is displayed. |
[Detail Setting] | Select the color, density, size, and pattern overwriting of print characters if necessary. |
[Copy Protect] | Select how to print the copy protect pattern. Also, you can set the pattern contrast if necessary. |
[Background Pattern] | Select a background pattern. |
[Change/Delete Position] | Allows the stamp position settings to be checked, changed or deleted, if necessary. You can change the stamp sequence and insert a space between stamps. When you select up to four stamps, you can change their angle (within +/-45 degrees). |
Copy Protect [Box]
Cover Sheet[Copy]
To display:
- [Copy]
- [Application]
- [Tailoring]
- [Cover Sheet]
- [Tailoring]
- [Application]
You can insert a cover sheet before the first page or after the last page of the text.
The paper used for the front and back cover sheets can be different from that used for body pages (in paper color and thickness). They can be printed at the same time.

Cover Sheet
To display:
- [Copy]
- [Application]
- [Tailoring]
- [Cover Sheet]
- [Tailoring]
- [Application]
You can insert a cover sheet before the first page or after the last page of the text.
The paper used for the front and back cover sheets can be different from that used for body pages (in paper color and thickness). They can be printed at the same time.
| Settings | Description |
|---|---|
[ON]/[OFF] | Select [ON] to specify Cover Sheet. |
[Front Cover] | Inserts a front cover.
|
[Back Cover] | Inserts a back cover.
|
Cover Sheet [Box]
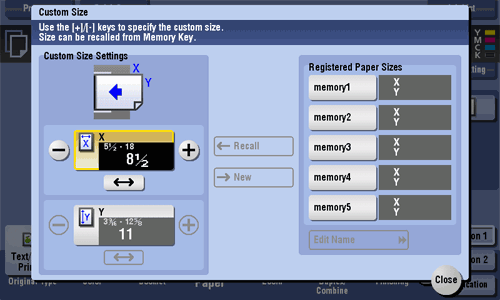
Custom Size[Copy]
To display:
- [Copy]
- [Paper]
- [
 ]
]- [Change Tray Setting]
- [Custom Size]
- [Change Tray Setting]
- [
- [Paper]
When loading custom size paper on the Bypass Tray, enter the length (X) and width (Y) of the paper.
You can either enter the size manually, or select from the registered sizes in the memory.
Custom Size
To display:
- [Copy]
- [Paper]
- []
- [Change Tray Setting]
- [Custom Size]
- [Change Tray Setting]
- [
- [Paper]
When loading custom size paper on the Bypass Tray, enter the length (X) and width (Y) of the paper.
You can either enter the size manually, or select from the registered sizes in the memory.
| Settings | Description |
|---|---|
[Custom Size Settings] | For the inch area, tap [+]/[-] or the keypad to enter the length (X) and width (Y) of the paper. For the centimeter area, tap [+]/[-] or press the Keypad to enter the length (X) and width (Y) of the paper. After you have entered the size, select a key ([memory1] to [memory5]) in [Registered Paper Sizes], and tap [New]. Then the size you have entered is registered in the memory. You can recall the registered size in the future. |
[Registered Paper Sizes] | The custom sizes registered in the memory are displayed.
|