
Description of Setup Buttons
Edit Document[Box]
To display:
- [Box]
- Select a User Box
- [Open]
- Select the file
- [Other]
- [Edit Document]
- [Other]
- Select the file
- [Open]
- Select a User Box
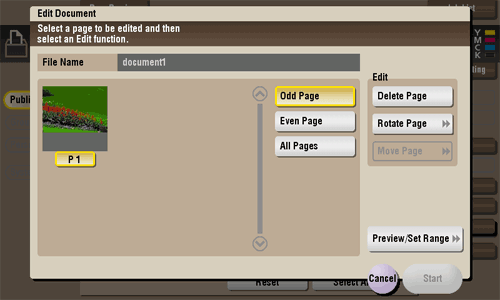
You can select a file and delete or rotate its pages.
Edit Document
To display:
- [Box]
- Select a User Box
- [Open]
- Select the file
- [Other]
- [Edit Document]
- [Other]
- Select the file
- [Open]
- Select a User Box
You can select a file and delete or rotate its pages.
| Settings | Description |
|---|---|
[Odd Page] | Selects odd-numbered pages only. |
[Even Page] | Selects even-numbered pages only. |
[All Pages] | Selects all pages. |
[Delete Page] | Deletes a selected page or pages. |
[Rotate Page] | Rotates a selected page 90 degrees or 180 degrees. |
[Move Page] | Reorders pages by moving some of them. Only one page can be moved at a time. Repeat this operation to move two or more pages.
|
[Preview/Set Range] | Sets a range of pages and displays them as preview image. You can also change the display size. |
Edit Name [Box]
E-mail[Scan/Fax]
To display:
- [Scan/Fax]
- [Direct Input]
- [E-mail]
- [Direct Input]
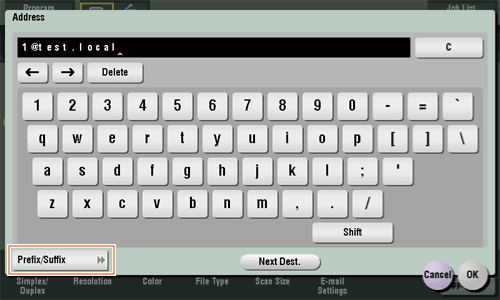
Enter a destination E-mail address when scanned original data is sent by E-mail attachment.
When specifying multiple destinations, tap [Next Dest.] to add destinations.
If E-mail address prefixes and suffixes are registered, you can recall a registered domain name etc. to complement entry.
To display:
- [Scan/Fax]
- [Direct Input]
- [E-mail]
- [Direct Input]
Enter a destination E-mail address when scanned original data is sent by E-mail attachment.
When specifying multiple destinations, tap [Next Dest.] to add destinations.
If E-mail address prefixes and suffixes are registered, you can recall a registered domain name etc. to complement entry.
E-mail [Box]
E-mail Settings[Scan/Fax]
To display:
- [Scan/Fax]
- [E-mail Settings]
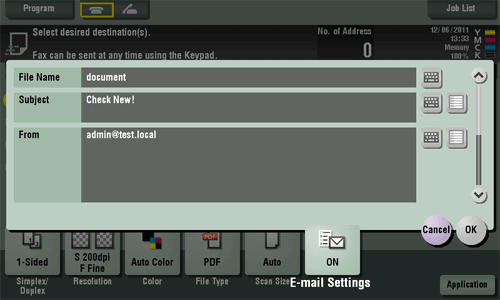
Change the file name of the scanned original.
When sending by E-mail, you can specify the subject and text of the E-mail message and change the sender E-mail address ("From" address).
E-mail Settings
To display:
- [Scan/Fax]
- [E-mail Settings]
Change the file name of the scanned original.
When sending by E-mail, you can specify the subject and text of the E-mail message and change the sender E-mail address ("From" address).
| Settings | Description |
|---|---|
[File Name] | If necessary, change the file name of the scanned original. |
[Subject] | If necessary, change the subject of the E-mail. If fixed subject phrases are registered, you can select a subject from those registered. |
[From] | If necessary, change the sender E-mail address. In normal circumstances, the E-mail address of the administrator is used as sender E-mail address. If user authentication is installed on this machine, the E-mail address of the login user is used as sender E-mail address. |
[Body] | If necessary, change the message text of the E-mail. If fixed message text phrase is registered, you can select message text from those registered. |
E-mail Settings [Box]
Encryption[Scan/Fax]
To display:
- [Scan/Fax]
- [File Type]
- [PDF Detail Setting]
- [Encryption]
- [PDF Detail Setting]
- [File Type]
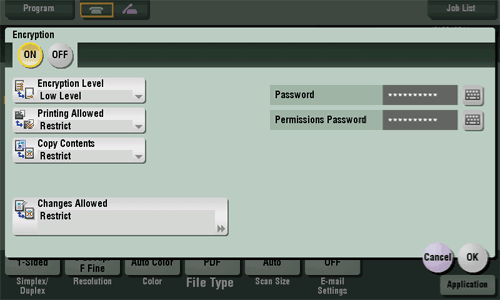
If [PDF] or [Compact PDF] is selected for file format, you can encrypt PDF files.
Encryption
To display:
- [Scan/Fax]
- [File Type]
- [PDF Detail Setting]
- [Encryption]
- [PDF Detail Setting]
- [File Type]
If [PDF] or [Compact PDF] is selected for file format, you can encrypt PDF files.
| Settings | Description |
|---|---|
[Password] | Enter the password to restrict access to the file. Create a PDF file that is accessible by specific users who know the password. |
[Permissions Password] | To specify permissions for printing and editing a PDF file, enter an authorization password. |
[Encryption Level] | When specifying permissions for a PDF file, select an encryption level according to the security level that you want to specify. If you select [High level], you can specify permissions more in detail. |
[Printing Allowed] | Select whether to permit printing of PDF files. If [Encryption Level] is set to [High level], you can permit printing of PDF files only in low resolution ([Low Resolution]). |
[Copy Contents] | Select whether to permit copying of text and image from PDF files. |
[Changes Allowed] | Select the content of PDF for which modification is permitted. If [Encryption Level] is set to [High level], you can select the contents to be permitted more in detail. |
Encryption [Box]
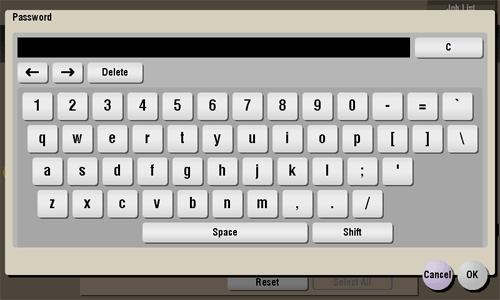
Enter Password[Box]
To display:
- [Box]
- [System]
- [Secure Print]
- Select the file
- [Other]
- [Enter Password]
- [Other]
- Select the file
- [Secure Print]
- [System]
Enter the password for the selected file.
External Memory[Box]
To display:
- [Box]
- [System]
- [External Memory]
- [System]
This window appears when you insert a USB memory device into the USB port of this machine.
Once you have opened the User Box, you can print out a file stored on a USB memory. Also, you can read the original data and directly save it as a file in the USB memory. You can also move a file from the USB memory to the External Memory User Box.
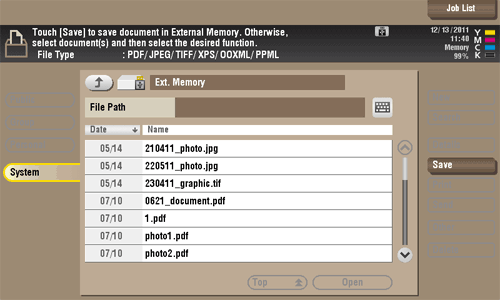
External Memory
To display:
- [Box]
- [System]
- [External Memory]
- [System]
This window appears when you insert a USB memory device into the USB port of this machine.
Once you have opened the User Box, you can print out a file stored on a USB memory. Also, you can read the original data and directly save it as a file in the USB memory. You can also move a file from the USB memory to the External Memory User Box.
| Settings | Description |
|---|---|
[File Path] | You can directly enter a file path of the folder where the file is stored (using up to 250 characters). |