
Description of Setup Buttons
Saturation[Copy]
To display:
- [Copy]
- [Application]
- [Edit Color]
- [Color Adjust]
- [Saturation]
- [Color Adjust]
- [Edit Color]
- [Application]
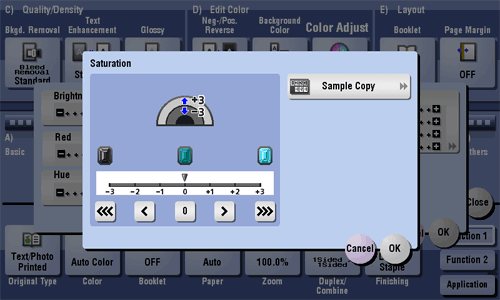
Adjust the saturation level.
Saturation
To display:
- [Copy]
- [Application]
- [Edit Color]
- [Color Adjust]
- [Saturation]
- [Color Adjust]
- [Edit Color]
- [Application]
Adjust the saturation level.
| Settings | Description |
|---|---|
[Sample Copy] | You can check the finishing by printing a sample copy. Place the original on the Original Glass, and tap [OK] or press Start. |
Tips
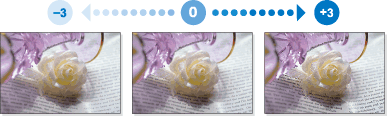
- What is saturation?:
Colors consist of three elements, that is, hue, brightness, and saturation. These are referred to as three attributes of colors, and all colors are created by combinations of these elements.
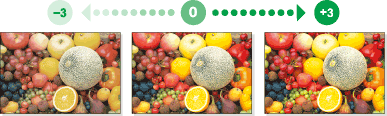
For example, compare two kinds of yellow between lemon and pear. By saying that the lemon is a more vivid yellow and the pear is a duller yellow, the difference between the two colors is stated in terms of "saturation", as opposed to "brightness". As opposed to hue and brightness, "saturation" is the characteristic that indicates the degree of vividness. - Adjusting saturation changes an image as shown in the following.
Save & Print[Scan/Fax]
To display:
- [Scan/Fax]
- [Application]
- [App]
- [Save & Print]
- [App]
- [Application]
You can print data simultaneously with Scan or Fax TX.
Save & Print
To display:
- [Scan/Fax]
- [Application]
- [App]
- [Save & Print]
- [App]
- [Application]
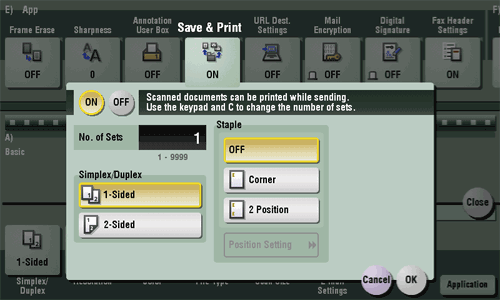
You can print data simultaneously with Scan or Fax TX.
| Settings | Description |
|---|---|
[ON]/[OFF] | Select [ON] to send and print at the same time. |
[No. of Sets] | If necessary, enter the number of copies to print. |
[Simplex/Duplex] | Select [2-Sided] to print on both sides of sheets of paper. |
[Staple] | Select the binding positions for sheet stapling.
|
Save & Print [Box]
Save in User Box[Copy]
To display:
- [Copy]
- [Application]
- [Others]
- [Save in User Box]
- [Others]
- [Application]
Save original images in the hard disk (user box) of this machine. You can also save an original in a user box and print at the same time.
Save in User Box
To display:
- [Copy]
- [Application]
- [Others]
- [Save in User Box]
- [Others]
- [Application]
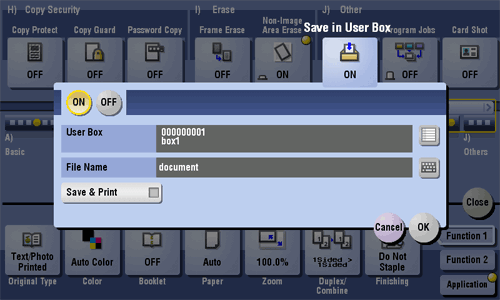
Save original images in the hard disk (user box) of this machine. You can also save an original in a user box and print at the same time.
| Settings | Description |
|---|---|
[ON]/[OFF] | Select [ON] to save in a user box. |
[User Box] | Select a User Box to save files in. You can select a user box from Public, Personal, Group User Box and Annotation User Box. |
[File Name] | If necessary, change the file name to save it. |
[Save & Print] | Set this option to save the document in a user box and print at the same time. |
Reference
- For details about the operation procedure of [Save in User Box], refer to Here.
Save in User Box [Box]
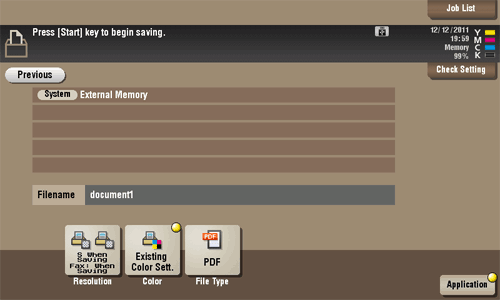
Save to External Memory[Box]
To display:
- [Box]
- Select a User Box
- [Open]
- Select the file
- [Other]
- [Save to External Memory]
- [Other]
- Select the file
- [Open]
- Select a User Box
You can select a file and save it on an external memory.
Scan Server[Scan/Fax]
To display:
- [Scan/Fax]
- [Direct Input]
- [Scan Server]
- [Direct Input]
Forward scanned original data to another location (secondary delivery) via a scan server. When selecting a destination, select an arbitrary PSP (Post-Scan-Process).
PSP is a function that automatizes a preset scanning workflow such as a distribution destination from a scan server. This is created by the Windows Server 2008 R2 application, and registered in Active Directory.
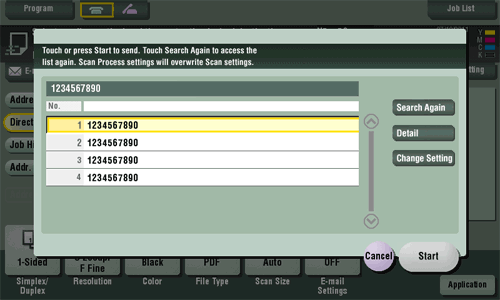
Scan Server
To display:
- [Scan/Fax]
- [Direct Input]
- [Scan Server]
- [Direct Input]
Forward scanned original data to another location (secondary delivery) via a scan server. When selecting a destination, select an arbitrary PSP (Post-Scan-Process).
PSP is a function that automatizes a preset scanning workflow such as a distribution destination from a scan server. This is created by the Windows Server 2008 R2 application, and registered in Active Directory.
| Settings | Description |
|---|---|
[Search Again] | Updates the PSP list. |
[Detail] | Displays the details of the selected PSP as necessary. |
[Change Setting] | Configure Scan option settings as necessary. |
Scan Size[Scan/Fax]
To display:
- [Scan/Fax]
- [Scan Size]
Select the size of the original to be scanned.
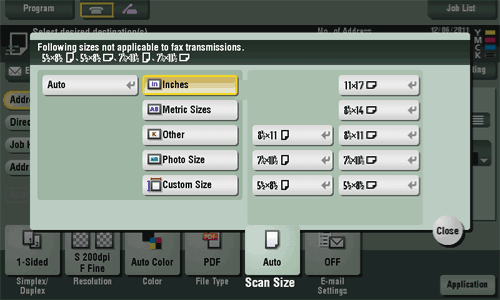
Scan Size
To display:
- [Scan/Fax]
- [Scan Size]
Select the size of the original to be scanned.
| Settings | Description |
|---|---|
[Auto] | Scan by automatically selecting the size according to the original size. |
[Inches] | Select this option to scan an inch-size original. Tap [Inch Sizes], and select a standard inch size. |
[Metric Sizes] | Select this option to scan a metric-size original. Tap [Metric Sizes], and select the standard metric size respectively. |
[Other] | Select this option to scan a postcard or an original other than an inch- or metric-size original. Tap [Other] to select each standard size. |
[Photo Size] | Select this option to scan photos or originals in photo size. Tap [Photo Size], and select a standard size. |
[Custom Size] | Select this option to scan originals in custom size. Enter vertical and horizontal values. |
Scan Size [Box]
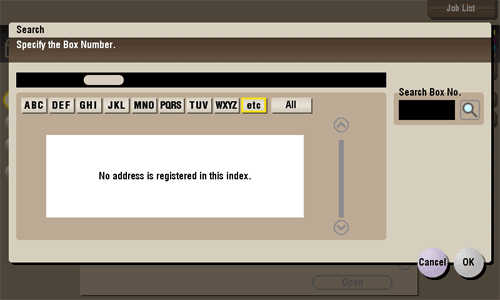
Search[Box]
To display:
- [Box]
- [Search]
This window is used to search for a User Box. The User Boxes are displayed based on search characters you have specified during box registration.
You can also specify a User Box number directly from the Keypad.
Secure Print[Box]
To display:
- [Box]
- [System]
- [Secure Print]
- [System]
When you print a document from the PC or when you select the Secure Print function using the printer driver, this data file is stored in the Secure Print User Box. Once you have opened the User Box, you can select a file stored in the User Box and preview, print, rename, or delete it.
The document ID and password are required to print out the files stored in the Secure Print User Box. After the file has been printed out, it is deleted automatically. This box is used to handle classified documents.

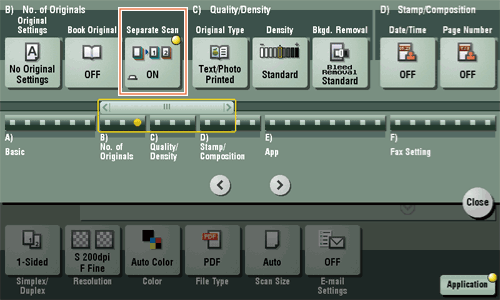
Separate Scan[Scan/Fax]
To display:
- [Scan/Fax]
- [Application]
- [No. of Originals]
- [Separate Scan]
- [No. of Originals]
- [Application]
If the number of original sheets is so large that they cannot be loaded into the ADF at the same time, you can load them in several batches and handle them as one job.
You can also scan the original using both ADF and Original Glass alternately.
Separate Scan
To display:
- [Scan/Fax]
- [Application]
- [No. of Originals]
- [Separate Scan]
- [No. of Originals]
- [Application]
If the number of original sheets is so large that they cannot be loaded into the ADF at the same time, you can load them in several batches and handle them as one job.
You can also scan the original using both ADF and Original Glass alternately.
Reference
- For details on the operation procedure of Serial Scan, refer to Here.
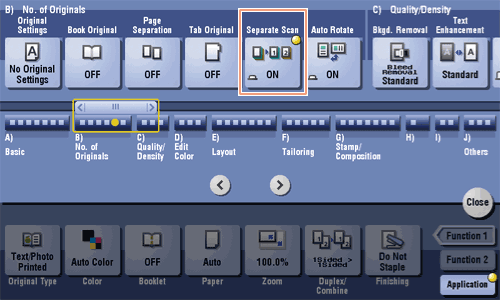
Separate Scan[Copy]
To display:
- [Copy]
- [Application]
- [No. of Originals]
- [Separate Scan]
- [No. of Originals]
- [Application]
If the number of original sheets is so large that they cannot be loaded into the ADF at the same time, you can load them in several batches and handle them as one job.
You can also perform scanning of the original by switching between the ADF and the Original Glass as required.
Separate Scan
To display:
- [Copy]
- [Application]
- [No. of Originals]
- [Separate Scan]
- [No. of Originals]
- [Application]
If the number of original sheets is so large that they cannot be loaded into the ADF at the same time, you can load them in several batches and handle them as one job.
You can also perform scanning of the original by switching between the ADF and the Original Glass as required.
Reference
- For details on how to operate Serial Scan, refer to Here.
Separate Scan [Box]
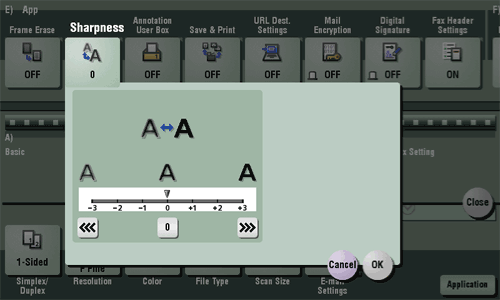
Sharpness[Scan/Fax]
To display:
- [Scan/Fax]
- [Application]
- [App]
- [Sharpness]
- [App]
- [Application]
Sharpen the edges of the image to improve legibility. Smoothen rough contours of an image or sharpen blurred image.
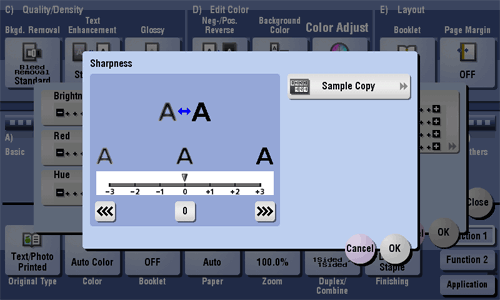
Sharpness[Copy]
To display:
- [Copy]
- [Application]
- [Edit Color]
- [Color Adjust]
- [Sharpness]
- [Color Adjust]
- [Edit Color]
- [Application]
You can adjust the amount of contours in text and images.
Smoothen the rough contour or sharpen the blurred image.
Sharpness
To display:
- [Copy]
- [Application]
- [Edit Color]
- [Color Adjust]
- [Sharpness]
- [Color Adjust]
- [Edit Color]
- [Application]
You can adjust the amount of contours in text and images.
Smoothen the rough contour or sharpen the blurred image.
| Settings | Description |
|---|---|
[Sample Copy] | You can check the finishing by printing a sample copy. Place the original on the Original Glass, and tap [OK] or press Start. |
Tips
- Adjusting sharpness changes an image as shown in the following.
Sharpness [Box]
Sheet/Book Print (External Memory) (Print)[Box]
To display:
- [Box]
- [System]
- [External Memory]
- Select the file
- [Print]
- [Application]
- [Basic]
- [Sheet/Book Print]
- [Basic]
- [Application]
- [Print]
- Select the file
- [External Memory]
- [System]
Select whether to print the currently selected sheet or the entire book when printing an OpenXML format (.xlsx) file.
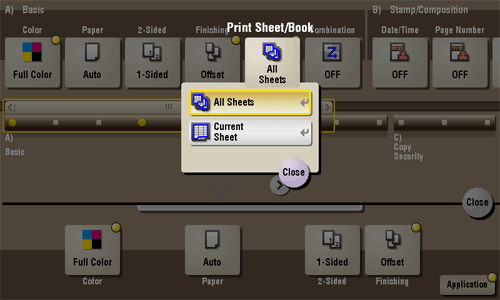
Sheet/Book Print (External Memory) (Print)
To display:
- [Box]
- [System]
- [External Memory]
- Select the file
- [Print]
- [Application]
- [Basic]
- [Sheet/Book Print]
- [Basic]
- [Application]
- [Print]
- Select the file
- [External Memory]
- [System]
Select whether to print the currently selected sheet or the entire book when printing an OpenXML format (.xlsx) file.
| Settings | Description |
|---|---|
[All Sheets] | Prints all sheets of the book. |
[Current Sheet] | Prints the currently selected sheet only. |
Simplex/Duplex[Scan/Fax]
To display:
- [Scan/Fax]
- [Simplex/Duplex]
Select the surface of the original to be scanned.
Simplex/Duplex
To display:
- [Scan/Fax]
- [Simplex/Duplex]
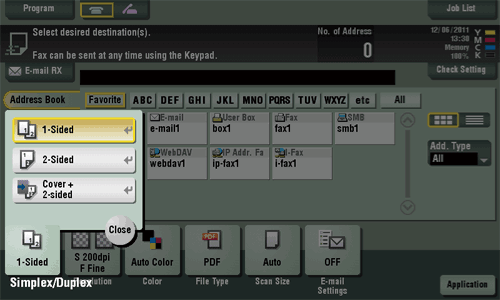
Select the surface of the original to be scanned.
| Settings | Description |
|---|---|
[1-Sided] | Press this button to scan one side of an original. |
[2-Sided] | Press this button to scan both sides of an original. |
[Cover + 2-sided] | Press this button to scan only one side for the first page in the original, and scan both sides of the remaining pages. |
Simplex/Duplex [Box]
Stamp[Scan/Fax]
To display:
- [Scan/Fax]
- [Application]
- [Stamp/Composition]
- [Stamp]
- [Stamp/Composition]
- [Application]
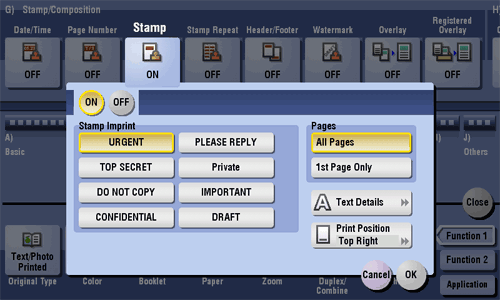
Texts such as "PLEASE REPLY" and "DO NOT COPY" are printed on the first page or all pages. You can select the text to be added from the registered fix stamps and arbitrary registered stamps.
Stamp
To display:
- [Scan/Fax]
- [Application]
- [Stamp/Composition]
- [Stamp]
- [Stamp/Composition]
- [Application]
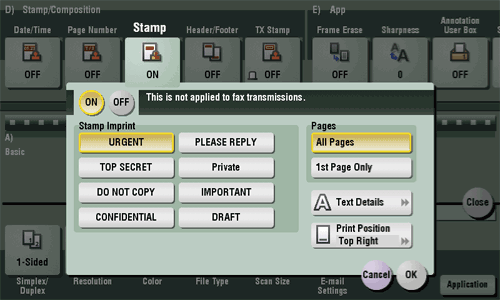
Texts such as "PLEASE REPLY" and "DO NOT COPY" are printed on the first page or all pages. You can select the text to be added from the registered fix stamps and arbitrary registered stamps.
| Settings | Description |
|---|---|
[ON]/[OFF] | Select [ON] to print a stamp. |
[Stamp Imprint] | Select the stamp you want to print. |
[Pages] | Select the range of pages to print. |
[Text Details] | If necessary, select the print size and text color. |
[Print Position] | If necessary, select the print position of the text. You can more finely adjust the print position in [Adjust Position]. |
Stamp[Copy]
To display:
- [Copy]
- [Application]
- [Stamp/Composition]
- [Stamp]
- [Stamp/Composition]
- [Application]
Text such as "PLEASE REPLY" and "DO NOT COPY" are printed on the first page or all pages. You can select the text to be printed from the registered fix stamps and arbitrary registered stamps.
Stamp
To display:
- [Copy]
- [Application]
- [Stamp/Composition]
- [Stamp]
- [Stamp/Composition]
- [Application]
Text such as "PLEASE REPLY" and "DO NOT COPY" are printed on the first page or all pages. You can select the text to be printed from the registered fix stamps and arbitrary registered stamps.
| Settings | Description |
|---|---|
[ON]/[OFF] | Select [ON] to print a stamp. |
[Stamp Imprint] | Select the stamp you want to print. |
[Pages] | Select the range of pages to print. |
[Text Details] | If necessary, select the print size and text color. |
[Print Position] | If necessary, select the print position of the text. You can adjust the print position in [Adjust Position] more closely. |
Stamp [Box]
Stamp Repeat[Copy]
To display:
- [Copy]
- [Application]
- [Stamp/Composition]
- [Stamp Repeat]
- [Stamp/Composition]
- [Application]
Stamp such as "Copy" and "Private" are printed on the entire page.
Stamp Repeat
To display:
- [Copy]
- [Application]
- [Stamp/Composition]
- [Stamp Repeat]
- [Stamp/Composition]
- [Application]
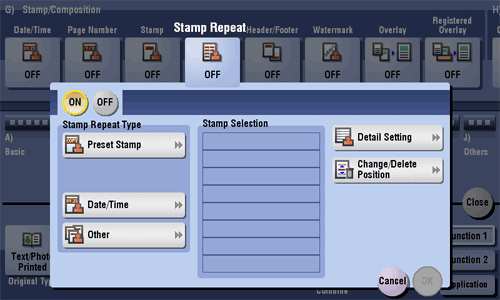
Stamp such as "Copy" and "Private" are printed on the entire page.
| Settings | Description |
|---|---|
[ON]/[OFF] | Select [ON] to repeatedly print a stamp. |
[Stamp Repeat Type] | Select a stamp used. The date and time can also be printed.
|
[Stamp Selection] | The registration status of the stamp is displayed. |
[Detail Setting] | Select the color, density, size, and pattern overwriting of print characters if necessary. |
[Change/Delete Position] | Allows the stamp position settings to be checked, changed or deleted, if necessary. You can change the stamp sequence and insert a space between stamps. When you select up to four stamps, you can change their angle (within +/-45 degrees). |
Tips
- You can print multiple stamps, such as registered stamp, preset stamp, date/time, job number, and serial number, at a time. However, the number of stamps that can be printed may be limited depending on the type and angle of the selected stamps.
Stamp Repeat [Box]
Stamp Settings[Box]
To display:
- [Box]
- [System]
- [Annotation]
- Select a User Box
- [Open]
- Select the file
- [Send]
- [Application]
- [App]
- [Stamp Settings]
- [App]
- [Application]
- [Send]
- Select the file
- [Open]
- Select a User Box
- [Annotation]
- [System]
A print text can be changed.
Stamp Settings
To display:
- [Box]
- [System]
- [Annotation]
- Select a User Box
- [Open]
- Select the file
- [Send]
- [Application]
- [App]
- [Stamp Settings]
- [App]
- [Application]
- [Send]
- Select the file
- [Open]
- Select a User Box
- [Annotation]
- [System]
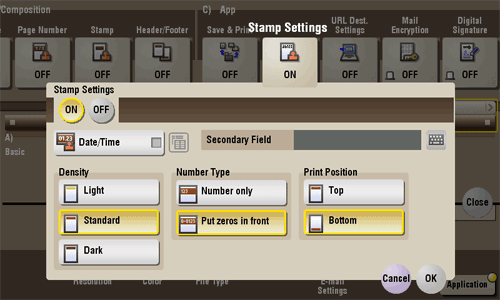
A print text can be changed.
| Settings | Description |
|---|---|
[Date/Time] | Select a format for the date and time to be printed. Select the [Date/Time] box and tap the icon on the right side of the screen, then you can select a Date/Time format from the shortcut menu. |
[Secondary Field] | Adds text to the number to be printed (using up to 20 characters). |
[Density] | Select a density of the text to be printed. |
[Number Type] | Select a number of digits of annotation to be printed.
|
[Print Position] | Select a print position. |
Standard Size[Copy]
To display:
- [Copy]
- [Paper]
- [
 ]
]- [Change Tray Setting]
- [Standard Size]
- [Change Tray Setting]
- [
- [Paper]
When loading a standard size paper into the Bypass Tray, select the paper size.
Standard Size
To display:
- [Copy]
- [Paper]
- []
- [Change Tray Setting]
- [Standard Size]
- [Change Tray Setting]
- [
- [Paper]
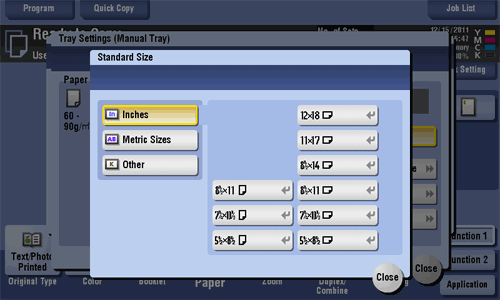
When loading a standard size paper into the Bypass Tray, select the paper size.
| Settings | Description |
|---|---|
[Inches] | When loading inch size paper into the Bypass Tray, select the paper size. |
[Metric Sizes] | When loading metric sizes paper into the Bypass Tray, select the paper size. |
[Other] | When continually loading a certain size of paper such as standard size envelope or photo size into the Bypass Tray, select the paper size. |
Staple[Copy]
To display:
- [Copy]
- [Finishing]
- [Staple]
- [Finishing]
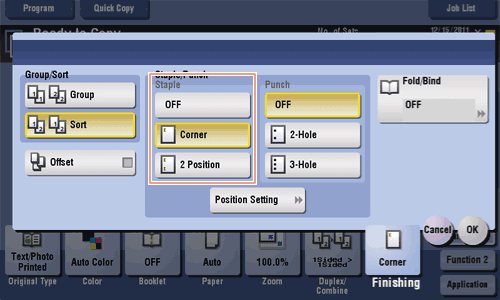
Select the binding positions for sheet stapling.
Staple
To display:
- [Copy]
- [Finishing]
- [Staple]
- [Finishing]
Select the binding positions for sheet stapling.
| Settings | Description |
|---|---|
[Corner] | Each set of printed sheets is stapled in a corner (top left or top right) before being output. |
[2 Position] | Each set of printed sheets is stapled at two positions (in the top, left, or right) before being output. |
[Position Setting] | Select the binding position and original loading direction. If [Auto] is specified for the binding position, the binding position is determined automatically based on the direction of the loaded original. |
Tips
- The Finisher is required to use the Staple function.
Staple [Box]
System[Box]
To display:
- [Box]
- [System]
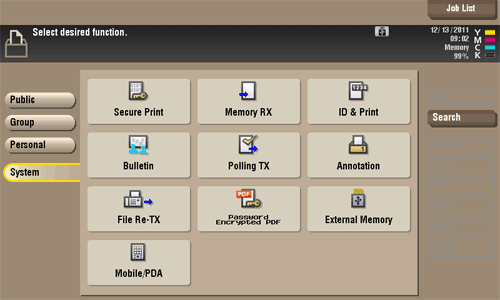
The System User Box is displayed.
To access a file in a User Box, select the desired User Box.
System
To display:
- [Box]
- [System]
The System User Box is displayed.
To access a file in a User Box, select the desired User Box.
| Type | Description |
|---|---|
[Secure Print] | When you print a document from the PC or when you select the Secure Print function using the printer driver, this data file is stored in the Secure Print User Box. Once you have opened the User Box, you can select a file stored in the User Box and preview, print, rename, or delete it. The document ID and password are required to print out the files stored in the Secure Print User Box. After the file has been printed out, it is deleted automatically. This box is used to handle classified documents. |
[Memory RX] | When a facsimile is received by the Memory RX function, it is stored in the Memory RX User Box. Once you have opened the User Box, you can select a fax stored in the User Box and preview, print, rename, or delete it. Because the received faxes are forcibly stored in this box, you can print out only the required faxes and subsequently reduce total printing costs. Also, this will prevent important faxes from being stolen or lost and therefore enhance security. The Fax Kit is required on this machine to use this function. |
[ID & Print] | When you print a document from the PC in the user authentication system environment, the files transferred with the ID & Print function are stored in the ID & Print User Box. When a user who has sent the print data logs in to this machine and opens the User Box, he/she can preview, print out, or delete the stored file. Because user authentication is required in order to use a file, this box is useful for handling documents containing private information. |
[Bulletin] | Multiple fax documents required for polling can be stored in the Bulletin Board User Box. You can create and register up to 10 Bulletin Board User Boxes. Once you have opened the User Box, you can select a fax document stored in the User Box and preview, print out, or delete it. If announcements and other fax documents are stored in Bulletin Board User Boxes by aim, and if recipients are notified of the related box numbers, users can select the required fax documents and be polled. The Fax Kit is required on this machine to use this function. |
[Polling TX] | The fax documents required for polling are stored in the Polling Transmission User Box. Once you have opened the User Box, you can select a fax document stored in the User Box and preview, print out, or delete it. If the fax documents are stored in the Polling TX User Box, recipients can be polled and receive fax documents from this box when necessary. The Fax Kit is required on this machine to use this function. |
[Annotation] | When a stored file is printed out or sent to another user, its date, time and any annotations are added to this box automatically. Once you have opened the User Box, you can select a file stored in the User Box and preview, print out, send, rename, or delete it. When a file is read from the Annotation User Box and used for printouts or transmitted to a recipient, the date, time and any annotations (previously determined for management) are automatically added to the header or footer of each image. You can prevent the unauthorized use of documents by creating a document that can identify the creation date and time and serial page number of each document. |
[File Re-TX] | When the recipient is busy and if communication cannot be established, undeliverable fax documents are stored in the Fax Retransmit User Box. Once you have opened the User Box, you can select a fax document stored in the User Box and preview, print out, send, or delete it. Fax transmission is attempted for the number of times set by Auto Redialing function. If those attempts have failed, the fax document is stored in the Fax Retransmit User Box. The Fax Kit is required on this machine to use this function. |
[Password Encrypted PDF] | When a password protected PDF file is printed out or stored in the User Box by using the Direct Print function or from a USB memory or a Bluetooth device, the file is stored in the Password Encrypted PDF User Box. Once you have opened the User Box, you can select a PDF file stored in the User Box to preview and print it out. Also, you can store the file in or delete it from the User Box. When printing or saving a PDF file, you will need to enter a password that was set for the file. |
[External Memory] | This window appears when you insert a USB memory device into the USB port of this machine. Once you have opened the User Box, you can print out a file stored on a USB memory. Also, you can read the original data and directly save it as a file in the USB memory. You can also move a file from the USB memory to the External Memory User Box. |
[Mobile/PDA] | This User Box is used to save files when this machine is connected to a Bluetooth-compatible mobile phone, smartphone, tablet PC, or other devices. Once you have opened the User Box, you can set the file printing and saving. Because files are transferred from the Bluetooth device to this machine via wireless communication, you can save and print out files even when no PC is available. The Local Interface Kit EK-607 is required on this machine to use this function. |