Selecting Pre-Created Reference Images and Performing Automatic Inspections
Overview
Execute the automatic inspection using the already created reference image.
Select the image from the list and print the job.
- Textured paper, unprinted insertion paper, paper with punch holes, tab paper, and insertion paper are not subject to automatic inspections.
- You can perform inspections when using paper with the numbering and page numbers already printed on it, or when using the stamp copying function for the date and time, by specifying the areas not targeted for inspection. For details, refer to Automatic Inspection Area.
- If Inspection Enhancement Kit UK-311 is mounted, you can set a reference image used for automatic inspection to RIP data. You can select from either [RIP Data] or [Scan Image] for the reference images, but the recommendation is that you select [RIP Data]. The operating procedure is the same no matter which option you select. For details, refer to [Common Setting].
Setting Procedure
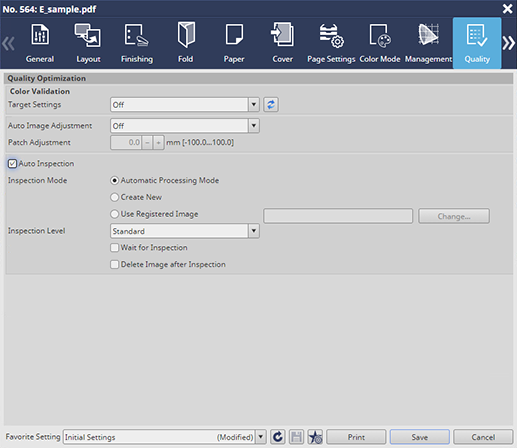
The following is an example of the procedure how to configure settings using the system's Touch panel.
You can perform the same operation using AccurioPro Print Manager.


For details about the settings, refer to the [Quality] tab settings (described after the procedure).
If an abnormality is detected during the inspection, it is displayed on the [MACHINE] and [IQ Detected Result] screens on the system’s Touch panel. For details, refer to [IQ Detected Result].
You can check the automatic inspection reports using the system’s Touch panel or from Web Utilities on Auto Inspection Unit UK-301.
- For details about automatic inspection reports, refer to Automatic Inspection Reports.
[Quality] tab settings
Item | Setting Value |
|---|---|
[Inspection Mode] | Select [Use Registered Image], press [Change...], and on the subsequently displayed screen select the reference image you want to use from the registered reference images |
[Inspection Level] | For example, select [Standard] |


 in the upper-right of a page, it turns into
  and is registered as a bookmark.