
Importing a Job File (PDF/VT-2)
You can import the file on the computer to a hold job, secure job, or HDD job.
The imported file can be changed its setting and printed.
preconditionAvailable file formats to be imported is PDF.
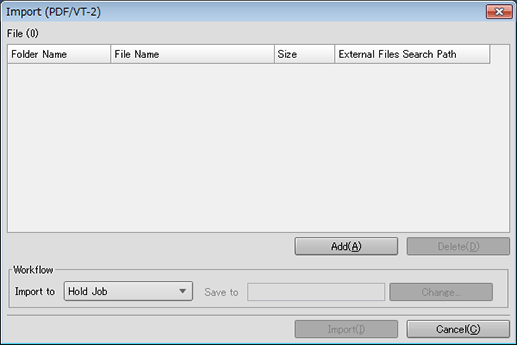
Select Import (PDF/VT-2) from the File menu on the Job Centro screen.
The Import (PDF/VT-2) screen is displayed.
supplementary explanationFor details about the Import (PDF/VT-2) screen, refer to [Import (PDF/VT-2)] Screen.
Click Add.
The Select Import File screen is displayed.
For details, refer to [Import (PDF/VT-2)] Screen.
Specify a job to import. Alternatively, to change the VDP folder in which the VDP source data is stored, specify the search path. Click OK.
supplementary explanationFor example, to create a subfolder called CompanyA under the pdfvt folder and then import files, specify CompanyA in External file search path.
Windows
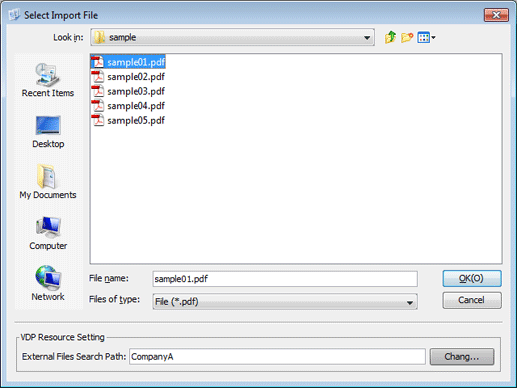
Click Change in VDP resource setting and specify the path. You can also input a direct path in External file search path.
Macintosh
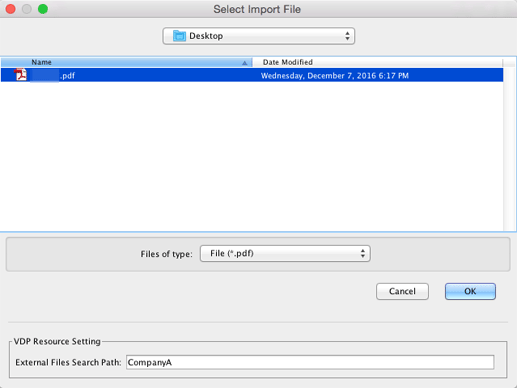
Input a direct path in External file search path in VDP resource setting.
supplementary explanationIn External Files Search Path, specify the external files search path using up to 193 characters. All the characters, excluding symbols "*", "?", """, "<", ">", and "¦", are available.
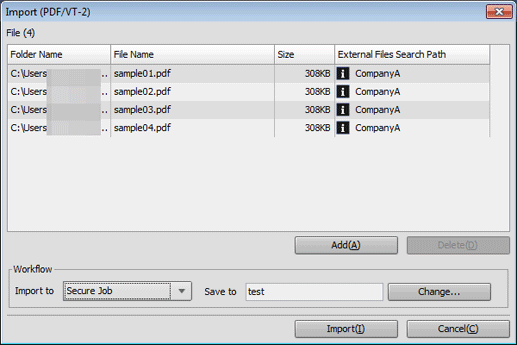
The Select Import File screen closes and the screen returns to the Import (PDF/VT-2) screen.
The added job is displayed on the list of the Import (PDF/VT-2) screen.
With the same operation as step 2 and step 3, display all jobs you want to import on the list of the Import (PDF/VT-2) screen.
supplementary explanationUp to 300 files can be imported.
If the sum of the number of the files displayed in the file list on the Import (PDF/VT-2) screen and the number of the files selected on the Select Import File screen is 301 or more, a warning is displayed.
supplementary explanationYou can select and import more than one file at a time.
supplementary explanationWhen you want to remove a job from the list, select the target job, and click Delete.
Specify Import to for the job.
Select one of Hold Job, Hold Job (Without RIP), Secure Job, and HDD Job.
If you select Secure Job or HDD Job, also specify Save to.
Click Import.
supplementary explanationWhen the HDD encryption mode is set to ON in the machine, Import is available.
Reference
If Password Rules Setting is set to Enable in Quick Security Setting of the UTILITY menu, you cannot import jobs without a password or jobs with a password that has been created against rules.
For details about Quick Security Setting, refer to Functions available in [Quick Security Setting].