
Optional settings before printing
- Change the color mode and print (Color)
- Enlarge or reduce an image (Zoom)
- Print on both sides of paper (Simplex/Duplex)
- Printing multiple pages on the same side of a single sheet (Combine)
- Stapled sheets (Staple)
- Punch the printed sheets. (Punch)
- Folding/Biding (Fold/Bind)
- Outputting by sets (Group/Sort)
- Outputting each set in staggered position (Offset)
- Add a margin to pages (Page Margin)
- Fine-tuning the print position (Image Shift)
- Insert front and back covers (Cover Sheet)
- Insert a different sheet into the specified page (Insert Sheet)
- Arrange the first page of the chapter on the front side (Chapters)
- Add the date and time (Date/Time)
- Add a page number (Page Number)
- Add a stamp (Stamp)
- Add a stamp on the entire page (Stamp Repeat)
- Add information to the header/footer (Header/Footer)
- Compose stored images (Registered Overlay)
- Print a concealed security watermark (Copy Protect)
- Add copy restriction information (Copy Guard)
- Add a password (Password Copy)
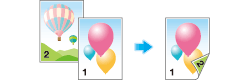
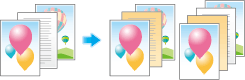
Change the color mode and print ([Color])
You can change the color mode settings, used for file storage in the User Box, and print the file in new color.
The Color Mode can be set to any of [Use Existing Color Setting], [Full Color], and [Black].
For details, refer to the following page.
Enlarge or reduce an image ([Zoom])
You can zoom a file image and print it to the desired scale.

Print on both sides of paper ([Simplex/Duplex])
Select to print on a single side or both sides of a sheet of paper.
If you print on both sides of paper, you can reduce paper usage by half. You can save more sheets by combination of the Combine function.
For details, refer to the following page.
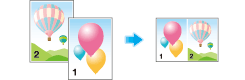
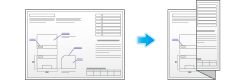
Printing multiple pages on the same side of a single sheet ([Combine])
You can save sheets by reducing and copying multiple pages (such as 2, 4 or 8 pages) on the same side of a single sheet.
You can select the page layout when printing four or eight pages onto the same side of one sheet.
You can save more sheets by combination of the 2-Sided copy function.
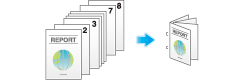
Stapled sheets ([Staple])
Each set of sheets can be stapled (at a corner or at two positions) and output automatically. This function is useful for preparing a project proposal or other booklet materials.

For details, refer to the following page.
Tips
- The optional Finisher is required to use the Staple function.
Punch the printed sheets. ([Punch])
Printed sheets are punched for filing and output. This function is useful when you want to bind printed materials in files.

For details, refer to the following page.
Tips
- To use the punch function, install the Punch Kit PK-521 or Z Folding Unit in the optional Finisher FS-535, or install Punch Kit PK-520 in the Finisher FS-534.
- The number of punched holes varies depending on the country you are in.
Folding/Biding ([Fold/Bind])
Printed sheets can be folded or bound and output automatically.
Half-folding

Tri-Fold
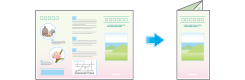
Center folding
Z-Fold
For details, refer to the following page.
Tips
- The optional Finisher and Saddle Stitcher are required to use the Fold/Bind function.
- To use the Z-fold function, the optional Finisher FS-535 and Z Folding Unit are required.
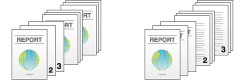
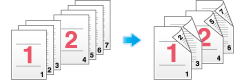
Outputting by sets ([Group/Sort])
Select whether to sort the output sheets or group them when printing multiple sets of copies.
If you select "Sort", the sheets are sorted and output in sequence. For example, pages 1, 2, 3, 4 and 5 are printed as a single set and output, and the specified number of sets of sheets are output. While if you select "Group", the sheets are grouped and output by page. For example, the first page is printed three times and output as a group. Then, the second page is printed three times and output, the third page is printed three times and output, and so on.
When you use both the Sort and Offset functions, the paper output position is staggered for each set, and you can easily prepare handouts.
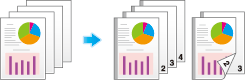
Outputting each set in staggered position ([Offset])
When printing multiple sets of paper, you can offset the paper output position for easy separation.
You can offset the paper output position by using the Sort and Offset functions. This function is useful to prepare handouts.

For details, refer to the following page.
Add a margin to pages ([Page Margin])
You can add a binding margin to each page. Set a binding position and a margin for each page.
If an image is displaced due to an excessive margin, you can shift the image in horizontal or vertical direction and return to its original position. This is useful to adjust the image position when you file print sheets.
For details, refer to the following page.
Tips
- If the positions of the staples or punched holes are different from the binding position, the positions of the staples or punched holes are given priority.
- If an image is partially lost due to incorrect margin setting, reduce the image size to print.
Fine-tuning the print position ([Image Shift])
You can fine tune the image position of the image upward, downward, rightward, and leftward with respect to the paper. Use this function when you want to make a fine adjustment, such as changing the print position a little or printing images in different positions between the front and back sides.

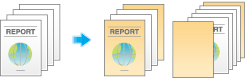
Insert front and back covers ([Cover Sheet])
You can insert a cover sheet before the first page or after the last page of the text.
The front and rear cover sheets can be different from that of the text pages (in paper color and thickness). You can print them at the same time.
For details, refer to the following page.
Tips
- Use the same size cover and body sheets, and stack them in the same orientation.
Insert a different sheet into the specified page ([Insert Sheet])
You can insert a different sheet from other pages into a specified page.
You can insert a color paper and a thick paper. Also, you can print or not print the original data on the inserted sheet.
For details, refer to the following page.
Tips
- You can specify up to 30 positions for insert sheets.
- Use insert sheets and text sheets of the same size, and stack them in the same orientation.
Arrange the first page of the chapter on the front side ([Chapters])
During 2-Side printing, the first page of each chapter is always printed on the front side of the sheet of paper used.
The first page of each chapter and the text pages are printed on the same sheets. Also, you can use a sheet different from text sheets for the first page of each chapter.
For details, refer to the following page.
Tips
- You can set up to 30 positions for the first page of chapters.
- Make sure that the paper loaded for the first page of the chapter and for text copies are of the same size and orientation.
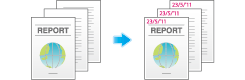
Add the date and time ([Date/Time])
You can print the current date and time by selecting a print position and format.
The date and time can be printed either on all pages or only on the first page.
For details, refer to the following page.
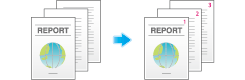
Add a page number ([Page Number])
You can print page and chapter numbers by selecting a print position and format.
Page and chapter numbers are printed on all pages.
For details, refer to the following page.
Add a stamp ([Stamp])
Text such as "PLEASE REPLY" and "DO NOT COPY" are printed on the first page or all pages. You can select the text to be added from the registered fix stamps and arbitrary registered stamps.
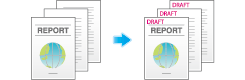
For details, refer to the following page.
Add a stamp on the entire page ([Stamp Repeat])
Stamp such as "Copy" and "Private" are printed on the entire page.
By printing text such as "Copy" or "Private" as a visible stamp, you can deter unauthorized copying.
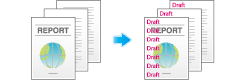
For details, refer to the following page.
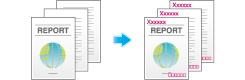
Add information to the header/footer ([Header/Footer])
Add the date and time and any other desired text in the top and bottom margins (header/footer) of the specified page. You must register the information to be added for the header and footer in advance on this machine.
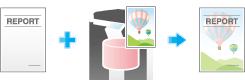
Compose stored images ([Registered Overlay])
You can recall registered overlay image and compose it to a file image. It will be useful to register frequently used overlay images.
Print a concealed security watermark ([Copy Protect])
Text such as "Copy" and "Private" are printed as concealed text. This function is called the Copy Protect function.
When a copy-protected document is copied, the concealed security watermark appears on the entire page, thereby indicating that it is an unauthorized copy.

For details, refer to the following page.
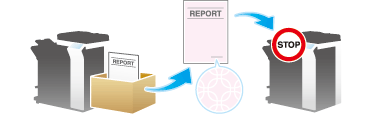
Add copy restriction information ([Copy Guard])
Copy Guard is a copy protection function that prints concealed security watermarks such as "FOR INTERNAL USE" or a date in the background to prevent unauthorized copying, and embeds a copy restriction pattern on all printed sheets.
If an attempt is made using a device that supports the copy guard function to copy a sheet that has been copy protected, a copy guard pattern is scanned, the copying process is canceled, and the job is deleted.
For details, refer to the following page.
Tips
- You can use the Copy Guard function when the optional Security Kit is installed and the Copy Guard function is enabled on this machine.
- The Copy Guard function does not support color paper, envelopes and transparencies.
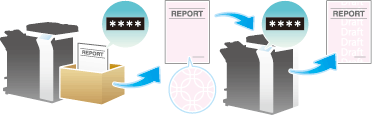
Add a password ([Password Copy])
Password Copy is a copy protection function that prints concealed security watermarks such as "FOR INTERNAL USE" or a date in the background to prevent unauthorized copying, and embeds a password for the password copy function on all printed sheets.
If an attempt is made using a device that supports the password copy function to copy a sheet that has been prepared for password copy, a password copy pattern is scanned and entry of a password is requested. Copying starts if the correct password is entered.
For details, refer to the following page.
Tips
- You can use the Password Copy function when the optional Security Kit is installed and the Password Copy function is enabled on this machine.
- The Password Copy function does not support color paper, envelopes and transparencies.