
[LDAP Search]
Overview
Search for the email address from the database in the LDAP server.
This function allows you to send to the searched address or register in this system.
This section describes LDAP Search using the LDAP server linked with the general Active Directory as an example.
The following settings are required to use this function.
- Configure the setting to use LDAP in [LDAP Setting].
- In [TCP/IP Setting], register the DNS server linked with Active Directory in this system.
- Match the date and time between this system and Active Directory in [Date/Time Setting].
- For details about [LDAP Setting], refer to [LDAP Setting].
- For details about [TCP/IP Setting], refer to [TCP/IP Setting].
- For details about [Date/Time Setting], refer to [Date/Time Setting].
Setting Procedure (Basic Search)
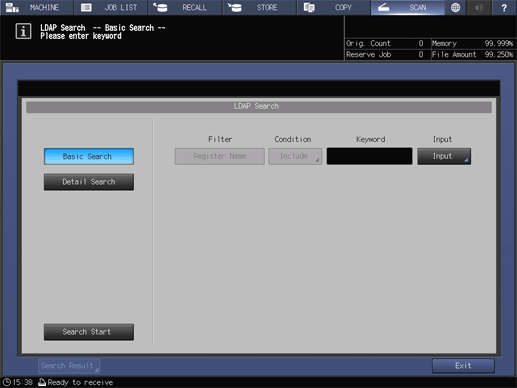

[Register Name] and [E-mail Address] can be specified using up to 256 single-byte characters (128 double-byte characters). Other filter items can be entered using up to 64 single-byte characters (32 double-byte characters).
To cancel the search, press [Cancel].
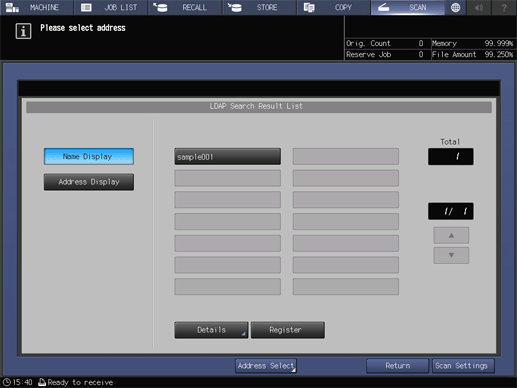
Up to 100 addresses extracted by the search are displayed. If the target address is not found, change the search character, and retry the search.
To display with an email address, press [Address Display].
To check the detailed information of the selected address, press [Details].


Pressing [Scan Settings] proceeds to the [Scan Settings] screen, enabling you to set scan conditions. For details about the scan conditions, refer to [Scan Settings].
To send data to multiple addresses, press [Address Select] to return to the [SCAN] screen.

If multiple addresses are selected, the last selected address is registered.
Check the registered contents in the search result. If there are no problems, press [Yes] on the displayed screen, and register the address.
Setting Procedure (Detail Search)


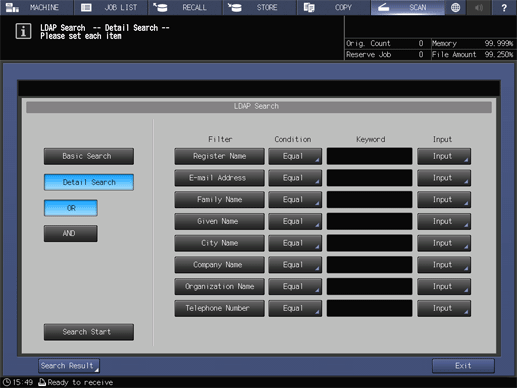
You can also combine with another search item (filter) to filter items in multiple conditions.

[Register Name] and [E-mail Address] can be specified using up to 256 single-byte characters (128 double-byte characters). Other filter items can be entered using up to 64 single-byte characters (32 double-byte characters).
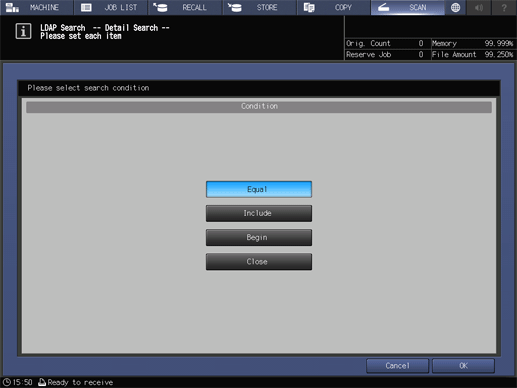
[Equal]: Data that matches the keyword
[Include]: Data that includes the keyword
[Begin]: Data beginning with the keyword
[Close]: Data ending with the keyword

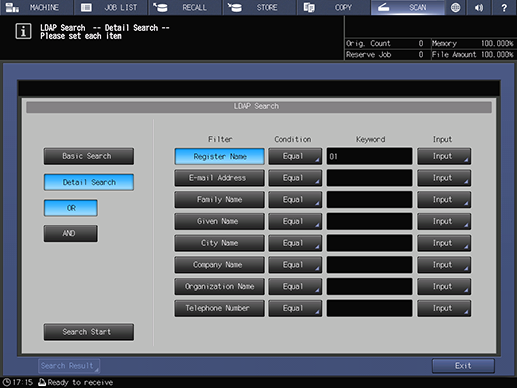

To cancel the search, press [Cancel].
If an LDAP search error occurs, press [Return] to return to the Search screen.

Up to 100 addresses extracted by the search are displayed. If the target address is not found, change the search character, and retry the search.
To display with an email address, press [Address Display].
To check the detailed information of the selected address, press [Details].


Pressing [Scan Settings] proceeds to the [Scan Settings] screen, enabling you to set scan conditions. For details about the scan conditions, refer to [Scan Settings].
To send data to multiple addresses, press [Address Select] to return to the [SCAN] screen.

If multiple addresses are selected, the last selected address is registered.
Check the registered contents in the search result. If there are no problems, press [Yes] on the displayed screen, and register the address.


 in the upper-right of a page, it turns into
  and is registered as a bookmark.