
Registering an SMB Server as a Destination
Register an SMB server. Sending scan data to an SMB server is made easy by registering the SMB server as a destination.
preconditionYou can register up to 30 SMB servers.
Follow the procedure on Registering a Destination and a Subject and a Message of E-mail to display the Scan Address Register Menu screen.
Press Address Edit.
The Scan Address Register screen is displayed.
Press SMB.
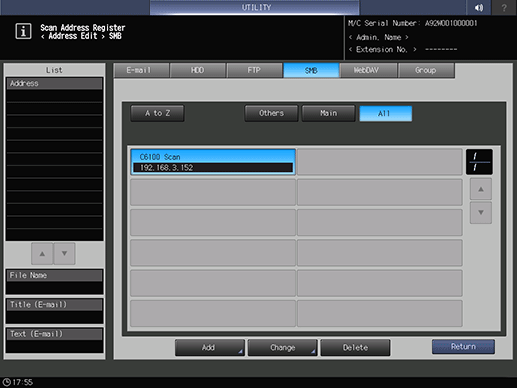
supplementary explanationAs default, the E-mail address list is displayed.
You can specify a destination tab that is displayed by default in Scan Setting.
For details, refer to [User Setting]: [Scan Setting] in User Setting or [Administrator Setting]: [Scan Setting] in Administrator Setting.
Press Add.
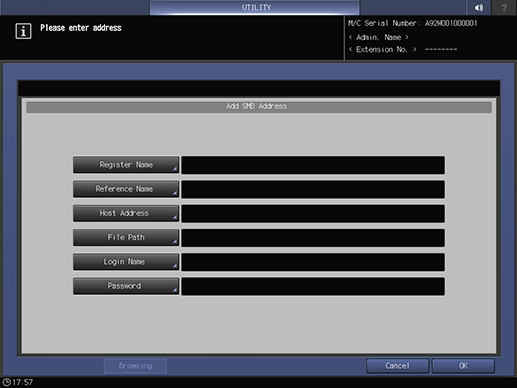
Enter information of a destination on the Add SMB Address screen. Pressing each item displays each screen to enter characters.
supplementary explanationFor details about how to enter characters, refer to Inputting Characters.
Register Name
Enter a name of the address.
If you register the name, it is displayed on the destination list.
You can enter up to 24 one-byte characters (12 two-byte characters).Reference Name
Enter text to search for a destination.
You can enter up to 24 one-byte characters (12 two-byte characters).Host Address
Enter the address of an SMB server.
You can enter up to 253 one-byte characters.File Path
Enter the file path of an SMB server.
You can enter up to 255 one-byte characters (127 two-byte characters).Enter a shared folder name or a shared folder name \a sub folder name (use "\" as a separator).
Login Name
Enter the login name for an SMB server.
You can enter up to 32 one-byte characters (16 two-byte characters).Password
Enter the password for an SMB server.
You can enter up to 32 one-byte characters.The entered password is shown by *.
Browsing
Search a destination from the browse list on the network.
Refer to Sending to an SMB Server for details.
Press OK.
Check that the registration is completed.
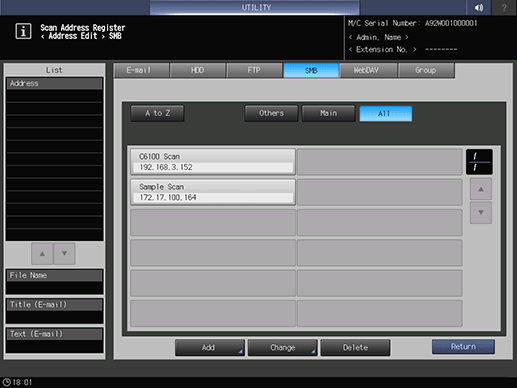
supplementary explanationIf destinations cannot be displayed on one page, press down or up to switch between pages.