
Adjusting Tone Curve for Hold Job
You can adjust the tone curve per job for the hold jobs. This is a convenient function when reprinting the job after adjusting the tone curve only. Also, you can adjust tone curves for each page (Page Tone Curve).
Tips
To use this function, Color Centro version 2.1.04000 or later needs to be installed on your computer.
Reference
For details, refer to [Tone Curve Adjustment] Screen in Color Centro.
When adjusting the tone curve by using Job Centro, the sample selection is not available.
This section describes how to adjust the tone curve of the hold job.
On the Job Centro screen, select the job for which the tone curve is adjusted from the Hold Job list.
The selected job is displayed against a dark background.
You can adjust tone curves for print jobs that are set to PS, PDF, PDF (APPE), TIFF, JPEG, or PPML as the PDL type displayed in the job list, but you cannot do so for other types of print jobs, print jobs from the PPD driver, or copy jobs.
However, by changing the setting of No. 28 in Utility/Counter - Administrator Setting - Controller - Software Switch Setting, you can also operate a PPD job.supplementary explanationWhen multiple jobs are selected, tone curves cannot be adjusted.
supplementary explanationWhen the object job is not found in the list, display the object job in the list by conducting a search or clearing the search parameters.
Click Tone Curve
 .
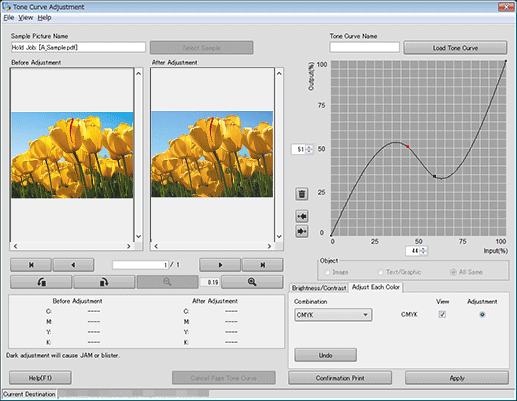
.The Tone Curve Adjustment screen is displayed.
supplementary explanationIf you select Image or Text/Graphic in the Object group box, you can adjust the tone curve to be applied to image objects and the tone curve to be applied to text objects and graphics objects respectively. (Tone curve adjustment by tag)
Selecting All Same applies the same tone curve to image and text/graphic objects
Note that if the items appear dimmed, All Same is selected.
supplementary explanationThe tone curve adjustment by tag is available only when Execute Each Tag Adj. is selected in the administrator setting of this machine.
For details about how to set Execute Each Tag Adj., refer to [Tone Curve Each Tag Setting].
supplementary explanationTo display the Tone Curve Adjustment screen, you can also select a job, and then select Tone Curve Adjustment from the right-click menu, select Hold Job - Tone Curve Adjustment from the Job Operations menu, or drag to the Tone Curve icon.
supplementary explanationTone curve cannot be adjusted in a job with custom screen settings. In such a case, use Color Centro to adjust the tone curve and apply it to the job.
supplementary explanationWhen Do Not Execute Adjustment is selected in the administrator setting of this machine, the tone curve adjustment function is not available for a job for which tone curves are applied separately to image objects and text/graphic objects.
However, if the tone curve of Text/Graphic is set to Same as image, the Tone Curve Adjustment screen opens where you can adjust the tone curve.
Adjust the tone curve.
supplementary explanationThe tone curve set for the selected job is to be adjusted.
Click Apply and apply the adjusted tone curve to the job.
supplementary explanationThe adjusted tone curve is applied only to the selected jobs. Select whether to apply the adjusted tone curve to the page currently open (Page Tone Curve) or to the whole job (Job Tone Curve).
supplementary explanationIf you apply the adjusted tone curve to the job, Use Job Tone Curve is set in Tone Curve on the Imaging screen of the print setting that is displayed in Job Edit.
supplementary explanationSelecting Job Tone Curve erases the applied page tone curves.
Select Close from the File menu and close the Tone Curve Adjustment screen.