[Append Blank Sheet] / [Insert Blank Sheet]
Overview
Insert a blank page before the selected image page, or add a blank page after the last image page.
The button display varies depending on the image page selection state.
- When no image page is selected, [Append Blank Sheet] is displayed. When an image page is selected, [Insert Blank Sheet] is displayed.
- If a blank page is inserted between the front and back pages for 2-sided printing, the job cannot be saved. In such a case, change the insertion position.
Setting Procedure (Inserting a Blank Page)
To add a blank page after the last image page, click [Append Blank Sheet] without selecting an image page.

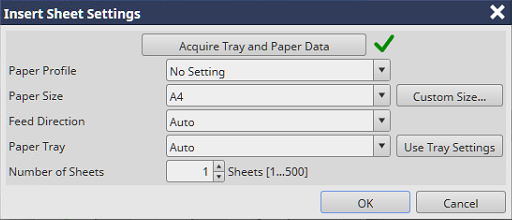
Click [Acquire Tray and Paper Data] to acquire the information about the paper tray and paper of this system. When information is acquired, "
 " is displayed in the right side. If information acquirement fails, "
 " is displayed.
In [Paper Profile], select the paper profile registered in this system.
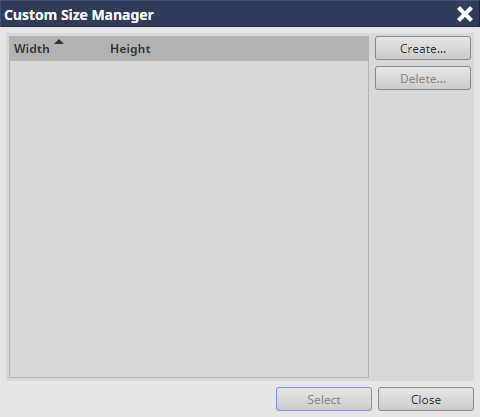
In [Paper Size], select the paper size. Click [Custom Size...] to acquire the information about the paper tray and paper of this system. The [Custom Size Manager] screen is displayed, enabling you to set the desired size.
In [Feed Direction], select the feed direction.
In [Paper Tray], select a paper tray to use. Click [Use Tray Settings] to apply the setting of the selected paper tray to [Paper Size] and [Feed Direction].
In [Number of Sheets], enter the number of sheets to be inserted. You can enter 1 to 500 sheets (250 sheets for the bypass tray).

Setting Procedure (Registering the Custom Size From [Custom Size...])
The [Insert Sheet Settings] screen is displayed.
The [Custom Size Manager] screen is displayed.

The [Custom Size Settings] screen is displayed.


Enter the numeric value in the setting range displayed on the screen.
Some paper sizes cannot be set depending on the optional paper feeder that is mounted on the system. For details about the available sizes, refer to Optional Part Names and Specifications for Paper Feed, or contact your service representative.
The custom size display unit can be changed.

The custom size is registered.
The registered custom size can be selected in the [Paper Size].
The custom size registered in this item is common to [Paper Size] of the [General] screen.

 in the upper-right of a page, it turns into
  and is registered as a bookmark.