
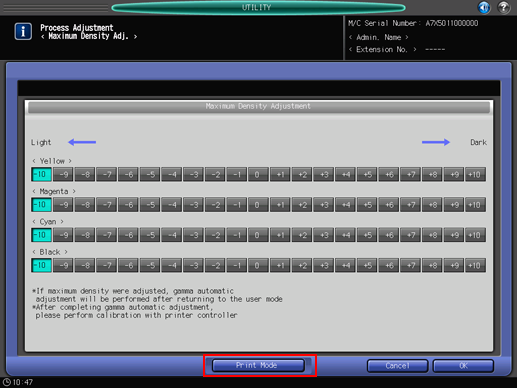
Maximum Density Adjustment: Adjusting the Maximum Density for Y, M, C, and K
Adjust the maximum density for each of Y, M, C, and K.
Adjustment Range: -10 (Light) to +10 (Dark) for each of <Yellow>, <Magenta>, <Cyan>, and <Black>
The machine will carry out the Gamma Automatic Adjustment after you change the maximum density. When the Gamma Automatic Adjustment is completed, proceed to the calibration with the Image controller.
For details, refer to Maximum Density Adjustment (Regular Adjustment Flow (High Accuracy)).
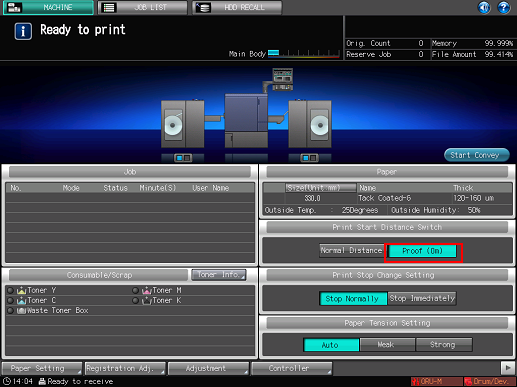
Press [Proof (0m)] for [Print Start Distance Switch] on the [MACHINE] screen on the touch panel of the main body.
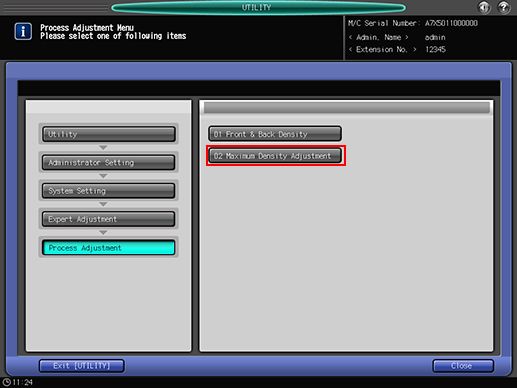
Follow the procedure on Administrator Setting to display the [Administrator Setting Menu] screen.
Press [System Setting] on the [Administrator Setting Menu] screen, and then press [Expert Adjustment], [Process Adjustment], and [Maximum Density Adjustment] in sequence.
Press [Print Mode].
Press Start on the control panel.
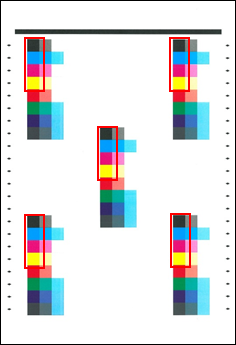
Chart printing is executed.

To print a test chart, press Stop Immediately on the [MACHINE] screen on the [touch panel] of the main body. It allows you to view the test chart near the delivering section.
Cut out a printed test chart from the media core of Roll Winder RW-201.
When cut out the printed chart, refer to Cutting the output paper and be careful not to injure your hands or fingers.
Use a colorimeter and measure four colors (BK, C, M, Y) of the five color samples in the red-boxed area respectively and calculate the average of each color.
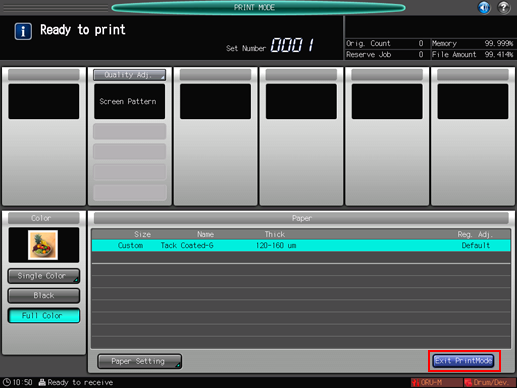
Press [Exit PrintMode].
The screen returns to the [Maximum Density Adjustment] screen.
Compare the average values calculated from the printed chart and the target values.
According to the result, select the desired density value for <Yellow>, <Magenta>, <Cyan>, and <Black>, respectively.
Repeat steps 4 to 9 as needed.
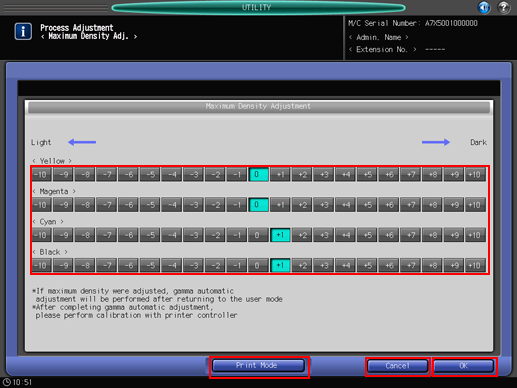
Press [OK] to complete the setting.
To cancel the change, press [Cancel]. In either case, the screen returns to the [Process Adjustment Menu] screen.
When you are ready to print all the pages of a job, be sure to set [Normal Distance] for [Print Start Distance Switch] before printing all the pages.