
Paper Setting: Registering the Paper Conditions
Register the frequently used paper setting as a paper profile. You can make paper settings by calling the paper profile.
This section describes how to select a paper size and register the paper profile.

You can also register paper profiles using [Reg./Del. Paper Set.] on the [MACHINE] screen. For details, refer to Paper Setting.
For details about the paper setting, how to register the currently used paper setting as a paper profile, and how to call a paper profile, refer to Paper Setting.
Paper setting consists of the following 5 conditions that can be specified as desired.
Setting item | Description | Setting options |
|---|---|---|
Paper Type | The following seven paper types are provided according to the plainness of paper. | Plain, Tack Plain, Tack Coated-G, Tack Coated-M, Tack PP(Synthetic Paper), Tack PP Film, Tack PET Film |
Profile Name | Enter the desired paper profile name. | You can enter up to 50 one-byte characters (25 two-byte characters). |
Thickness (weight) | Select one from the options provided on the screen according to the paper type. If [Weight] is set in [Weight Thickness Switch Set.], [Weight] and units for weight are displayed. Available paper thickness (weight) settings vary by paper type. | Thickness Set. (Plain): 90-110 μm 111-130 μm 131-160 μm 161-210 μm Thickness Set. (Tack): 120-160 μm 161-195 μm 196-250 μm Speed Setting: High, Middle, Low, Auto Change Weight Setting: 81-91g/m2 / 22-24 lb Bond 92-105g/m2 / 25-28 lb Bond 106-135g/m2 / 29-36 lb Bond 136-176g/m2 / 37-47 lb Bond 177-216g/m2 / 48-57 lb Bond 217-256g/m2 / 58-68 lb Bond Change Unit: g/m2, Duodecimo-Kg, Octavo-Kg, lb Bond, lb Index, lb Cover |
Registration Adj. | Adjust the print position (Zoom and Image Shift). | Zoom: For Vertical, -1.00 to 1.00 (1 step = 0.01%); for Horizontal, -1.00 to 1.00 (1 step = 0.01%) Image Shift: For Up/Down, -10.0 to +10.0 (1 step = 0.1 mm) |
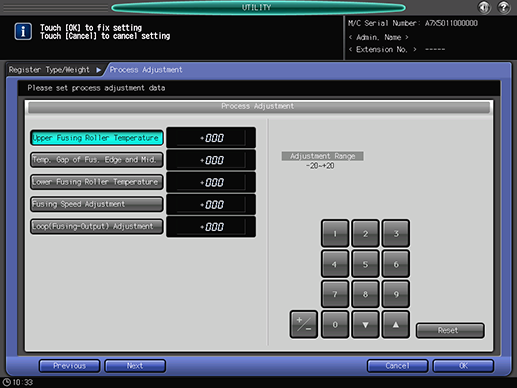
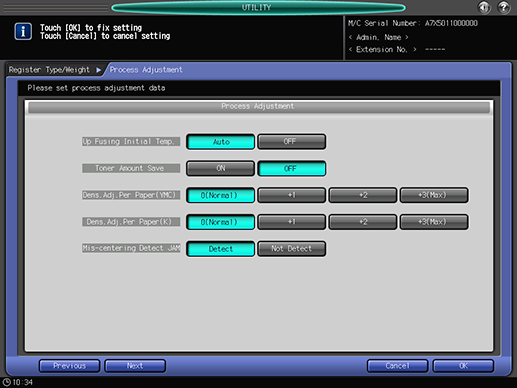
Process Adjustment | Process adjustment of transfer/separation/fusing and Up Fusing Initial Temp., Toner Amount Save, Dens. Adj. Per Paper (YMC), Dens. Adj. Per Paper (K), Mis-centering Detect JAM, Thick BK Mode, Fusing Air Separation Air Level Setting, Change Fusing Pressure can be adjusted. For details about the Mis-centering Detect JAM, refer to Print Job JAM Setting: Setting the Detection of Paper Jam Caused by Misalignment. [Process Adjustment] is not displayed by default. Contact your service representative. | 2nd Transfer Output Adj.: -50 to +50 Separation AC: -600 to +600 Separation DC: -60 to +60 Upper Fusing Roller Temperature: -20 to +20 Temp. Gap of Fus. Edge and Mid.: -10 to +10 Lower Fusing Roller Temperature: -15 to +10 Fusing Speed Adjustment: -200 to +200 Loop (Fusing-Output) Adjustment: -20 to +20 Up Fusing Initial Temp.: Auto, OFF Toner Amount Save: ON, OFF Dens. Adj. Per Paper (YMC): 0 (Normal), +1, +2, +3 (Max.) Dens. Adj. Per Paper (K): 0 (Normal), +1, +2, +3 (Max.) Mis-centering Detect JAM: Detect, Not Detect Thick BK Mode: ON, OFF Fusing Air Separation Air Level Setting: 1 (Weak) to 7 (Strong), Auto (3) Change Fusing Pressure: Auto, Normal, Weak |
Paper Type Descriptions
Paper name | Description |
|---|---|
Plain | The plain paper is usually not recycled paper. Thickness can be set from 90 μm to 210 μm (81 g/m2 to 176 g/m2 / 22 lb Bond to 47 lb Bond for weight). |
Tack plain | The tack plain paper is non-coated tack paper. Thickness can be set from 120 μm to 250 μm (136 g/m2 to 256 g/m2 / 37 lb Bond to 68 lb Bond for weight). |
Tack coated-G | Glossy paper. Thickness can be set from 120 μm to 250 μm (136 g/m2 to 256 g/m2 / 37 lb Bond to 68 lb Bond for weight). |
Tack coated-M | Matte paper. Thickness can be set from 120 μm to 250 μm (136 g/m2 to 256 g/m2 / 37 lb Bond to 68 lb Bond for weight). |
Tack PP (synthetic paper) | The tack PP has advantages of both paper and film such as the quality to last long, resist water and chemical. Thickness can be set from 120 μm to 160 μm (136 g/m2 to 176 g/m2 / 37 lb Bond to 47 lb Bond for weight). |
Tack PP Film | Tack PP Film. Thickness can be set from 120 μm to 160 μm (136 g/m2 to 176 g/m2 / 37 lb Bond to 47 lb Bond for weight). |
Tack PET Film | Tack paper made of PET Film. Thickness can be set from 120 μm to 195 μm (136 g/m2 to 216 g/m2 / 37 lb Bond to 57 lb Bond for weight). |
Adding/Editing the Paper Conditions Registration
Follow the procedure on User Setting to display the [User Setting Menu] screen.
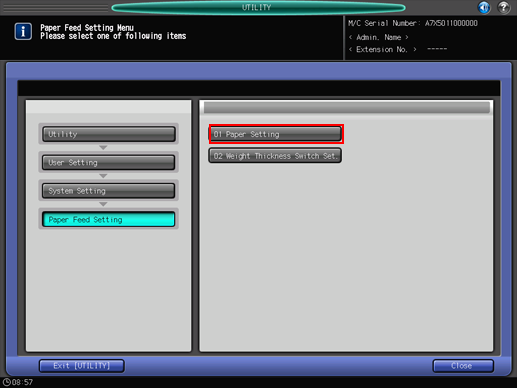
Press [System Setting] on the [User Setting Menu] screen, and then press [Paper Feed Setting] and [Paper Setting] in sequence.

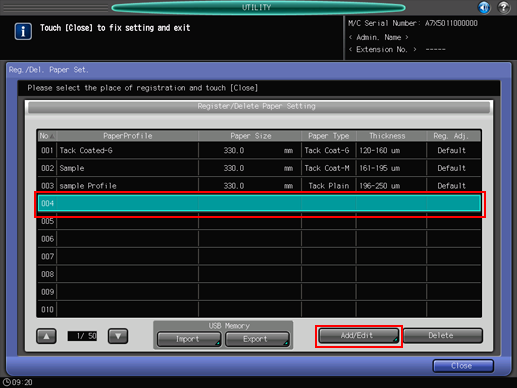
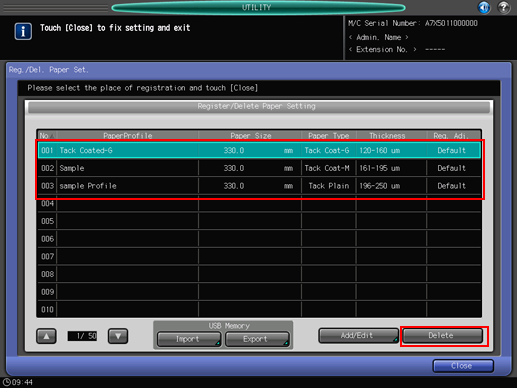
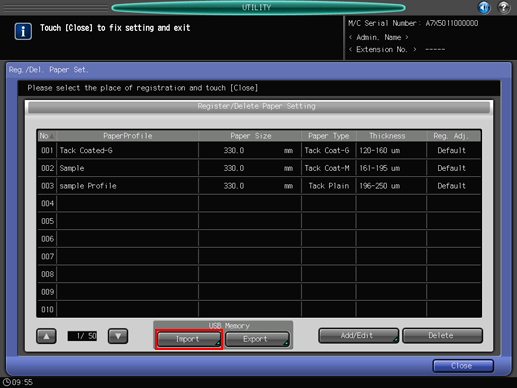
The [Register/Delete Paper Setting] screen is displayed.
Select the destination to register paper conditions.
Select the row of the destination and press [Add/Edit].
To edit the paper conditions previously registered, select that row.
The [Register Type/Weight] screen is displayed.
Select one of the buttons under [Paper Type].
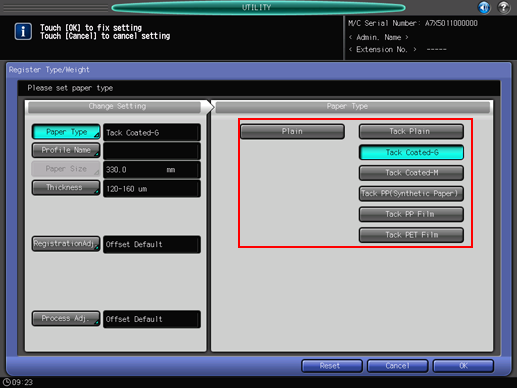
Press [OK].
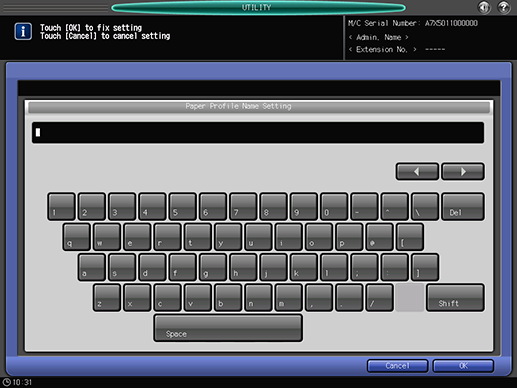
Enter the desired paper profile name. You can enter up to 50 one-byte characters (25 two-byte characters).
Press [OK].
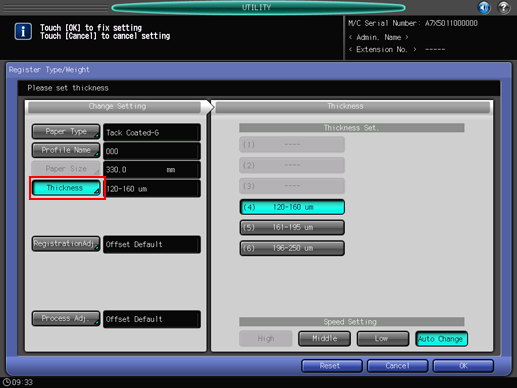
Press [Thickness] or [Weight].
The [Thickness] or [Weight] screen is displayed. Some settings cannot be selected depending on the paper type. Select a desired button under [Thickness Set.] or [Weight Setting].
If [Weight] is set in [Weight Thickness Switch Set.], select a weight unit button under [Change Unit] The screen displays the paper weight in the selected unit.
Process speed can be selected from the keys under [Speed Setting]. Some speed settings cannot be selected depending on the paper type and thickness (weight). Select the desired button.
Press [Registration Adj.].
Select an item you want to adjust from [Zoom] or [Image Shift], and press the touch panel keypad, [
 ], [
], [ ], or the keypad on the control panel to enter values.
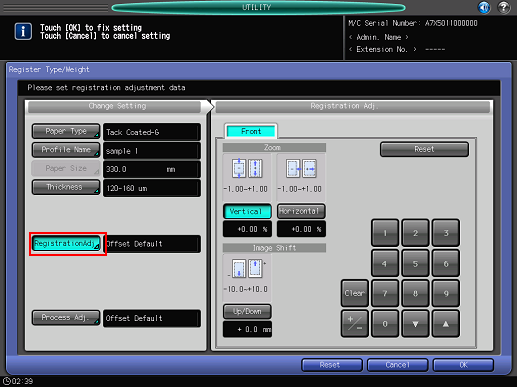
For details about Registration Adj., refer to Registration Adj..
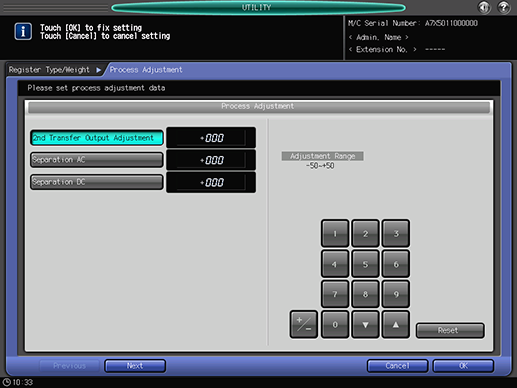
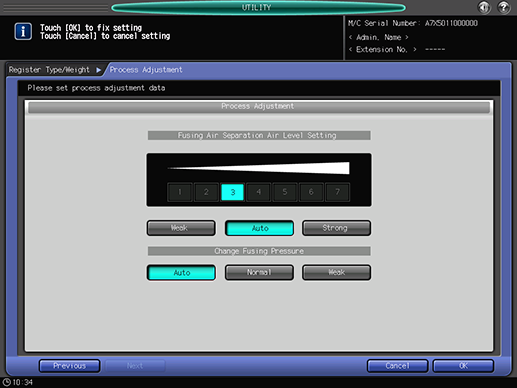
Press [Process Adj.].

Process Adjustment is not displayed by default. If you wish to use the Process Adjustment function in paper setting, contact your service representative.
For [Loop (Fusing-Output) Adjustment] displayed by pressing [Next] on the screen where [2nd Transfer Output Adj.] is displayed, select an item you want to adjust and press the touch panel keypad, [
], [], or the keypad on the control panel to enter values.
Press [+/-] to specify the value to be positive or negative.
Press [Next] to display the setting screen.
Make settings for the following items.
[Up Fusing Initial Temp.], [Toner Amount Save], [Dens. Adj. Per Paper (YMC)], [Dens. Adj. Per Paper (K)], [Mis-centering Detect JAM], [Thick BK Mode], [Fusing Air Separation Air Level Setting], [Change Fusing Pressure]
Press [OK] to complete the setting. To cancel the change, press [Cancel]. In either case, the screen returns to the [Register Type/Weight] screen.

Press [OK] on the [Register Type/Weight] screen. The screen returns to the [Reg./Del. Paper Set] screen.
Press [Close] to return to the [Paper Feed Setting Menu] screen.
Deleting the Paper Conditions
Follow the procedure on User Setting to display the [User Setting Menu] screen.
Press [System Setting] on the [User Setting Menu] screen, and then press [Paper Feed Setting] and [Paper Setting] in sequence.

The [Register/Delete Paper Setting] screen is displayed.
Select the row to be deleted from the list of paper conditions, then press [Delete].
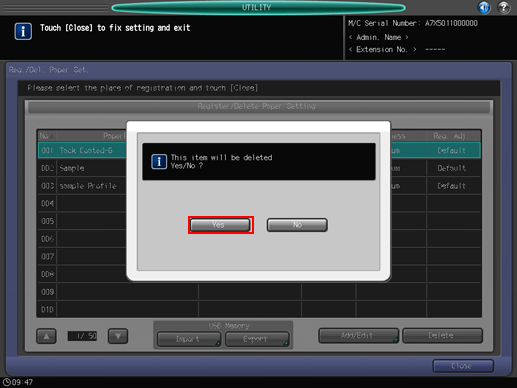
Press [Yes] on the confirmation dialog.
Or, press [No] to cancel.
Press [Close] to return to the [Paper Feed Setting Menu] screen.
USB Import/Export Function for Paper Setting
The USB Import/Export function saves the paper setting data registered on this machine to USB flash drive and registers the data to another machine of the same model. To import or export paper setting data, you need to connect USB flash drive to a USB port previously. The number of USB flash drive that can be connected is one.
When using the importing [All] option, all the data of paper setting stored on the USB flash drive is imported and the data registered on the machine is overwritten.
When using the importing [individual] option, the paper setting data you select is imported and the data is newly stored or overwritten on the machine. With the [New Store] option, up to 500 data, together with the number of the data that has already been registered on the machine, can be imported. (The remaining data after reduction of the registered data from 500 can be imported.) With the [Overwrite] option, up to 500 data can be imported.
The export function saves the entire paper setting data of a machine to a USB flash drive.
Importing Paper Setting Data
Follow the procedure on User Setting to display the [User Setting Menu] screen.
Press [System Setting] on the [User Setting Menu] screen, and then press [Paper Feed Setting] and [Paper Setting] in sequence.
The [Register/Delete Paper Setting] screen is displayed.
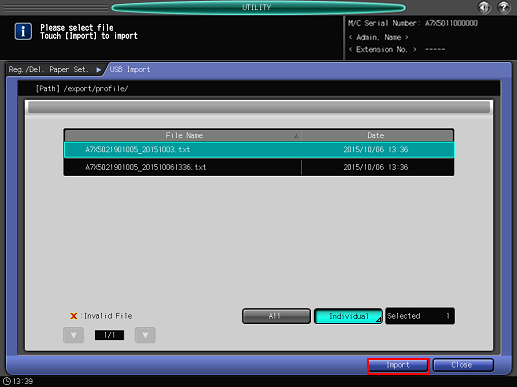
Press [Import].
The [USB Import] screen is displayed.
Select the data to import, then press [All] or [Individual].
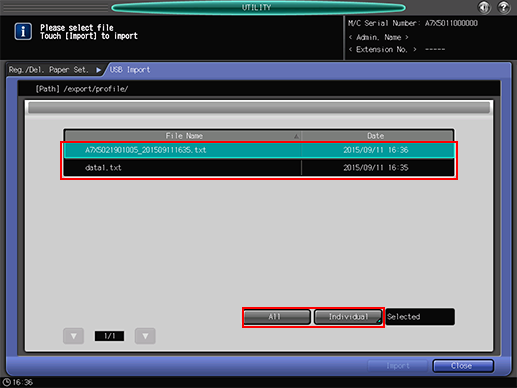
When pressing [All], go to step 5.
When pressing [Individual], go to step 6.
 mark is displayed on the left side of the file name of the data which cannot be imported.
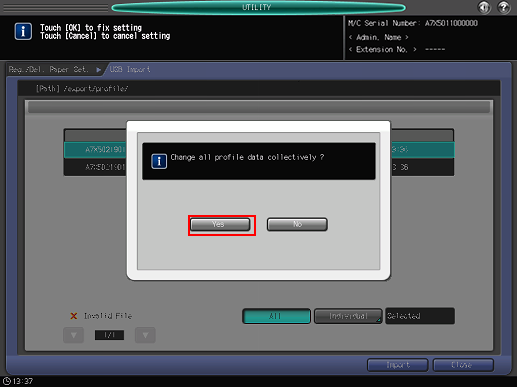
Press [Import] to change all data.
The confirmation dialog is displayed. Press [Yes] to confirm. To cancel, press [No].
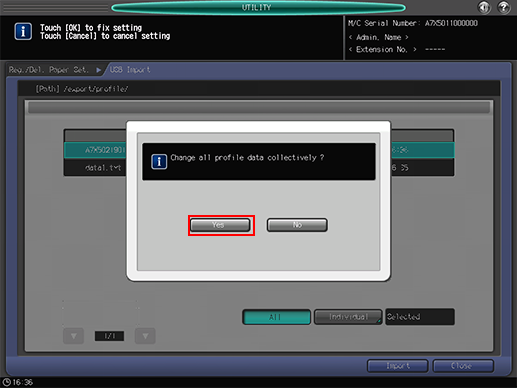
In each case, the screen returns to the [Register/Delete Paper Setting] screen.
When the [Individual] screen is displayed, select paper setting data to import.
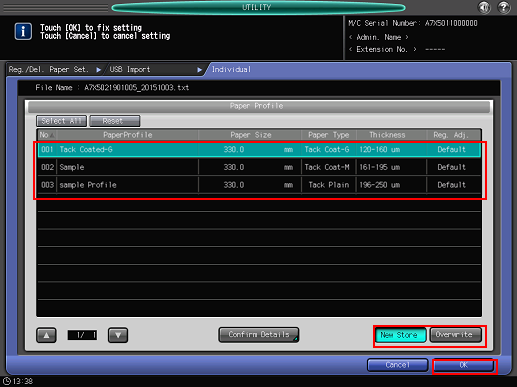
To select all data, press [Select All]. To cancel selecting all data, press [Reset].
To display details of the selected data, press [Confirm Details].
Select [New Store] or [Overwrite].
With New Store, the data is imported to the blank number of paper setting on the machine.
With Overwrite, the data is imported to the same number of paper setting on the machine.
Press [OK].
The screen returns to the [USB Import] screen.
Press [Import].
The confirmation dialog is displayed.
Press [Yes] to confirm. To cancel, press [No] (The confirmation dialog varies depending on whether to select [New Store] or [Overwrite]. The following shows an example of the screen for [New Store]).
In each case, the screen returns to the [Register/Delete Paper Setting] screen.
Exporting Paper Setting Data
Follow the procedure on User Setting to display the [User Setting Menu] screen.
Press [System Setting] on the [User Setting Menu] screen, and then press [Paper Feed Setting] and [Paper Setting] in sequence.

The [Register/Delete Paper Setting] screen is displayed.
Press [Export].

The screen for entering the file name of the exported paper setting data is displayed.
Enter the file name, and then press [OK].
The default file name is displayed in the following order.
machine number (13-digit)_year (4-digit) month (2-digit) day (2-digit) hour (2-digit) minute (2-digit)
Up to 60 one-byte characters can be entered for the file name.
When not changing the file name, press [OK] without entering any characters.
