
[MACHINE] Screen (touch panel of the machine)
The [MACHINE] screen allows you to display various types of information about the machine and change settings.
Components of the [MACHINE] Screen
This section describes the [MACHINE] Screen.
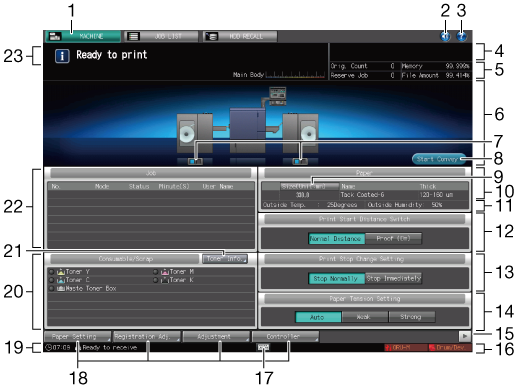
No. | Name | Description |
|---|---|---|
1 | [MACHINE] tab | Displays the [MACHINE] screen. |
2 | Info. Sound/Voice ON/OFF | Turns ON or OFF all information sounds or voices. |
3 | Help | Displays the help message which provides information about the screen currently displayed. Depending on the screen, When the [MACHINE] screen is displayed, the instructions for supplying toner and replacing the waste toner box are indicated. |
4 | Output information indicator | Displays the print count, set count, and job number of the current job while printing. |
5 | Machine management information indicator | Displays the number of reserved job, remaining memory amount, original count, and file system amount. |
6 | Machine configuration display | Displays the configuration of main body and options. |
7 | Roll Winder RW-101/Roll Winder RW-201 Status LEDs | Displays the status of Roll Winder RW-101 and Roll Winder RW-201. When the Roll Winders are online, they light in blue and they light in red when Roll Winders are offline. |
8 | [Start Convey] / [Stop Convey] | Press when conveying the media. |
9 | [Size] / [Size (Unit:mm)] | Switches the custom size indication between [Custom] and actual dimensions in millimeters/inches. The sizes are displayed in millimeters by default. Switching between millimeters and inches can be made from the [UTILITY] screen. For details, refer to Unit Setting: Selecting the Unit for Values. |
10 | Paper Information indicator | Displays paper size, name, and thickness (weight). For details, refer to Paper Setting. The [Thickness] (μm) is displayed by default. Switching between [Thickness] (μm) and [Weight] (g/m2) can be made on the [Weight Thickness Switch Set.] screen of [UTILITY]. For details, refer to Weight Thickness Switch Set.. |
11 | [Outside Temp.] and [Outside Humidity] | Displays outside temperature and outside humidity that are detected with the temperature and humidity sensor mounted on the machine. |
12 | Print Start Distance Setting | Switches between [Normal Distance] and [Proof (0m)]. [Normal Distance]: A length of the media which is set in Print Start Distance Setting: Specify the Print Start Distance is conveyed before printing starts. [Proof (0m)]: This setting helps reduce the amount of paper conveyed before printing starts and cut media consumption. |
13 | Print Stop Change Setting | Switches between [Stop Normally] and [Stop Immediately]. [Stop Normally]: Printed image stops after being wound on Roll Winder RW-201. [Stop Immediately]: Printed image stops near the delivering section, which allows you to check the printing status. |
14 | Paper Tension Setting indicator | Switch the paper tension between [Auto], [Weak], and [Strong]. |
15 | Machine function keys switch | Switches the display of the machine function keys. |
16 | Machine status indicator/right | Displays [Toner], [PM Call], [Drum/Dev.], [ORU-M], [Rotation]. Up to 4 indicators can be displayed in large size. When 5 or more indicators are displayed, small icons without texts will substitute for the indicators from the 5th and onward. The maximum number of items displayed is a total of 7, including 3 normal-size icons and 4 small-size icons. [Fuser A] and [Fuser B] may be displayed depending on the settings. For details, contact your service representative. |
17 | Soft-hard key icon | When using Real-time Remote Panel, hard keys of the control panel can be displayed on a computer screen and on the touch panel. Press any part of the black bar with this icon displayed. It does not function in other cases. When you move to another screen from the screen with hard keys displayed, the hard key display disappears. For details, refer to Remotely Controlling Machine (Remote Panel). |
18 | Machine function keys display area | Paper Setting: Press to set the paper settings. Registration Adj.: Press to adjust magnification and print position. Adjustment: Press to set the machine configuration and print adjustment. Controller: Configures the controller. Reg./Del. PaperSet.: Press to registering or delete paper settings. |
19 | Machine status indicator/left | Displays the current time or the status of the image controller. |
20 | Consumable and Scrap Indicators area | Displays the current status of toner supply. Also, it notifies via a red indicator when the waste toner box is full. The number of replacements of the toner bottle can be counted. For details, contact your service representative. |
21 | Toner Info. | Displays the current status of toner supply. |
22 | Job display area | Displays the current status of the jobs to be operated on the machine. When there are any incomplete jobs, the [Incomp. History] key is displayed. |
23 | Message area | Displays messages concerning the current status of the machine or operation currently required. |
 may be shaded and no help message can be displayed.
Setting on the [MACHINE] Screen
The following keys are provided at the bottom of the [MACHINE] screen: [Paper Setting], [Registration Adj.], [Adjustment], [Controller][Reg./Del. Paper Set.].
Press the display switching key to display hidden function keys.
You can customize the machine function keys to display pressing [System Setting] on the [Administrator Setting Menu] screen, and then pressing [Operation Screen Customize] and [Machine Function Key Setting] in sequence.
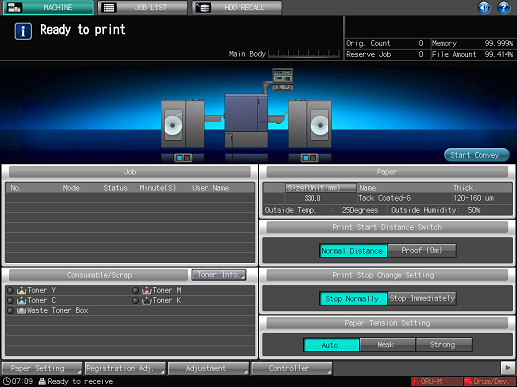
For detailed information about the displayed screens and settings when each key is pressed, refer to the following descriptions.