
User Registration
Click [User Registration] on the menu of [Security] tab to display this screen.
When [General Settings] (User Authentication) is set to [OFF], the following screen is displayed.

Click [User Authentication/Account Track Menu] to display the User Auth/Account Track screen. For user registration, [General Settings] must be set to either [ON (MFP)] or [ON (External Serv)].
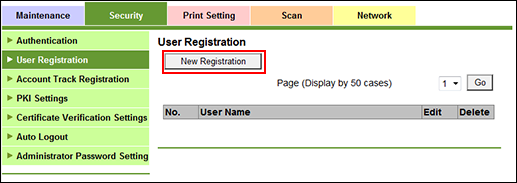
You can register or delete a user for user authentication.
User registration
Click [New Registration] to register a new user, or click [Edit] for a desired user name to edit the data already registered.
When [General Settings] is set to [ON (External Serv)], [New Registration] is unavailable.
To display the registration list of the selected range, select a range of numbers from the [Page (Display by 50 cases)] drop-down list, and click [Go].
Enter the registration number.
The available range is 1 to 1000.
If you are editing, the registration number for the selected user name is displayed. You cannot enter the value.
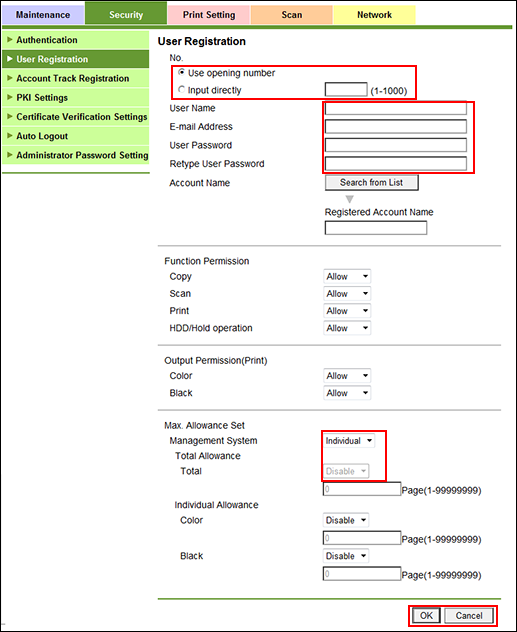
Enter the user name.
You can enter up to 64 one-byte characters (32 two-byte characters).
When [General Settings] is set to [ON (External Serv)], this item is dimmed. The name of the external authentication server is also displayed underneath.
Enter the E-mail address.
You can enter up to 320 alphanumeric characters and symbols.
When [General Settings] is set to [ON (External Serv)], this item is dimmed.
Enter the user password.
Up to 64 one-byte characters can be used. Enter the same password for [Retype User Password].
When [General Settings] is set to [ON (External Serv)], any item relevant to user password is not displayed.
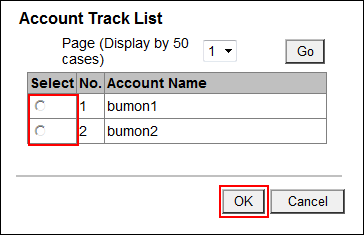
Specify an account name for the user.
Click [Search from List]. Click the radio button of an account name, and click [OK].
When [Synchronize User Authentication & Account Track] is set to [Not Synchronize], it is not displayed.
Set the functions to be available and the maximum value allowed for printing for the registered user.
If the machine is not mounted with Paper Feeder Unit PF-708, Copy and Scan settings are not displayed.
Maximum must be specified after selecting [Enable] from the [Max. Allowance Set] drop-down menu.
Click [OK]. Clicking [Cancel] cancels the setting.
Click [OK] on the setting complete screen.
To delete a user
Click [Delete] for a user to be deleted.
Click [OK] on the confirmation screen. Click [Cancel] to cancel the deletion.
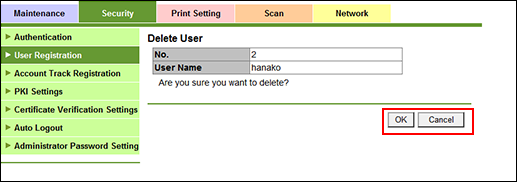
Click [OK] on the setting complete screen.