Sending to an Unregistered WebDAV Server
Procedure

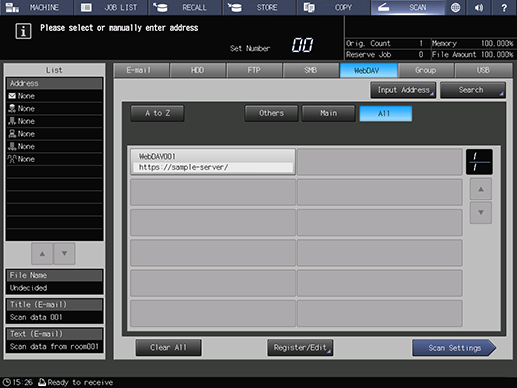
You can select destinations by pressing the register name from the destination list. For details about selecting a registered destination, refer to Sending to a Registered WebDAV Server.


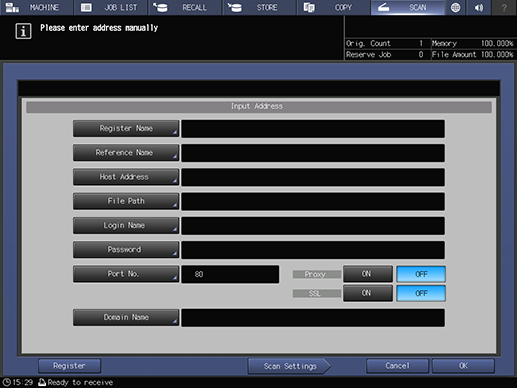
[Register Name]: Enter the destination name. The registered name is displayed in the destination list. Up to 24 single-byte characters (12 double-byte characters) can be entered.
[Reference Name]: The same name as the register name is entered automatically. The text used to search for the destination. If you want to change it, up to 24 single-byte characters (12 double-byte characters) can be entered.
[Host Address]: Enter the address of the WebDAV server. Up to 253 single-byte characters can be entered.
[File Path]: Enter the file path of the WebDAV server. Up to 142 single-byte characters (71 double-byte characters) can be entered.
[Login Name]: Enter the account name of the WebDAV server. Up to 64 single-byte characters (32 double-byte characters) can be entered.
[Password]: Enter the password of the WebDAV server. Up to 32 single-byte characters can be entered. The entered password is shown by "*".
[Port No.]: Enter the port number used for the WebDAV server using a 5-digit number (00001 to 65535). In general use, the default setting does not need to be changed.
[Domain Name]: Enter the domain name of the WebDAV server. The name can be specified using up to 64 single-byte characters.
For details about how to enter characters, refer to Entering Text.

[Proxy]: Configure a setting to use a proxy server. If the destination is an external server, select [ON]. To use the server, be sure to set [WebDAV Client Settings] to [ON]. For details, refer to [WebDAV Client Settings].
[SSL]: Configure a setting to use SSL. If the destination is an external server, select [ON].
You can register up to 30 WebDAV destinations. For details about registering a destination, refer to [Scan Address Register].
The [Scan Settings] screen is displayed.
 in the upper-right of a page, it turns into
  and is registered as a bookmark.