
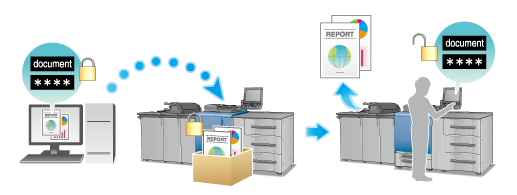
Secure Print: Prints data with a password.
About Secure Print
The Secure Print function saves a print job in the Secure Job box of the machine and users need to enter passwords on the touch panel to output the job. This function is very useful for printing confidential documents.
The Secure Print function can be specified using the printer driver when printing, and printing can be performed from the touch panel.
In order to prevent information leakage, you can restrict printing done on this machine to secure printing only.
Reference
For details about setting the printer driver, refer to [Print Setting] Screen.
Tips
You can also print a secure job using Job Centro. For details, refer to Overview of Job Management with HDD.
Performing Secure Print (PS Plug-in Driver)
Output Method: Secure Print
The Windows 7 screen is used for explanation purposes.
Click the Workflow tab.
Select Secure Print from the Output Method pull-down menu.
At this time, Normal is automatically selected for Print Mode.

Enter the Secure Print ID and Password. To specify the password, type Password, then enter the same password in Reenter.
supplementary explanationPassword: 1 to 8 one-byte characters
Click OK to make prints.
Recalling a job using the control panel
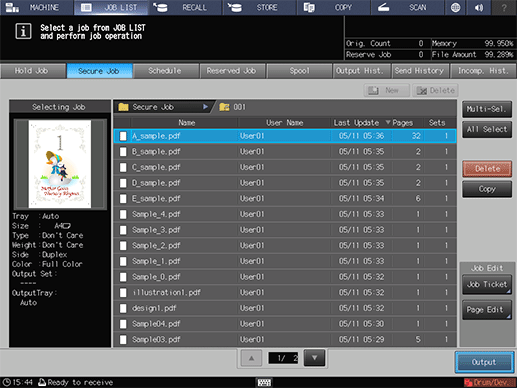
A Secure Print job is saved in Secure Job in the JOB LIST tab.
For the Secure Print job, the Secure Print ID specified on the printer driver for printing is displayed as name.
Reference
For details about the functions of each key on the touch panel, refer to Basic Operations.
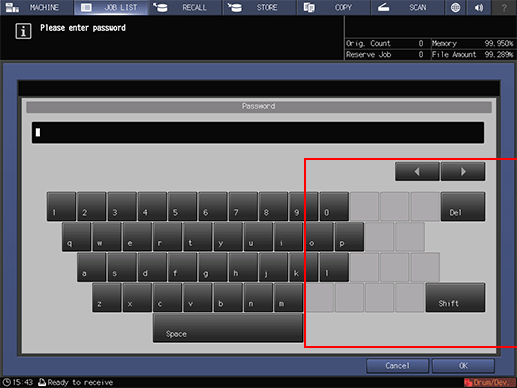
On the touch panel, press JOB LIST and then press Secure Job.
Select the name that has the Secure Print ID specified on the printer driver for printing.
Enter a set password in Secure Print, and then press OK.
The print jobs in the User Box are displayed.
Select a print job, then click Output.
A dialog is displayed to specify the output method and number of copies.
Select the desired one from Normal, Proof, Proof(1st), and Wait, enter the number of copies using the keypad on the control panel, then press OK.

When print-out processing is completed, the print job is deleted from the User Box.

Reference
For details about job editing functions on the JOB LIST screen, such as HDD Store, refer to [Secure Job] Screen.