
Package Color Auto Adj.
Package Color Auto Adj.
Automatically adjust colors collectively. This menu item is to be displayed on the machine mounted with Integrated Color Care Unit IQ-501. Package Color Auto Adj. provides two methods: manual and automatic selection of adjustment items. If necessary, you can configure a setting so that Package Color Auto Adj. is performed when the machine starts.
Manually selecting adjustment items
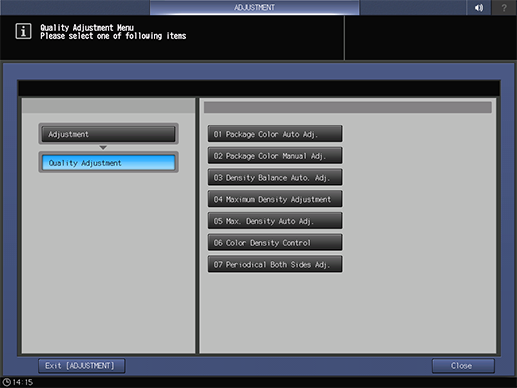
Press Adjustment on the MACHINE screen to display the Adjustment Menu screen.
Press Quality Adjustment and Package Color Auto Adj. in sequence.
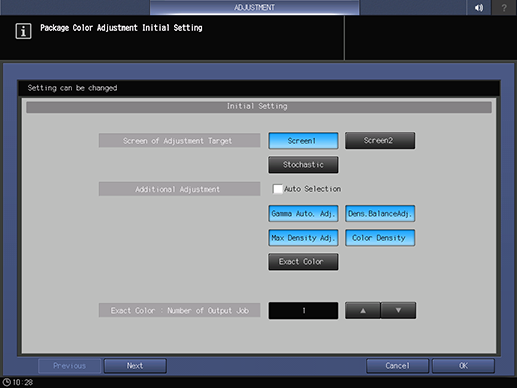
Before making adjustments, you can press Initial Set. to change adjustment settings as needed.
Change any setting (Screen of Adjustment Target, Additional Adjustment, Exact Color : Number of Output Job (or G7 Calibration : Number of Output Job), Maximum Density Adjustment Tray, Adjustment Tray, Auto Run, or Overwrite Tray Set. of Max.DensityAdj.).

supplementary explanationYou can press Previous or Next to move the page.
supplementary explanationIf Auto Run is set to ON, Package Color Auto Adj. is automatically performed to suit the machine status when the machine is turned on.
supplementary explanationLoad paper into the trays selected in Maximum Density Adjustment Tray and Adjustment Tray. Also, in the tray specified in Maximum Density Adjustment Tray, load paper used to register the Target Density.
supplementary explanationIf ON is selected in Overwrite Tray Set. of Max.DensityAdj., the paper type and weight of the tray to be used for Maximum Density Adjustment are changed to the target value setting of Maximum Density.
supplementary explanationWhen Exact Color or G7 is selected, specify the number of adjustment times in Number of Exact Color : Number of Output Job or G7 Calibration : Number of Output Job. Multiple sheet charts are output at one time, so when specifying many adjustment times, load a sufficient amount of paper into the tray.
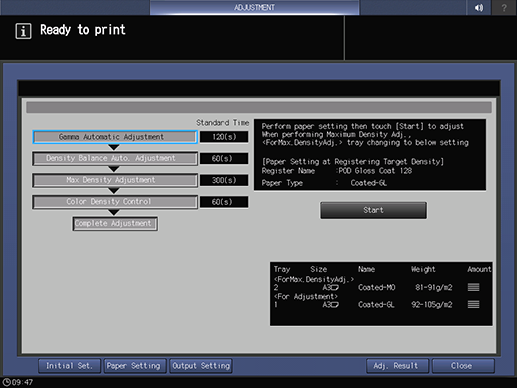
Press Start.

When the adjustment is completed, the adjustment result is displayed.

Tips
When Auto Run is selected, Package Color Auto Adj. is performed once a day.
If the controller calibration is G7, the setting item G7 Report is added to the Package Color Adjustment Initial Setting screen. When it is set to ON, the G7 report is output.
If Use Color Density Control is set to OFF in Color Density Control - Basic Setting, this option is not included in the adjustment items.
Automatically selecting adjustment items
Press Adjustment on the MACHINE screen to display the Adjustment Menu screen.
Press Quality Adjustment and Package Color Auto Adj. in sequence.
Before making adjustments, you can press Initial Set. to change adjustment settings as needed.
Select the Auto Selection check box in Additional Adjustment.
supplementary explanationPerform Image Diagnosis in Auto Selection, and adjust the executable items, excluding controller calibration such as Exact Color and G7.
supplementary explanationTo perform Auto Selection, select Basic Setting of Color Density Control, and set Use Color Density Control to ON. Also, in the tray specified in Maximum Density Adjustment Tray, load paper used to register the Target Density.
supplementary explanationTo perform Auto Selection, set Screen1 or Screen2 in Custom Screen to Dot190. For details about Custom Screen setting, refer to Custom Screen.
Change any setting (Screen of Adjustment Target, Additional Adjustment, Exact Color : Number of Output Job (or G7 Calibration : Number of Output Job), Maximum Density Adjustment Tray, Adjustment Tray, Auto Run, or Overwrite Tray Set. of Max.DensityAdj.).

supplementary explanationIf Auto Run is set to ON, Package Color Auto Adj is automatically performed when the machine is turned on.
supplementary explanationLoad paper into the trays selected in Maximum Density Adjustment Tray and Adjustment Tray.
supplementary explanationWhen you select the Auto Selection check box, use paper of Maximum Density Adjustment Tray. Load the paper that is used to register Target Density (lengthwise (X): 420.0 mm to 487.7 mm, widthwise (Y): 279.4 mm or more).
supplementary explanationIf ON is selected in Overwrite Tray Set. of Max.DensityAdj., the paper type and weight of the tray to be used for Maximum Density Adjustment are changed to the target value setting of Maximum Density.
supplementary explanationWhen Exact Color or G7 is selected, specify the number of adjustment times in Number of Exact Color : Number of Output Job or G7 Calibration : Number of Output Job. Multiple sheet charts are output at one time, so when specifying many adjustment times, load a sufficient amount of paper into the tray.
Press Start.
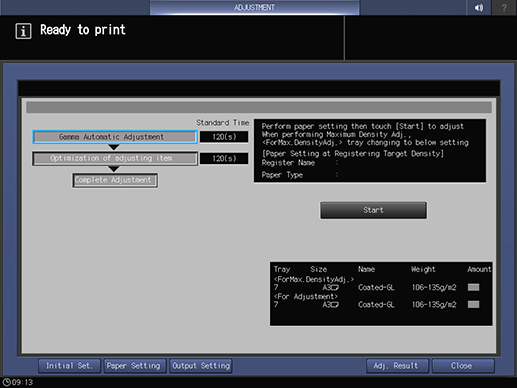
supplementary explanationThe simplified image analysis chart and basic image diagnosis chart are printed out.
supplementary explanationIf DetailedDiagnosis/Sync.SimpleDiagnosis is set to ON in Image Diagnosis - Basic Setting, Detailed Diagnosis is automatically performed if any problem(s) is detected during the diagnosis. In such a case, a detailed diagnosis chart is printed out.
supplementary explanationIf DetailedDiagnosis/Sync.SimpleDiagnosis is set to OFF in Image Diagnosis - Basic Setting, the result of Simple Diagnosis is displayed. When there is an item for which Recommend Detailed Diagnosis is displayed as the diagnosis result, select Run Detailed Image Diagnosis.
supplementary explanationFor details about Image Diagnosis, refer to Image Diagnosis.
NOTICE
If you press Run Pack. Color Auto Adj on the Simple Image Diagnosis Result screen, adjustment items are selected and executed automatically. When there is no adjustment item, the display returns to the screen shown in step 3, and the adjustment process ends.
When the adjustment is completed, the adjustment result is displayed.
Output AQA Reference chart shown below, and check the image quality.
Tips
Output the AQA Reference chart using the printer driver.
For details about how to obtain the AQA Reference chart, contact your service representative.
Tips
When Auto Run is selected, Package Color Auto Adj. is performed once a day.
If the controller calibration is G7, the setting item G7 Report is added to the Package Color Adjustment Initial Setting screen. When it is set to ON, the G7 report is output.
When the image analysis and diagnosis are completed, diagnosis analysis data and diagnosis scan image data are generated. The generated diagnosis results are sent to the service representative as logs if permitted by the setting. For details about sending logs, contact Error Image Send Permission Setting or your service representative.