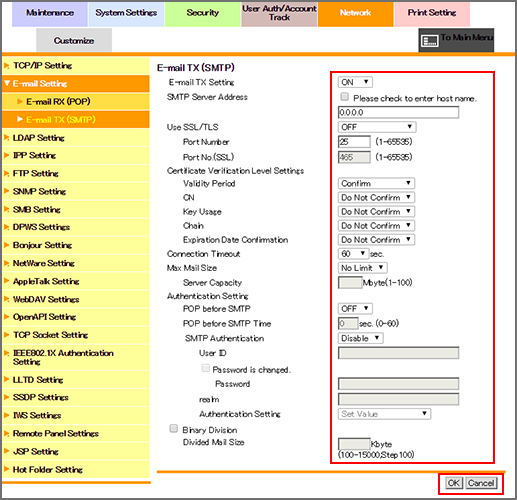
E-mail TX (SMTP)
Click [E-mail Setting] - [E-mail TX (SMTP)] on the menu of [Network] tab to display this screen.
This screen allows you to make the settings on E-mail transmission by SMTP. The settings described in this section are always required if you want to use Scan to E-mail.
To send E-mails from the machine, select [ON] from the [E-mail TX Setting] drop-down list.
Enter the SMTP server address. To enter the host name, select the [Please check to enter host name.] checkbox.
To use SSL/TLS, select [SMTP over SSL] or [Start TLS] from the [Use SSL/TLS] drop-down list, and specify a port number if necessary.
If you want to verify certificates for communication via SSL, specify whether to confirm the items to be verified.
[Validity Period]: Checks whether the certificate's validity period is still valid.
[CN]: Checks whether the Common Name (CN) of the certificate is identical to the address of the server.
[Key Usage]: Checks whether the certificate is used according to the intended usage approved by the issuer of the certificate
[Chain]: Checks whether or not the certificate chain (certificate pass) has a problem. The chain is verified by referring to the external certificates managed by the machine.
[Expiration Date Confirmation]: Checks whether or not the certificate has expired.
If necessary, enter [Connection Timeout] and [Port Number].
To set the maximum E-mail size, select [Limit] from the [Max Mail Size] drop-down list, and specify the server capacity.
If you are using the POP before SMTP authentication, select [ON] from the [POP before SMTP] drop-down list.
If necessary, specify in [POP before SMTP Time] the waiting time between POP authentication and the start of E-mail transmission.
To use SMTP authentication, select [Enable] from the [SMTP Authentication] drop-down list.
Specify a user ID, password, and realm (domain name for SMTP authentication).
If user authentication is used, specify whether to synchronize the user authentication.
If the maximum size of transmission E-mail is restricted by the mail server, select the [Binary Division] checkbox, and enter the divided size in [Divided Mail Size].
Click [OK]. Clicking [Cancel] cancels the setting.
Click [OK] on the setting complete screen.
