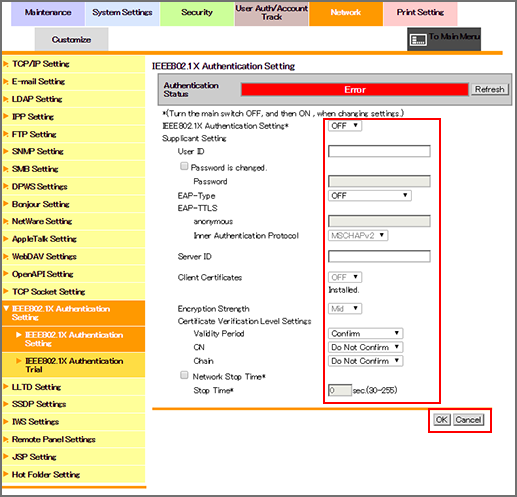
IEEE802.1X Authentication Setting
Click [IEEE802.1X Authentication Setting] - [IEEE802.1X Authentication Setting] in the [Network] tab to display this screen.
This screen allows you to make the IEEE802.1X authentication settings.
This option is available when IEEE802.1X authentication is installed in your environment. Using IEEE802.1X authentication allows you to connect only the devices permitted by the administrator to the LAN environment. The unauthenticated devices cannot be joined in the network, enabling you to ensure a good security.
Select the desired option from the drop-down list provided for each setting item. To make an entry, click the text box to type in. For details about each item, refer to the following table.
Item
Description
Prior confirmation
[Authentication Status]
Displays the authentication status.
[Succeeded]: Displayed when authentication is completed successfully.
[Now authenticating]: Displayed when authentication is in process.
[Not authenticated]: Displayed when authentication is not yet made.
[Failure]: Displayed when authentication has failed.
[Error]: Displayed when failed in getting the authentication status.
Click [Refresh] to get the current authentication status.
[IEEE802.1X Authentication Setting]
Select [ON] to use IEEE802.1X authentication.
[Supplicant Setting]
Make the settings required as a supplicant (authentication client) in order to get authenticated from the authentication server.
Set each item according to your environment.
[User ID]
Enter the user ID. (Up to 128 alphanumeric characters)
The user ID is used in all EAP-Types.
[Password is changed.]
Put a checkmark when changing the password.
[Password]
Enter the password (up to 128 alphanumeric characters).
The password is used in EAP-Types other than [EAP-TLS].
[EAP-Type]
Select the EAP authentication method.
Select [Depend on Server] to perform authentication using the EAP-Type provided by the authentication server. Specify the supplicant settings needed for the machine according to the EAP-Type provided by the authentication server.
Do not select [OFF].
EAP Authentication
[EAP-TTLS]
Make the settings related to EAP-TTLS.
[anonymous]
Enter an anonymous name to be used in the EAP-TTLS authentication (up to 128 alphanumeric characters).
This setting is available when [EAP-TTLS] or [Depend on Server] is specified for [EAP-Type].
[Inner Authentication Protocol]
Select the inner authentication protocol of [EAP-TTLS].
This setting is available when [EAP-TTLS] or [Depend on Server] is specified for [EAP-Type].
[Server ID]
Enter the server ID (up to 64 alphanumeric characters).
This setting is required when the CN of server certificate is verified.
Verify the CN of the server certificate.
[Client Certificates]
Specifies whether to encrypt the authentication information by using the device certificate of the machine. This setting is available when the device certificate is registered to the machine.
The device certificate is required when [EAP-TLS] is selected in [EAP-Type].
This setting is also available when [EAP-TTLS] or [PEAP] is specified for [EAP-Type].
[Encryption Strength]
Select the encryption strength for the encrypted communication using TLS.
[Low]: Communicate using all possible keys.
[Mid]: Communicate using keys exceeding 56 bits.
[High]: Communicate using keys exceeding 128 bits.
This setting is available when any option other than [OFF] or [EAP-MD5] is specified for [EAP-Type].
[Certificate Verification Level Settings]
Specify the method of verification when you verify the server certificate.
[Validity Period]
Checks whether the certificate's validity period is still valid.
[CN]
Checks whether the Common Name (CN) of the certificate is identical to the address of the server.
[Chain]
Chain: Checks whether or not the certificate chain (certificate pass) has a problem. The chain is verified by referring to the external certificates managed by the machine.
[Network Stop Time]
All network communications stop if authentication cannot be completed within a specified period. Put a check mark to specify the period of time to elapse before the network communication stops since the authentication process started.
[Stop Time]
Specify the period of time to elapse before the network communication stops since the authentication process started.
To make it recognize again after the network communication stops, turn the main power switch off then on.
Click [OK] to complete the setting. If you press [Cancel], the settings are not saved.
Click [OK] on the setting complete screen.
If you have changed any setting with an asterisk (*), turn the machine power off then on.
