
Setting items in the printer driver
Available operations in [Page Attributes]
In [Page Attributes] in the [Page Setup] (or [Paper Setup]) window, you can configure basic settings about paper.
| Settings | Description |
|---|---|
[Paper:] | Select the size of paper for printing. |
[Orientation:] | Specify the orientation of the original created in application software. If the setting in the printer driver differs from the one specified in the application software, correct the setting. |
[Scale:] | Specify the zoom ratio to enlarge or reduce the original image. |
Registering a custom paper size
To print on custom sized paper, select [Custom Page Sizes] in the [Page Setup] window, then register the paper size. The registered size can be selected from [Paper:] in [Page Attributes].
- From the [File] menu, select [Page Setup] (or [Paper Setup]).
- Select [Custom Page Size].
- Click [Add].
- Register the desired paper size, and click [OK].
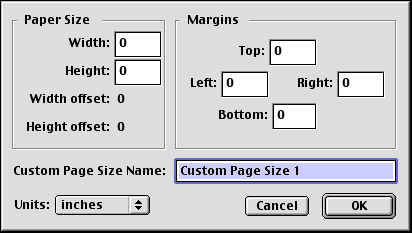
Settings Description [Paper Size]Enter the width and length as desired.In [Units:], change the unit of the values as necessary.[Margins]If necessary, set the top, bottom, right, and left margins of the paper.In [Units:], change the unit of the values as necessary.[Custom Page Size Name]Set a name for the paper size.Use a name that helps you easily identify the paper.
Available operations in [General]
In [General] in the [Print] window, you can configure basic settings about printing, such as the number of copies and print range.![]()
| Settings | Description |
|---|---|
[Copies:] | When printing multiple sets of copies, specify the number of sets. |
[Collated] | When printing multiple sets of copies, select whether to consecutively print sets of copies. |
[Pages:] | When printing a multi-page original, specify the range of pages to be printed. |
[Paper Source:] | Select the paper tray and paper type used for printing. |
Available operations in [Layout]
In [Layout] in the [Print] window, you can specify how the original pages are combined on sheets.![]()
| Settings | Description |
|---|---|
[Pages per sheet:] | Multiple pages can be reduced and printed on the same side of a single sheet of paper. |
[Layout direction] | Select the page layout order. |
[Border:] | When you want to draw border lines between pages, select the border line type. |
Available Operations with printer-specific functions (Finishing Options 1 to 6)
In [Finishing Option 1] to [Finishing Option 6] in the [Print] window, you can configure the printer-specific functions. These options can be specified when functions of the machine such as stapling and punching are to be used.![]()
| Settings | Description |
|---|---|
[Offset:] | When multiple sets of copies are printed, the sets are output in staggered layers. |
[Output Tray:] | Select the tray to which the printed sheets are output. |
[Binding Position:] | Select the binding positions for stapling or punching the sheets. |
[Print Type:] | Set the print side of papers to [1-Sided] or [2-Sided]. |
[Combination:] | The original is printed in booklet format. The pages in the original data are arranged, spread, and printed on both sides of sheets. When the printed sheets are stacked and folded in two, the pages are arranged in the correct order. |
[Staple:] | The printed sheets are stapled. Specify the number and positions of staples. |
[Punch:] | Punch holes (binder holes) are made in the printed sheets. Specify the number and positions of punch holes. |
[Fold:] | When folding the printed sheets, select the folding mode. |
[Front Cover:] | A front cover is inserted and used for printing. In [Front Cover Tray:], select the paper tray for the front cover. |
[Back Cover:] | A back cover is inserted and used for printing. In [Back Cover Tray:], select the paper tray for the back cover. |
[Front Cover from Post Inserter:] | Select this check box to insert and print on an outer front cover. In addition, select the PI tray for the outer front cover. |
[Back Cover from Post Inserter:] | Select this check box to insert and print on an outer back cover. In addition, select the PI tray for the outer back cover. |
[Transparency Interleave:] | When multiple OHP transparencies are printed, paper is inserted between the OHP transparencies. In [Interleave Tray:], select the paper tray for the paper to be inserted. |
[Output Method:] | When printing a large number of copies, set [Proof Print]. This machine prints only one copy and waits for the user's command before printing the remaining copies. |
[Resolution:] | Select the print resolution. |
[Select Color:] | Select colors for printing. |
[Glossy Mode:] | Images are printed with a glossy finish. The printing speed is reduced. |
[Color Settings:] | Select the optimum color setting mode for the original. |
[Auto Trapping:] | To prevent misalignment or generation of white space, neighboring colors are superimposed around a picture. |
[Black Overprint:] | To prevent white space being generated around black characters or figures, black is superimposed on neighboring colors. |
[Color Matching (Text):] | Select this option to adjust the color quality of the text in the original. |
[Pure Black (Text):] | Select whether to use (ON/OFF) the Pure Black function for the texts in the original. |
[Screen (Text):] | Select whether to use screening for the texts in the original. |
[Color Matching (Photo):] | Select this option to adjust the color quality of the photos in the original. |
[Pure Black (Photo):] | Select whether to use (ON/OFF) the Pure Black function for the photos in the original. |
[Screen (Photo):] | Select whether to use screening for the photos in the original. |
[Smoothing (Photo):] | Select whether to use smoothing for the photos in the original. |
[Color Matching (Graphic):] | Select this option to adjust the color quality of the figures, tables, or graphs in the original. |
[Pure Black (Graphic):] | Select whether to use (ON/OFF) the Pure Black function for the figures, tables, or graphs in the original. |
[Screen (Graphic):] | Select whether to use screening for the figures, tables, or graphs in the original. |
[Smoothing (Graphic):] | Select whether to use smoothing for the figures, table, or graphs in the original. |
[Toner Save:] | Select this check box to reduce the printing density in order to save the amount of toner consumed. |
[Edge Enhancement:] | Sharpen the edges of images such as text in the table and graphics to improve legibility. |
Tips
- To use [Staple:], the optional Finisher is required.
- To use [Punch:], the optional Finisher and Punch Kit are required.
- The number of punched holes varies depending on the country you are in.
- To use Center Staple & Fold, Half-Fold, or Tri-Fold of [Fold:], the optional Finisher and Saddle Kit are required.
- To use Z-Fold of [Fold:], the optional Finisher and Z-Fold Unit are required.
- To use Z-Fold of [Fold], specify the paper size described at the setting you selected from the drop-down list ([Z-Fold (A3, B4, 11
 17, 8K)], [Z-Fold (8 1/2 14)] at "Paper Size" of the application software or printer driver.
 - To use [Front Cover from Post Inserter]/[Back Cover from Post Inserter], the optional Post Inserter is required.
- [Front Cover:] and [Front Cover from Post Inserter:], or [Back Cover:] and [Back Cover from Post Inserter:] cannot be specified at the same time.