User's Guide

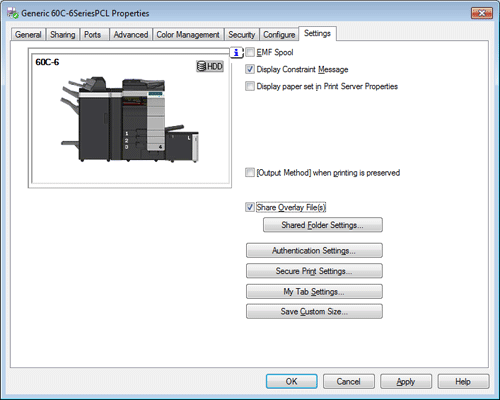
Available operations in the [Settings] tab
In the [Settings] tab, you can change the default settings for how to display confirmation messages and the window for inputting authentication information.
| Settings | Description |
|---|---|
[EMF Spool] | Select this check box when meta file (EMF) spooling is required in your own system environment. |
[Display Constraint Message] | Select this check box to display a message indicating that you have selected printer driver functions that cannot be used together. |
[Display paper set in Print Server Properties] | Select this check box when using the paper added in [Server Properties] in the printer window. |
[[Output Method] when printing is preserved] | The [Output Method] settings in the [Basic] tab are saved. This option is helpful when you want to repeat printing with the same output method settings. |
[Share Overlay File(s)] | To share overlay files, set a shared folder on the network for storing them. |
[Authentication Settings] | Configure the User Authentication/Account Track settings.
|
[Secure Print Settings] | Configure the Secure Print settings.
|
[My Tab Settings...] | Configure the display settings for [My Tab] when using [My Tab] of the printer driver.
|
[Save Custom Size...] | If you print on odd size paper, specify the size to register the paper. The registered paper size can be selected from [Original Size] in the [Basic] tab. |
Tips
- [EMF Spool] is a function of the PCL driver.
- [Save Custom Size...] is a function of the PCL driver.
- To use the EMF spool function with a PS/XPS driver, select the [Enable advanced printing features] check box in the [Advanced] tab to enable the EMF spool function.
- The procedure for opening [Server Properties] is as follows:
- In Windows 7/Server 2008 R2, select the desired printer, and click [Print Server Properties] on the toolbar.
- In Windows Vista/Server 2008, right-click on the area that has nothing displayed in the [Printers] window, and click [Run as administrator] - [Server Properties].
- In Windows XP/Server 2003, click the [File] menu, and click [Server Properties].
- The paper set in Print Server Properties for the printer driver is allowable in the following ranges.
Custom sizes available in printer driver:
Width: 3-9/16 to 12-5/8 inches (90.0 to 320.0 mm), Length: 5-1/2 to 18 inches (139.7 to 457.2 mm)
Banner sizes available in printer driver:
Width: 8-1/4 to 11-11/16 inches (210.0 to 297.0 mm), Length: 18 to 47-1/4 inches (457.3 to 1200.0 mm)
Allowable range of large size 1:
Width: 3-9/16 to 8-1/4 inches (90.0 to 209.0 mm), Length: 18 to 46-13/16 inches (457.3 to 1189.0 mm)
Allowable range of large size 2:
Width: 11-11/16 to 12-5/8 inches (297.1 to 320.0 mm), Length: 18 to 46-13/16 inches (457.3 to 1189.0 mm)
Allowable range of large size 3:
Width: 12-5/8 to 33.11 inches (320.1 to 841.0 mm), Length: 5-1/2 to 13/16 inches (139.7 to 1189.0 mm)
The paper sizes registered in the range of the above custom sizes or banner sizes are available in both of [Original Size] and [Paper Size] of the printer driver. However, the paper size registered in the allowable range of each large size is available only in [Original Size] of the printer driver. - If you set the function layout on the [My Tab] using the Driver Packaging Utility, each user can use those functions in the same layout.
When creating a driver package with Driver Packaging Utility, move the printer driver that is used as a source of the package to the desired position in My Tab. In [My Tab Settings...], select the [Display My Tab] and [Share My Tab] check boxes, then configure Driver Packaging Utility to copy the printer settings. For details on the Driver Packaging Utility settings, refer to the Driver Packaging Utility Help.
Reference
- For details on how to edit [My Tab], refer to Here.