[Expert Adj.]
Overview
Set the advanced adjustment items such as the transfer, separation, or fusing process.
Adjusting the [Expert Adj.] items allows you to deal with various situations or finishing conditions.
- The selectable items vary depending on the optional devices mounted on this system.
Setting Items

Setting item | Description |
|---|---|
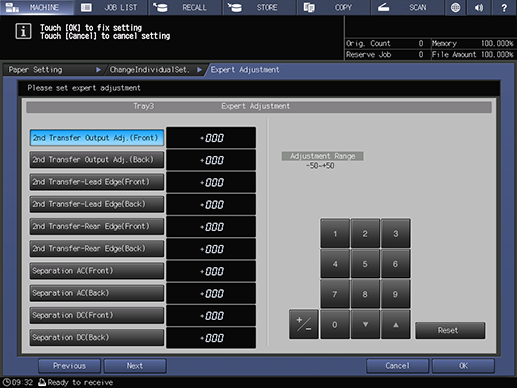
[2nd Transfer Output Adj.(Front)] | Set the adjustment range when a deficient transfer or white spots occur on the front side of paper. Range: -50 to +50 |
[2nd Transfer Output Adj.(Back)] | Set the adjustment range when a deficient transfer or white spots occur on the back side of paper. Range: -50 to +50 |
[2nd Transfer-Lead Edge(Front)] | Set the adjustment range when a deficient transfer occurs at the lead edge of the front side of paper. Range: -50 to +50 |
[2nd Transfer-Lead Edge(Back)] | Set the adjustment range when a deficient transfer occurs at the lead edge of the back side of paper. Range: -50 to +50 |
[2nd Transfer-Rear Edge(Front)] | Set the adjustment range when a deficient transfer or transfer repelling occurs at the rear edge of the front side of paper. Range: -50 to +50 |
[2nd Transfer-Rear Edge(Back)] | Set the adjustment range when a deficient transfer or transfer repelling occurs at the rear edge of the back side of paper. Range: -50 to +50 |
[Separation AC(Front)] | Set the adjustment range when a transfer leak mark or electrostatic noise occurs while printing the front side. Range: -600 to +600 |
[Separation AC(Back)] | Set the adjustment range when a transfer leak mark or electrostatic noise occurs while printing the back side. Range: -600 to +600 |
[Separation DC(Front)] | Set the adjustment range when an offset occurs while printing the front side. Range: -60 to +60 |
[Separation DC(Back)] | Set the adjustment range when an offset occurs while printing the back side. Range: -60 to +60 |
[Upper Fusing Roller Temperature] | Set the gloss and image density adjustment ranges when one of the following phenomena occurs.
Range: -20 to +20 |
[Lead Edge Erase Quantity] | Set the adjustment range when a separation defection (fusing belt) occurs on thin paper (low stiffness paper). Range: 0 to +200 |
[Temp. Gap of Fus. Edge and Mid.] | Set the gloss and image density adjustment ranges when one of the following phenomena occurs.
Range: -10 to +10 |
[Lower Fusing Roller Temperature] | Set the adjustment range when one of the following phenomena occurs.
Range: -15 to +70 |
[Rear Edge Erase Quantity] | Set the adjustment range when a separation defection (fusing belt) occurs on thin paper (low stiffness paper). Range: 0 to +200 |
[Back on Top Output Timing Adj.] | Set the adjustment range when paper jams or creases occur at the time of reverse output. Range: 0 to +10 |
[ADU Reverse Timing] | Set the adjustment range when buckling (at face down) of the rear edge of paper, paper jams, or roller marks occur on coated thin paper. Range: -6 to +6 |
[Fusing Speed(Front Side)] | Set the adjustment range when one of the following phenomena occurs.
|
If a failure occurs on both the front and back sides, first adjust [Fusing Speed(Front Side)], and then [Fusing Speed(Back Side Offset)]. Range: -200 to +200 | |
[Fusing Speed(Back Side Offset)] | Set the adjustment range when one of the following phenomena occurs.
|
If a failure occurs on both the front and back sides, first adjust [Fusing Speed(Front Side)], and then [Fusing Speed(Back Side Offset)]. Range: -200 to +200 | |
[Registration Loop(Front)] | Set the adjustment range when paper wrinkles or paper jams in the registration roller section occur while printing the front side of thin paper (low stiffness paper). Range: -99 to +99 |
[Registration Loop(Back)] | Set the adjustment range when paper wrinkles or paper jams in the registration roller section occur while printing the back side of thin paper (low stiffness paper). Range: -99 to +99 |
[IQ Transport Roller Speed Adj.] | If a crease or delivery failure occurs while thin paper (low stiffness paper) is scanned on Intelligent Quality Care Unit IQ-501, set the speed balance of the conveyance roller. Range: 0 to +20 |
[Registration Speed] | Make adjustments when a transfer slippage or color gap occurs.
Range: -128 to +127 |
[Reverse De-Curler Speed] | Set the adjustment range when paper jams, depressions in the crosswise direction, or creases occur. Range: -200 to +200 |
[Reverse Speed(RevExit)] | Set the adjustment range when one of the following phenomena occurs on paper.
Range: -200 to +200 |
[Reverse Speed(ADU)] | Set the adjustment range when one of the following phenomena occurs on paper.
Range: -200 to +200 |
[Banner Reverse Speed1] | Set the adjustment range when one of the following phenomena occurs on banner paper (487.8 mm / 19.2" or more).
Range: -200 to +200 |
[Output De-Curler Speed] | Set the adjustment range when paper wrinkles occur on thin paper (low stiffness paper) while de-curling. Range: -200 to +200 |
[LCT BannerRegist.Speed] | Set the adjustment range when lines in the crosswise direction or uneven density occurs on banner paper. This function requires one of the following optional devices.
Range: -15 to +15 |
[Regist. Speed(Banner)] | Set the adjustment range when lines in the crosswise direction occur on banner paper or the margin at the rear edge is insufficient. Range: -50 to +50 |
[Banner Reverse Speed2] | Set the adjustment range when one of the following phenomena occurs on banner paper (697.0 mm / 27.4" or more).
Range: -200 to +200 |
[Reverse Gate SW Timing] | Set the adjustment range when paper jams occur at the reverse gate or marks occur at the rear edge of paper. Range: -30 to +30 |
[RU Speed Adjustment(Banner)] | Set the adjustment range when lines in the crosswise direction occur on banner or thin paper (low rigidity paper). The following optional device is required.
Range: -100 to +100 |
[Pre-regist. Loop Adj.(Front)] | Set the adjustment range when one of the following phenomena occurs on the front side of the paper.
Range: -99 to +99 |
[Pre-regist.Loop:1st Connection] | Set the adjustment range when one of the following phenomena occurs on the front side of the paper.
The following optional device is required.
Range: -99 to +99 |
[Pre-regist.Loop:2nd Connection] | Set the adjustment range when one of the following phenomena occurs on the front side of the paper.
The following optional device is required.
Range: -99 to +99 |
[Pre-regist.Loop:BypassConnection] | Set the adjustment range when one of the following phenomena occurs on the front side of the paper.
The following optional device is required.
Range: -99 to +99 |
[Pre-regist.Loop:Tray6 Connection] | Set the adjustment range when one of the following phenomena occurs on paper.
This function requires Paper Feed Unit PF-707m as well as one of the following optional devices.
Range: -99 to +99 |
[Up Fusing Initial Temp.] | When the image density is low on uncoated paper (especially, plain-rough paper), select [OFF]. [Auto]: Automatically adjusts the fusing initial temperature. [OFF]: Does not adjust the fusing initial temperature. |
[2ndTrans.Pressure] | When a patch, noise, deficient transfer, or spots at the rear edge of the paper occurs, set the transfer pressure to suit the paper conditions. [Auto]: Performs automatic setting. [High]: Sets to the high pressure. [Normal]: Sets to the normal pressure. [Low]: Set to the low pressure. |
[CPM Down] | If white or colored lines occur in the crosswise direction at the position equivalent to one round (310 mm / 12.2") of the fusing belt from the rear edge of the preceding paper, select [Down]. [Normal]: Sets to Normal. [Down]: Sets to Down. |
[Toner Amount Save] | Set this when a separation defection (fusing belt) occurs on thin paper (low stiffness paper).
[ON]: Controls the total toner consumption. [OFF]: Does not control the total toner consumption. |
[Dens. Adj. Per Tray(YMC)] | Set this option when the image density (YMC) is low on uncoated paper such as plain paper, rough paper, and textured paper. [0(Normal)]: Sets to the standard density. [+1] to [+3(Max)]: Sets the density to a positive "+" value than the standard. |
[Dens. Adj. Per Tray(K)] | Set this option when the image density (K) is low on uncoated paper such as plain paper, rough paper, and textured paper. [0(Normal)]: Sets to the standard density. [+1] to [+3(Max)]: Sets the density to a positive "+" value than the standard. |
[Mis-centering Detect JAM] | Configure the setting to detect mis-centering of 5 mm / 0.2" or more as a paper jam. [Detect]: Detects mis-centering. [Not Detect]: Does not detect mis-centering. |
[Double Feed Detection] | Configure the setting to detect double feeding. The following optional device is required.
[Detect]: Detects double feeding. [Not Detect]: Does not detect double feeding. |
[Int. Transfer Separation] | Set this option when white lines occur in the halftone image of the original. [Auto]: Automatically performs intermediate transfer separation. [ON]: Performs intermediate transfer separation. [OFF]: Does not perform intermediate transfer separation. |
[Thick BK Mode] | Set this when lines in the crosswise direction occur on thick paper (high stiffness paper) of black & white mode. [ON]: Enables Thick BK Mode. [OFF]: Disables Thick BK Mode. |
[Feed Correction Level] | Configure this setting when curving occurs at the position (end of the registration roller position) within 110 mm / 4.33" before/after the center of thick paper (high stiffness paper). [0(Normal)]: Sets the standard correction level. [-1]: Sets a lower correction level than the standard by -1. [-2]: Sets a lower correction level than the standard by -2. |
[Output Curl Adjustment] | Set this when a paper feeding failure causing output curls or curls occurs. [Auto]: Automatically adjusts the output paper curling level. [0]: Adjusts the output paper curling level to the standard. [+1]: Adjusts a higher output paper curling level than the standard by +1. [+2]: Adjusts a higher output paper curling level than the standard by +2. |
[Output Curl(Back on Top)] | Set this when a paper feeding failure causing output curls or curls occurs while 2-sided printing. [Auto]: Automatically adjusts the reverse output paper curling level. [0]: Adjusts the reverse output paper curling level to the standard. [+1]: Adjusts a higher reverse output paper curling level than the standard by +1. [+2]: Adjusts a higher reverse output paper curling level than the standard by +2. |
[Paper Feed Assist Set.] | Enable paper re-feeding when paper feeding is not performed in the Main body tray (no-feed jam).
|
[Auto]: Automatically sets Paper Feed Assist to [Productivity]. [Manual]: Manually selects Paper Feed Assist. [Productivity]: Gives priority to productivity. [Paper Feeding]: Gives priority to paper feedability. | |
[Centering Adj.(Front)] | Set this when you want to offset the image position on the front side. |
[ON(Blank)]: Select this item when the paper color is white. This function adjusts mis-centering on the front side of paper. [ON(PrePrinted)]: Select this option when performing PrePrinted. [OFF]: Does not make adjustment. | |
[Detect Setting]: Adjusts the mis-centering detection position when PrePrinted is selected. [(1)Detect Position]: Sets the distance from the lead edge of paper. Range: 5 mm to 25 mm [(2)Detect Range]: Sets the range without a rough sketch. Range: 1 mm to 10 mm | |
[PaperColor(Light)]: Select this item when the paper color is white or pale. [PaperColor(Dark)]: Select this item when the paper color is dark. | |
[Centering Adj.(Back)] | Set this when you want to offset the image position on the back side. |
[ON(Blank)]: Select this item when the paper color is white. This function adjusts mis-centering on the back side of paper. [ON(PrePrinted)]: Select this option when performing PrePrinted. [OFF]: Does not make adjustment. | |
[Detect Setting]: Adjusts the mis-centering detection position when PrePrinted is selected. [(1)Detect Position]: Sets the distance from the lead edge of paper. Range: 5 mm to 25 mm [(2)Detect Range]: Sets the range without a rough sketch. Range: 1 mm to 10 mm | |
[PaperColor(Light)]: Select this item when the paper color is white or pale. [PaperColor(Dark)]: Select this item when the paper color is dark. | |
[Oscillation Setting] | Adjust the rear edge position of the paper by registration oscillation when banner paper is transferred. Normally set to [Auto].
This function requires one of the following optional devices.
[Auto]: Performs automatic setting. [Manual]: Performs manual setting. |
[Name]: Names an oscillation setting. [Front]: Select this item when setting the number of oscillations on the front side. [Back]: Select this item when setting the number of oscillations on the back side. | |
[Fusing Air Separation Air Level Setting] | Set this when a fusing separation failure occurs or when lines in the paper feed direction are caused by the fusing separation claw. [Weak]: Weakens the separation air level each time this key is pressed. [Auto]: Automatically sets the separation air level. [Strong]: Strengthens the separation air level each time this key is pressed. |
[Change Fusing Pressure] | Set this when one of the following phenomena occurs.
|
[Auto]: Automatically switches the pressure. [Normal]: Sets to the normal pressure. [Weak]: Sets to a lower pressure than [Normal]. | |
[Hard Paper Mode] | Set this option when a misalignment of color registration occurred on high stiffness paper. [ON]: Set to [Hard Paper Mode]. [OFF]: Does not set to [Hard Paper Mode]. |
[PFU Suction Air Level Setting] | Set this when a damage occurs on paper due to suction.
The following optional device is required.
[Weak]: Weakens the suction air level each time this key is pressed. [Auto]: Automatically sets the suction air level. [Strong]: Strengthens the suction air level each time this key is pressed. |
[Output Paper Separation Setting] | Set this option when an electrostatic adsorption occurs at the time of output. [ON(Coated)]: Automatically sets the offset (misalignment) amount when coated paper is loaded into a paper tray. [ON(Uncoated)]: Automatically sets the offset amount when paper other than coated paper is loaded into a paper tray. [Manual]: Manually sets the offset amount using [Offset Value]. [OFF]: Offset is not performed. [Offset Value]: Set the offset amount. Adjustment range: -50 to +100 |
[Output Cooling Air Level Adj.] | Blow air at the paper to prevent sheets from sticking together. This function requires one of the following optional devices.
[Weak]: Weakens the cooling air level each time this key is pressed. [Auto]: Automatically sets the cooling air level. [Strong]: Strengthens the cooling air level each time this key is pressed. |
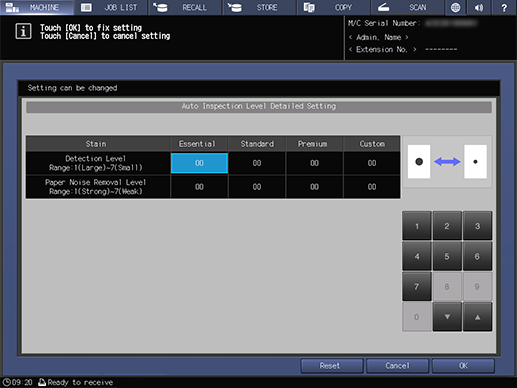
[Auto Inspection Level Detailed Setting]*1 | Adjust the inspection standard for automatic inspection (automatic inspection level). You can set the automatic inspection level for each paper tray. Even if [Enable] is selected, the operation is the same as [Disable] in the following cases.
When there are multiple paper trays to be used when executing a job
|
[Enable]: Sets the automatic inspection level for each paper tray. The paper loaded in the specified paper tray is automatically inspected at the selected level. [Disable]: Disables the automatic inspection level specified for each paper tray. The automatic inspection level specified in [Common Setting] or [IQ Function Setting] is enabled. [Detail Setting]: Inspection level selection key ([Essential], [Standard], [Premium], [Custom]) Sets the inspection level to suit the selected item. | |
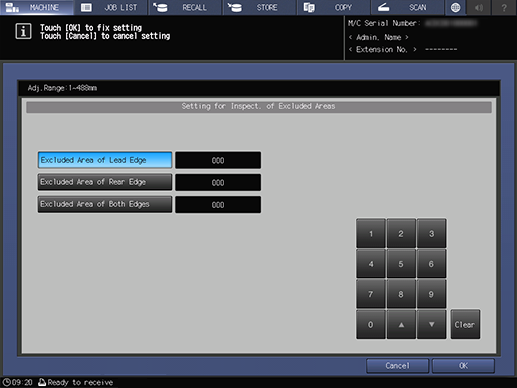
[Excluding Edge Setting for Automatic Inspection]*1 | Set the default Inspection Excluding Area for automatic inspection. You can set the edge exclusion area for each paper tray when generating the reference image. Even if [Enable] is selected, the operation is the same as [Disable] in the following cases.
|
[Enable]: Sets the inspection exclusion area for each paper tray. The set value becomes the edge exclusion area when the reference image is generated. [Disable]: Disables the inspection exclusion area specified for each paper tray. The value specified in [Common Setting] or [Setting for Inspect. of Excluded Areas] of [IQ Function Set.] is enabled. [Detail Setting]: Set the default Inspection Excluding Area for automatic inspection. | |
Keypad | Used to enter numeric values. Press [+ / -], and set the sign of the numeric value. |
*1: All the following optional devices are required.
Intelligent Quality Care Unit IQ-501
Auto Inspection Unit UK-301
Relay Unit RU-702
Video Interface Kit VI-514
Video Interface Kit VI-515
Setting Procedure (Adjustment of [Auto Inspection Level Detailed Setting])

This section describes an example case in which the [Detection Level] of [Stain] is selected.

Setting Procedure (Adjustment of [Excluding Edge Setting for Automatic Inspection])
The setting screen is displayed.


[Adj.Range:1~488mm] 1step=1 mm

 in the upper-right of a page, it turns into
  and is registered as a bookmark.