
Scan Transmission Setting
You can configure the scan transmission function that is part of the Administrator Setting using a web browser.
General rules
preconditionConfirm that you are not using the scan transmission function on the main body.
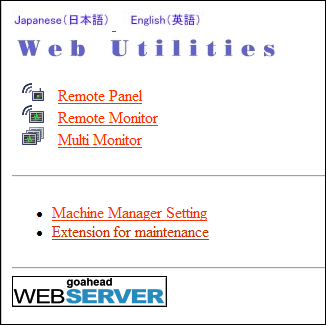
Display the Main page screen of Web Utilities.
Click on Machine Manager Setting.
The password entry dialog box is displayed.
Enter "admin" in the User Name text box, and the 8-character administrator password in the password text box, then click on OK.
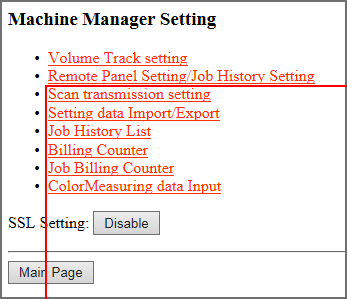
The Machine Manager Setting screen is displayed.
Click on Scan transmission setting.
The Scan transmission setting screen is displayed.
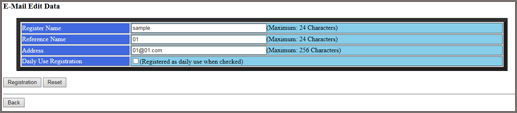
Register the E-Mail, HDD, FTP, SMB, and WebDAV as required.
supplementary explanationFor details about the setting values, refer to Registering a Destination and a Subject and a Message of E-mail.
supplementary explanationThe symbols that cannot be displayed in the entry box will be ignored, if entered.
supplementary explanationIf the HDD box name is filled with numerals, it is registered as 9 digits. For example, entering "1" will be registered as "000000001."
supplementary explanationClick on the Daily Use Registration check box, if the data is frequently used.
supplementary explanationIf you violate the character limitation or do not fill in a required field, an error message indicating that the settings are wrong is displayed. Click on Back and re-enter the values.
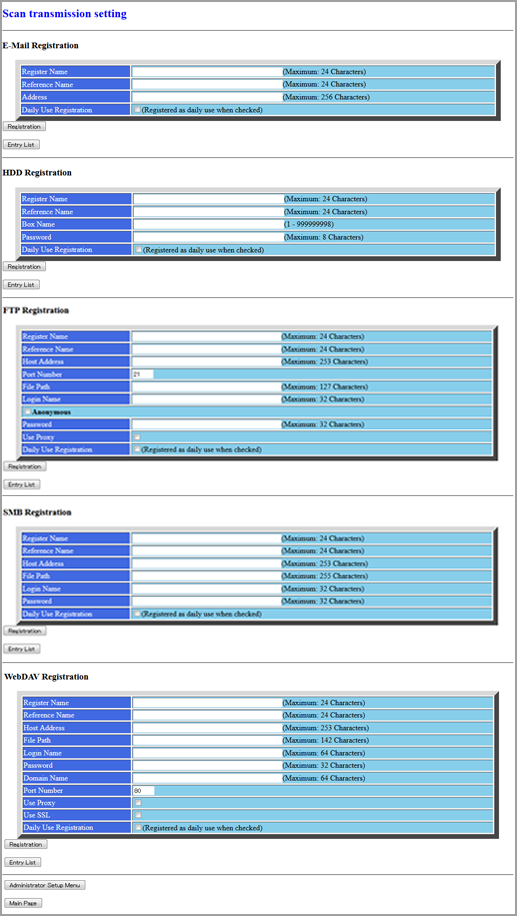
Click Register.
The registered content is displayed.

Click on Back.
The screen returns to the Scan transmission setting screen.
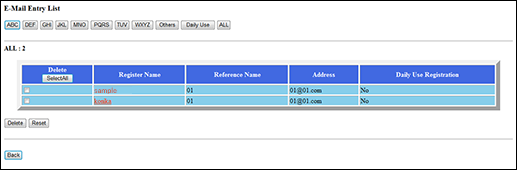
Display the entry list.
supplementary explanationClick on Entry List of the desired item to display the entry list.
Click on Back to return to the Scan transmission setting screen.
Change the registered contents.
supplementary explanationDisplay the entry list of the desired item as described in step 8.
supplementary explanationClick a register name. The Edit scan transmission setting screen is displayed.
supplementary explanationChange the contents as desired, then click on Registration.
supplementary explanationThe changed contents is displayed.

supplementary explanationClick on Back. The screen returns to the Registered List screen.
Delete the registered contents.
supplementary explanationDisplay the entry list of the desired item as described in step 8.
supplementary explanationYou can select multiple items to be deleted. If all the data are to be cleared, click on Select All.
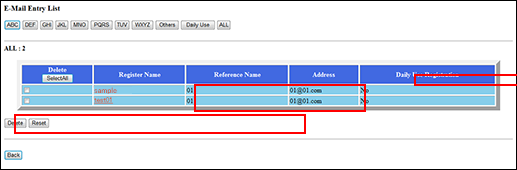
supplementary explanationClick on the check box in the Delete column of the item to be deleted, then click on Delete.
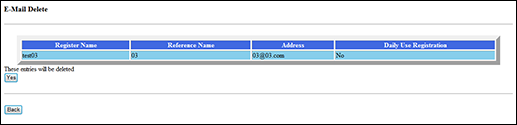
supplementary explanationThe Delete screen is displayed.
supplementary explanationConfirm the registered name to be deleted, then click on Yes.
supplementary explanationClick on Back. The screen returns to the Registered List screen.
supplementary explanationClick on Back. The screen returns to the Scan transmission setting screen.