Copying while specifying the image quality and density
To automatically adjust to the appropriate image quality for the contents of the original ([Original Type])
To display:
- [Copy]
- [Original Type]
Select the optimum settings for the original to copy it in the optimum image quality.
Settings | Description |
|---|---|
[Text] | Copy originals primarily containing text at the optimum image quality level. Sharpen the edges of text to improve legibility. |
[Text/Photo Printed] | Copy the original, which consists of text and photos, at the optimum image quality level. Sharpen the edges of text, and smoothen photos. Select this option to scan printed originals such as brochures and catalogs. |
[Text/Photo PhotoPaper] | Copy the original, which consists of text and photos, at the optimum image quality level. Sharpen the edges of text, and smoothen photos. Select this option for scanning originals in which photos are printed on photographic paper. |
[Photo Printed ] | Tap this button to copy an original consisting of only photos at the optimum image quality level. Select this option to scan printed originals such as brochures and catalogs. |
[Photo PhotoPaper] | Tap this button to copy an original consisting of only photos at the optimum image quality level. Select this option for scanning originals printed on photographic paper. |
[Dot Matrix Original] | Copy an original, that primarily consists of text such as thin or faint characters, at the optimum image quality level. Darken the text to improve legibility. |
[Copied Paper] | Copy an original, which has been output with an even density from the copier or printer, at the optimum image quality level. |
[Recall Image Adjustment Program] | Call the image quality adjustment program. The registered content of a program is applied. For image adjustment program, you can register the settings of [Original Type], [Density], [Bkgd. Removal], [Text Enhancement], [Neg-/Pos. Reverse], [Image Adjustment], and [Mirror Image]. For details on how to register, refer to Here. |
To adjust the copy density ([Density])
To display:
- [Copy]
- [Density]
Adjust the density of a copy image.
To adjust the background density of the original ([Bkgd. Removal])
To display:
- [Copy]
- [Bkgd. Removal]
Adjust the density of the original with the colored background (newspaper, recycle paper, etc.) or the background of an original that is so thin that text or images on the back would be scanned.
Settings | Description |
|---|---|
[Background Removal] | Copy 2-sided originals made of thin paper and originals with colored background with optimal image quality.
|
[Background Removal Level] | Adjust the density of the background color for originals with colored background. If [Auto] is selected, the density of the background color is determined automatically, and the original is copied at the optimal background density level. |
To enhance a text against the background ([Text Enhancement])
To display:
- [Copy]
- [Application]
- [Quality]
- [Text Enhancement]
- [Quality]
- [Application]
Either of photos or text is enhanced when text is superimposed over photos (figure, graph, etc.).
Settings | Description |
|---|---|
[Lighter Text] | If you want to enhance the background against text, adjust to the [Lighter Text] side. |
[Standard] | Copy with the optimal balance between the background and text. |
[Darker Text] | If you want to enhance text against the background, adjust to the [Darker Text] side. |
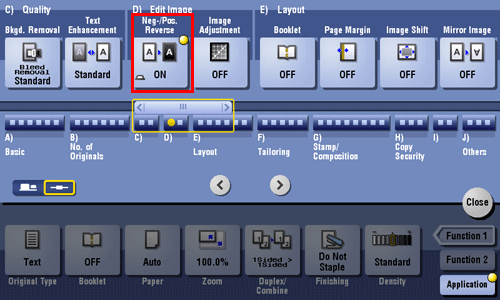
To reverse the contrast and colors ([Neg-/Pos. Reverse])
To display:
- [Copy]
- [Application]
- [Edit Image]
- [Neg-/Pos. Reverse]
- [Edit Image]
- [Application]
Copy the original with the density (gradations) and color of the image inversed. The finished image looks like a negative print photo.

To fine-tune the image quality according to the original ([Image Adjustment])
To display:
- [Copy]
- [Application]
- [Edit Image]
- [Image Adjustment]
- [Edit Image]
- [Application]
Copy after adjusting the image quality. You can check the finishing by printing a sample copy.
Settings | Description |
|---|---|
[Contrast] | Adjust the shading of an image. |
[Copy Density] | Adjust the copy density. |
[Sharpness] | Sharpen the edges of the image to improve legibility. Smoothen the rough contour or sharpen the blurred image. |