Using HDD: Changing the Print Setting of Hold Job (Job Ticket Edit)
It is possible to edit the print setting of hold jobs using the touch panel of the main body. The function is called "Job Ticket Edit."
You can save the edited job overwriting the original job or newly save as a different job keeping the original job as is.
• Examples Introduced in This Section
You can use the touch panel of the main body to edit the print setting of hold jobs.
Editing Job Tickets from the Main Body
Using touch panel of the main body to edit the print setting of hold jobs.
• Related Section
•Precautions
You cannot edit HDD saved jobs. Recall and save them as hold jobs before editing. (Refer to Using HDD: Managing Jobs in Folders.)
Editing Job Tickets from the Main Body
You can use the touch panel of the main body to edit the print setting of hold jobs.
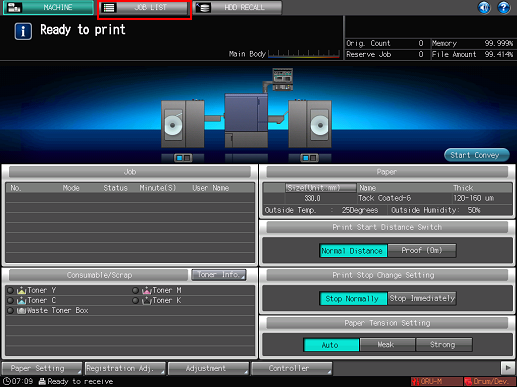
On the touch panel of the main body, press [JOB LIST].
Press [Hold Job].
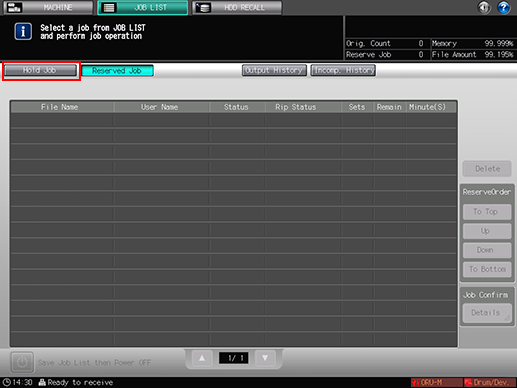
Press to select the job (one job) to edit and press [Job Ticket] in the [Job Edit] field.
When editing job tickets on the main body, a
 icon is displayed.
If the same [File Name] (job name) is in the list, a
 icon is displayed.
 mark is displayed for a job which cannot be output.
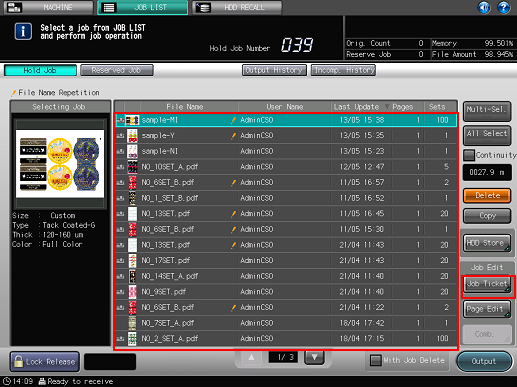
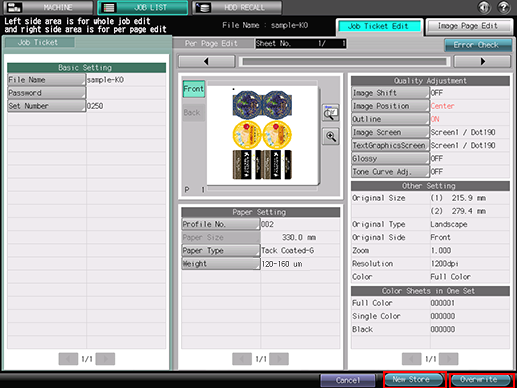
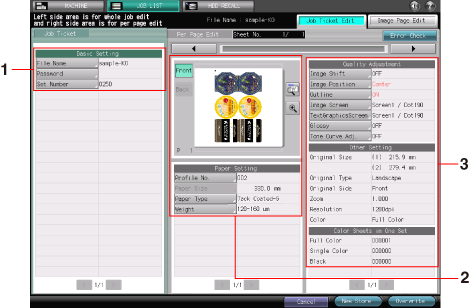
The specified job is called and the [Job Ticket Edit] screen is displayed.
Click the button of the item to edit and change the setting.
You can check the status of imposition with the preview image in the middle of the screen.
Job Ticket Edit on the touch panel of the main body allows you to make the following settings.
Item
Check Job
1. Left pane of the screen
[Basic Settings]
Set [File Name][Password][Set Number].
2. Center pane of the screen
Preview image display
Displays the preview image of the selected file. It is possible to check the rotate view image or the output direction of the image. On the enlarged preview screen, you can set the image position or image shift function.
[Paper Setting]
Set [Profile No.], [Paper Type ], and [Thickness] (or [Weight]).
3. Right pane of the screen
[Quality Adjustment]
Set [Image Shift], [Image Position], [Outline], [Image Screen], [TextGraphicsScreen], [Glossy], and [Tone Curve Adj.].
[Other Setting]
Check the original size, original type, original side, zoom, resolution and color.
[Color Sheets in One Set]
The page number of color or black-and-white in the job is displayed.
Pressing [Error Check] in the upper right of the screen starts checking for inconsistency of the settings. If any of the settings obstructs output, the cause is displayed.
To display the [Page Edit] screen (refer to Using HDD: Editing a Hold Job on a per Page Basis (Page Edit)), press the [Image Page Edit] tab. To return to the [Job Ticket Edit] screen, press the [Edit Job Ticket] tab.
After editing, press [New Store] or [Overwrite].
[New Store]: The data is saved as new data keeping the original data as is.
[Overwrite]: The original data is overwritten by the edited data.