
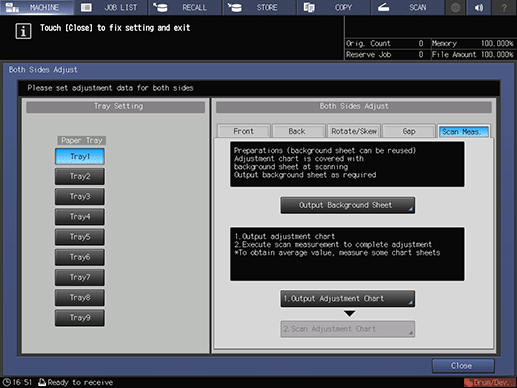
Scan Meas. Adjustment
Adjust the magnification ratio and printing position of the back side with reference to the printing position of the front side. The magnification ratio and printing position of the back side are automatically adjusted by using the scanner function of this machine to measure the gap amount in printing position of the back side to the front side. You do not need to measure the gap amount with a scale. The adjustment is available for paper of all sizes which can be used with this machine.
Print out 1 to 20 sheets of the adjustment chart having both front and back sides printed, and scan them 4 times per sheet. The average value of gap amounts in printing position of the back side to the front side, which can be obtained by scanning up to 20 sheets of the adjustment chart, will be calculated in order to adjust the magnification ratio and printing position of the back side.
Tips
A scanner is not mounted on a machine that is not equipped with Paper Feed Unit PF-711; therefore, the Scan Meas. adjustment is not available to scan adjustment charts.
The Scan Meas. adjustment provides the coordination based on the average value of gap amounts, taking into account the gap in printing position between the first and last sheets which can be produced when multiple sheets are output.
Performing the Scan Meas. adjustment may require readjustment of the Zoom/Image Shift adjustment registered in a paper profile.
The Scan Meas. adjustment is a simple method to adjust only the magnification ratio and image position of the back side. To make adjustments, including for the front side, perform the procedure described in [AutoMeasure] adjustment, [Chart Adjustment], or [Zoom]/[Image Shift] Adjustment.
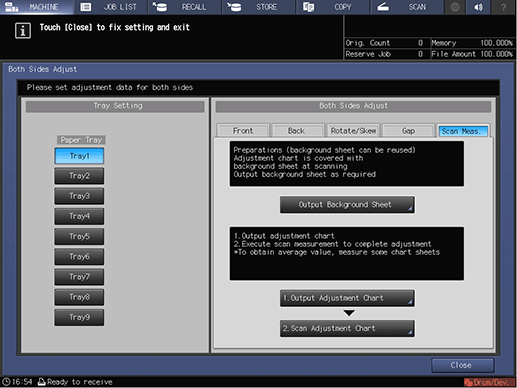
Press Both Sides on the MACHINE screen.
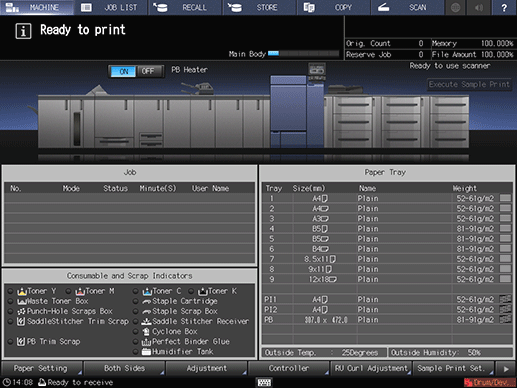
The Scan Meas. screen is displayed. If the Scan Meas. screen is not displayed, press the Scan Meas. tab on the screen.
Select the tray to output a background sheet, and then press Output Background Sheet.
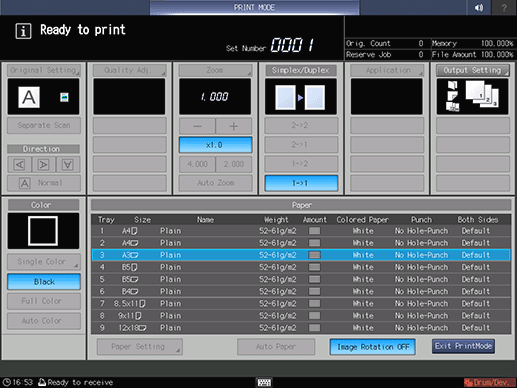
Display the PRINT MODE screen for the background sheet, then press Start on the control panel. Check that the output is completed, then press Exit PrintMode.
supplementary explanationIt is not necessary to output the background sheet if you already have one for use. Proceed to step 4.
supplementary explanationUse paper of A3 or larger, or 11 17 or larger to output the background sheet. When you press Output Background Sheet to display the PRINT MODE screen for the background sheet, the tray selected in step 2 is automatically selected on the screen, but it can be changed as desired. Select a tray loaded with A3 or larger, or 11 17 or larger paper. You can also change the print count, but only one sheet is needed. If the background sheet size is smaller than A3 or 11 17, the scan measurement may not be performed.
Output the necessary number of adjustment charts.
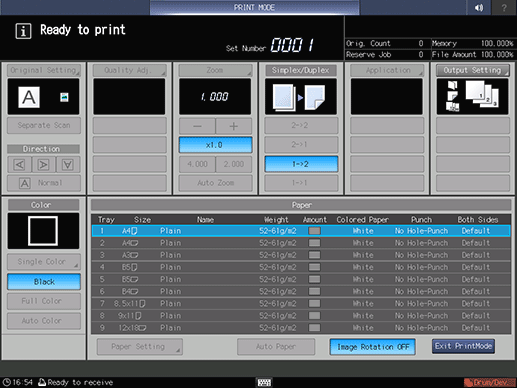
Press 1. Output Adjustment Chart to display the PRINT MODE screen for the adjustment chart. Enter the necessary number of adjustment charts, then press Start on the control panel. The adjustment charts are 2-sided printed on paper in the tray you selected in step 2. Check that the output is completed, then press Exit PrintMode.
supplementary explanationYou can output 20 or more of the adjustment charts but cannot scan more than 20 sheets for measurement.
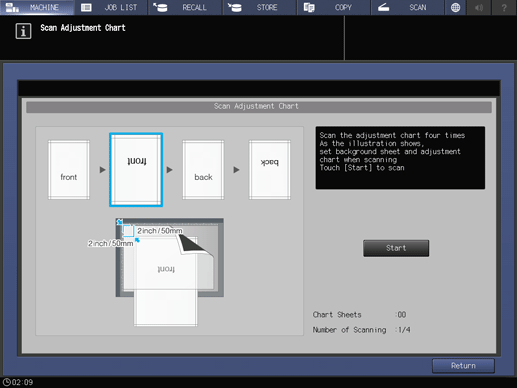
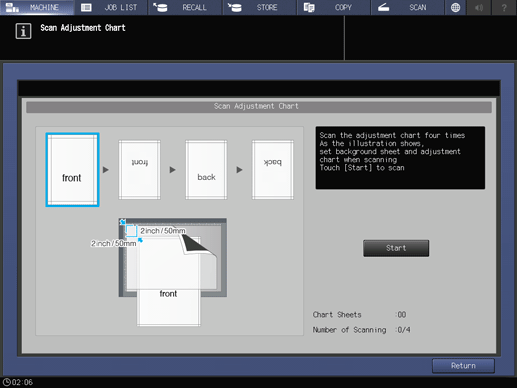
Press 2. Scan Adjustment Chart.

The Scan Adjustment Chart screen is displayed.
Set the adjustment chart and background sheet on the original glass.
supplementary explanationOpen the ADF.
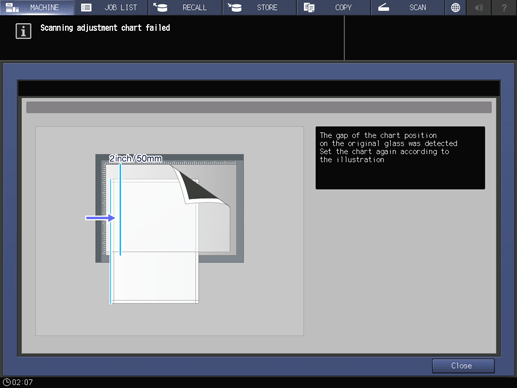
supplementary explanationSet the front side of the adjustment chart face up (turned away from the original glass), with its top edge positioned to the back side. Place the top-left corner of the adjustment chart at a distance of about 5 cm (2 inches) each from the vertical size guide and horizontal size guide, and align the left and top edges parallel to the vertical size guide and horizontal size guide on the original glass.
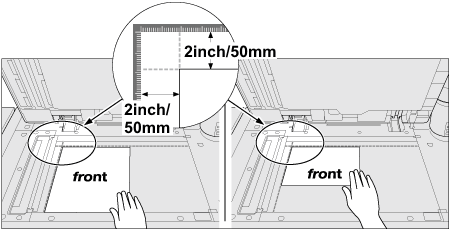
supplementary explanationSet the black side of the background sheet face down (facing to the original glass), and fit it to the vertical size guide and horizontal size guide as shown below. In doing so, be careful not to shift the position of the adjustment chart that has previously been set.
supplementary explanationClose the ADF.
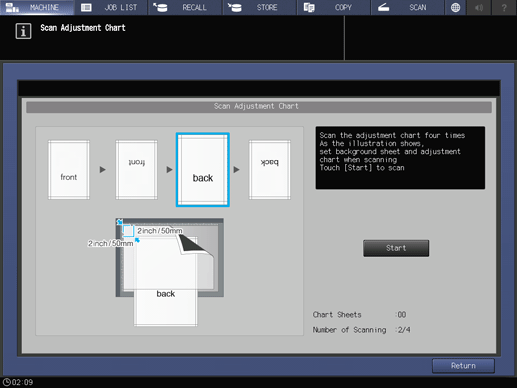
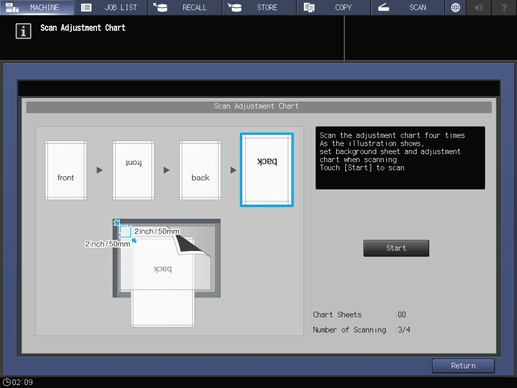
Scan the adjustment chart.
Press Start on the Scan Adjustment Chart screen.

When scanning is properly completed, the counter of Number of Scanning on the Scan Adjustment Chart screen is added by one, and the blue frame displayed in the illustration on the screen shifts to the next one on the right side. If you move the adjustment chart before the blue frame shifts to the next, the measurement may not be performed properly.
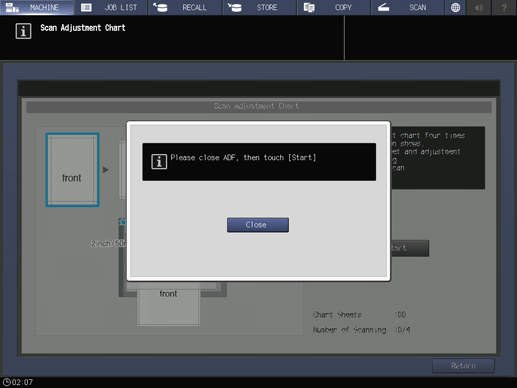
supplementary explanationIf the ADF is open, the following dialog is displayed and you cannot start scanning. Close the ADF, and then press Close on the dialog.
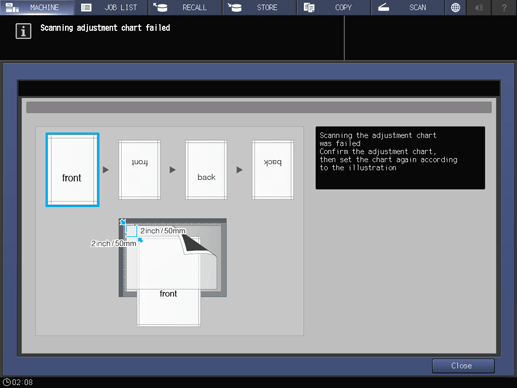
supplementary explanationYou may see the message Scanning adjustment chart failed. Follow the instruction on the screen to correctly set the adjustment chart and background sheet, and then press Close.
supplementary explanationWhen the screen below is displayed, press Close again.
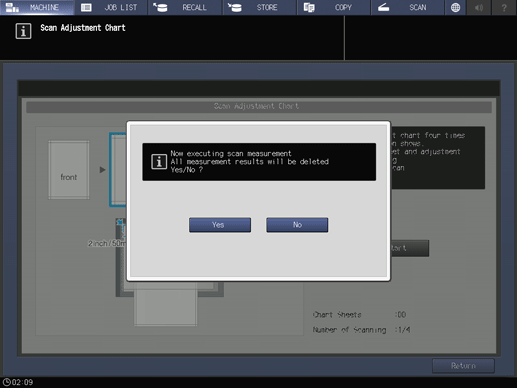
supplementary explanationIf you press Return on the Scan Adjustment Chart screen while the scan measurement is in process, the following dialog is displayed. To stop the scan measurement and discard the measurement results obtained so far, press Yes. Restart the scan measurement from the first scanning procedure. To continue the scan measurement, press No.
Repeat the scanning steps 6 and 7 four times for every adjustment chart.
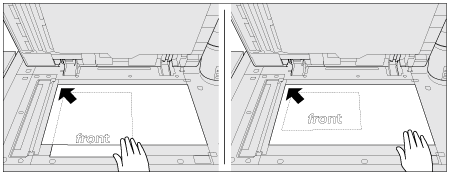
First time: Set the front side of the adjustment chart face up (turned away from the original glass), with its top edge positioned to the back side.
Second time: Set the front side of the adjustment chart face up (turned away from the original glass), with its bottom edge positioned to the back side.
Third time: Set the back side of the adjustment chart face up (turned away from the original glass), with its top edge positioned to the back side.
Fourth time: Set the back side of the adjustment chart face up (turned away from the original glass), with its bottom edge positioned to the back side.
supplementary explanationWhen four times of scanning are completed, a dialog is displayed to calculate the adjustment value.
Select whether to continue the scan measurement or to finish the scan measurement and calculate the adjustment value.
To continue the scan measurement, press No.
To finish the scan measurement and calculate the adjustment value, press Yes.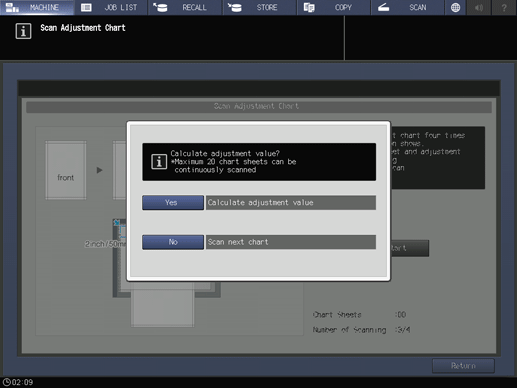
supplementary explanationPressing No returns to the Scan Adjustment Chart screen on which the counter of Chart Sheets is added by one. Repeat steps 6 to 8 for the number of adjustment charts. The measurement results will be added up. This operation can be repeated up to 20 times.
supplementary explanationPressing Yes automatically calculates the adjustment value from the added measurement results and reflects it on Zoom, Image Shift, and Rotate/Skew to be specified for Back.
Rotate/Skew may also be applied to both Front and Back.
After pressing Yes, output a sheet of the adjustment chart to confirm the result. If readjustment is needed, repeat steps 4 to 9.
supplementary explanationIf the adjustment value calculated by pressing Yes exceeds the adjustment range, the following dialog is displayed. Press Close to discard the measurement results, and restart the scan measurement from the beginning.
Possible causes to exceed the adjustment range may include that the chart used in the scan measurement is incorrect (a different chart has been used), the printing position of the front side has been poorly adjusted, or the adjustments of the reference positions are not completed. Confirm these points before restarting the scan measurement. If Back Side Magnification Adjustment is set to OFF, the magnification in the feeding direction is not adjusted.
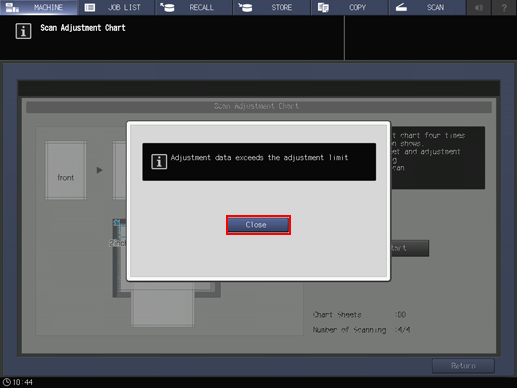
Press Close.
Now, the Scan Meas. adjustment is completed.
supplementary explanationFor fine adjustment, perform [Zoom]/[Image Shift] Adjustment.