
Back Side Fine Adjustment
This adjustment is useful when you want to adjust the magnification and position of the image on the back side based on the output result of the job data that is actually going to be used.
Output approximately three sheets of the job data that is actually going to be used from the tray to which "Both Sides Adj." is applied.
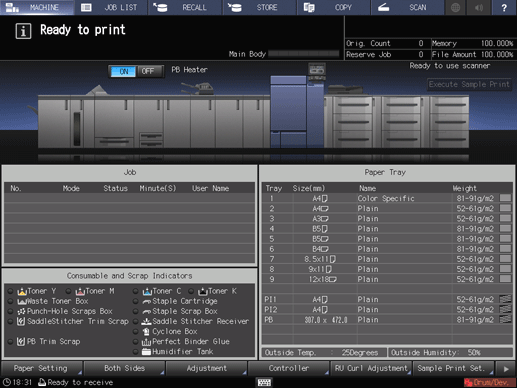
Press Paper Setting on the MACHINE screen.
Select the tray to which the job data is output, and press Change Set.
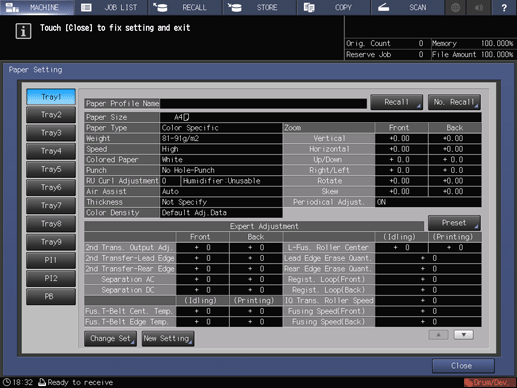
Press Both Sides Adj..
Press Back.
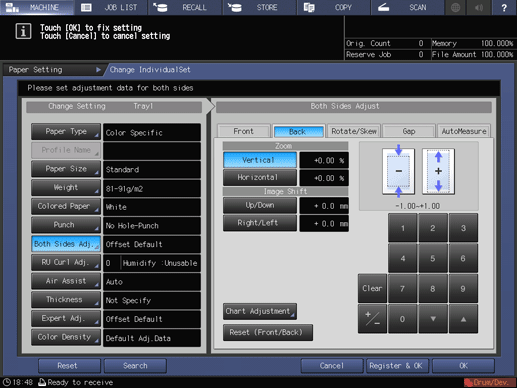
Check the magnification deviation on the back side from the image on the back side of each of the second and third output charts in the job output in step 1.
Put the third output chart (with the back side facing upward) on the second one (with the front side facing upward), then compare the interval of the image on the front side with that of the image on the back side. When you want to invert paper, set the rotation axis in the crosswise direction.

If the interval of the image on the front side is different from that of the image on the back side, enter the adjustment value in Vertical (crosswise direction) and Horizontal (feed direction) on the Back screen.

The adjustment value is updated in 0.01% steps.
Adjustment range: Vertical -1.00 to +1.00, Horizontal -0.80 to +0.20
When User Setting - Common Setting - Back Side Magnification Adjustment is set to OFF, you cannot adjust the value of Horizontal.
Image magnification adjustment example:
When the interval of the image on the front side is set to 400 mm and that of the image on the back side to 401 mm, enter -0.25% as the adjustment value.
When the adjustment is completed, press OK.

Output approximately three sheets of the same job data as that output in step 1 from the same tray.
Check the magnification deviation using the second and third output charts.
Repeat Step 6 to 8 until the image magnification deviation is cleared.
Press Paper Setting on the MACHINE screen.
Select the tray in which the paper to be adjusted has been loaded, then press Change Set.
Press Both Sides Adj..
Check the position error on the back side from the image on the back side of each of the second and third output charts in the job output after the magnification adjustment has been completed.
The black line in the figure indicates the back side and the blue dash line indicates the opposite (front) side.
If the position of the image on the front side is different from that of the image on the back side, enter the adjustment value in Up/Down (crosswise direction) and Right/Left (feed direction).
To move the image upward or rightward, enter a positive value, and to move downward or leftward, enter a negative value.
Image position adjustment example:
When the image on the back side is misaligned downward by 0.5 mm and rightward by 0.3 mm against that of the front side, enter +0.5 mm in Up/Down and -0.3 mm in Right/Left.

The adjustment value is updated in 0.1mm steps.
Adjustment range: Up/Down -10.0 to +10.0; Right/Left -3.0 to +3.0
When the adjustment is completed, press OK.
Output approximately three sheets of the same job data as that output in step 1 from the same tray.
Check the misalignment of the image on the back side using the second and third output charts.
Repeat steps 13 to 15 until the image misalignment is cleared.
When the image misalignment is cleared, finish the adjustment.