
Screen Pattern
Overview of Screen Pattern
This machine uses the screen method to reproduce copy images. The following screens are used.
Auto is set by default for Screen Pattern. The machine automatically selects an appropriate screen according to specified copy conditions.
In the default setting, Screen 1 (Dot190), Screen 2 (Dot150), and Stochastic (FM3) are specified.
Follow the procedure below to manually select the desired screen for originals hardly reproducible using Auto mode.
Screen types:
Screen 1 (selected from Dot270, Dot210, Dot190, Dot175, Dot150, Dot130, Line200, Line180, Line150)
Screen 2 (selected from Dot270, Dot210, Dot190, Dot175, Dot150, Dot130, Line200, Line180, Line150)
Stochastic (selected from FM1, FM2, FM3)
Reference
The three screens are provided with screen types for each as mentioned above, and a specific type can be selected for each screen. The screen type is predetermined by the administrator. If setting change is desired, consult your administrator. For details, refer to [Custom Screen].
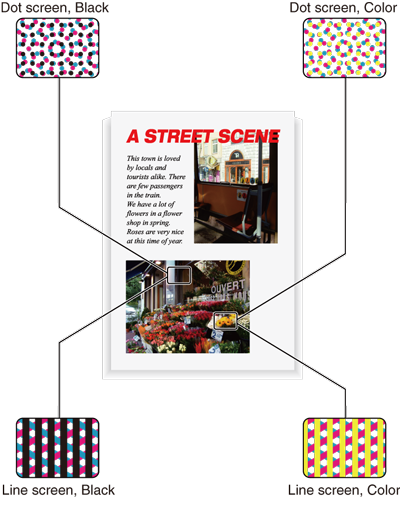
How to reproduce copy images
The line screen uses many halftone lines, like scanning lines of a television, and provides fine quality in reproducing the gradation in images. However, text originals may not be reproduced clearly in this method, being processed in the same way as photo originals.
The dot screen uses dots to reproduce an image.
The Stochastic is an error diffusion method that uses aperiodic small dots to reproduce copy images. This method is suitable for reproducing text originals sharply.
Screen pattern in the initial setting
Auto is set by default for Screen Pattern. The machine automatically selects the screen corresponding to the original type and color mode specified at that time.
Screen to be selected automatically according to the combination of color mode and original type
Original type | Color mode | Screen to be selected automatically |
|---|---|---|
Text /Photo (Print) | Full Color, Single Color | Screen 1 |
Black | Stochastic | |
Text /Photo (Photo) | Full Color, Single Color | Screen 1 |
Black | Stochastic | |
Photo (Print) | All modes | Screen 1 |
Photo (Photo) | All modes | Screen 1 |
Text | All modes | Stochastic |
Copied | All modes | Screen 1 |
Map | All modes | Stochastic |
Inkjet | All modes | Screen 1 |
Tips
Screen 1 and Stochastic should be used as a premise. These cannot be disabled.
Screen 2 can be used as desired.
The machine can be set to specify the screen to be selected automatically according to specified color mode and original type.
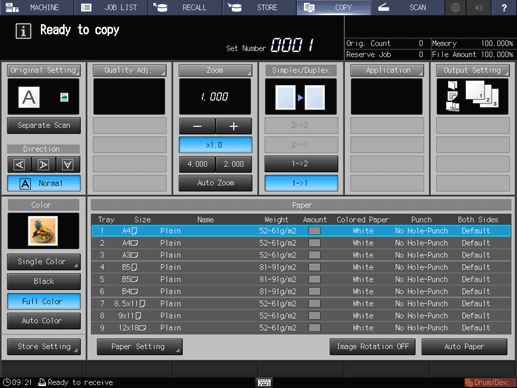
Press the COPY tab to display the COPY screen.
Press Quality Adj. on the COPY screen.
Position the original.
supplementary explanationPrepare an original for adjusting Screen Pattern, and position it into the ADF or on the original glass.
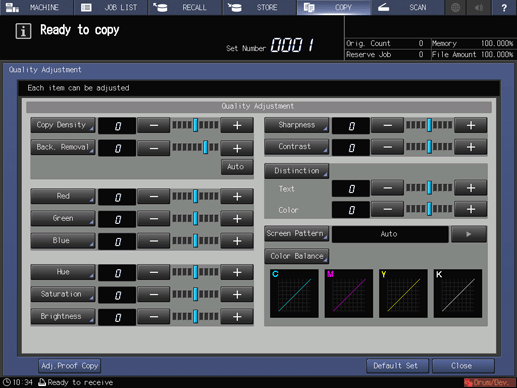
Select the desired screen on the Quality Adjustment screen.
Press right on the right side of Screen Pattern to display the desired screen.
supplementary explanationTo select a screen on the Screen Pattern screen, proceed to step 5.
supplementary explanationIf you press Default Set, the screen returns to the COPY screen and the setting returns to Auto.
supplementary explanationTo output a sample copy to check the adjustment result, proceed to step 6.
supplementary explanationTo complete the adjustment, proceed to step 7.
supplementary explanationIf you press Default Set on the Quality Adjustment screen, all adjustment items are returned to the standard level.
Select the desired screen on the Screen Pattern screen.
Press Screen Pattern to display the Screen Pattern screen.
Select the desired screen key.
supplementary explanationIf you press Default Set, the screen returns to the Quality Adjustment screen and the setting returns to Auto.
supplementary explanationTo output a sample copy to check the adjustment result, proceed to step 6.
supplementary explanationTo complete the adjustment, press OK and proceed to step 7.

Output a sample copy.
After making the desired adjustment, press Adj.Proof Copy on the Quality Adjustment screen, Adj.Proof Copy on the Screen Pattern screen, or Proof Copy on the control panel. Check the adjustment result with output image.
supplementary explanationRepeat steps from 3 to 6 until the desired result is obtained.
Press Close on the Quality Adjustment screen.
The screen returns to the COPY screen. The Screen Pattern indication can be found under Quality Adj. on the COPY screen.