
Adding a Text or Image to the Original
To add the date and time ([Date/Time])
To display:
- [Classic Style]
- [Copy]
- [Application]
- [Stamp/Composition]
- [Date/Time]
- [Stamp/Composition]
- [Application]
- [Copy]
Add the print date/time to the first page or all pages.

Setting | Description |
|---|---|
[ON]/[OFF] | Select [ON] to add the date/time. |
[Date Format] | Select the date printing format. |
[Time Format] | Select the time printing format. If you do not want to print the time, select [OFF]. |
[Pages] | Select the range of pages to print. |
[Text Details] | If necessary, select the print size, font, and other conditions. |
[Print Position] | If necessary, select the print position of the text. You can more finely adjust the print position in [Adjust Position]. |

To add a page number ([Page Number])
To display:
- [Classic Style]
- [Copy]
- [Application]
- [Stamp/Composition]
- [Page Number]
- [Stamp/Composition]
- [Application]
- [Copy]
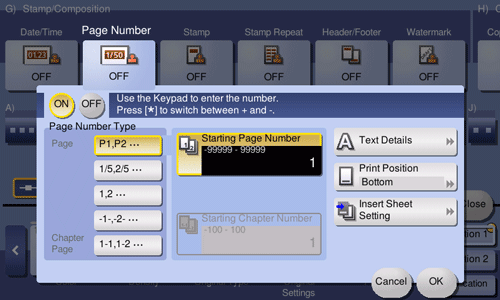
Adds page and chapter numbers on printed sheets. Page and chapter numbers are printed on all pages.
Setting | Description |
|---|---|
[ON]/[OFF] | Select [ON] to set Page Number. |
[Page Number Type] | Select the format of the page number. |
[Starting Page Number] | Specify the starting page number to be printed on the first page. For example, to print page numbers from the third page of the file, enter "-1". The first page of the file is counted as "-1", the second page as "0", and the third page is counted as "1". In [Starting Page Number], a page number is printed on pages 1 and later. If "2" is entered, page numbers are printed from the first page of the file as "2, 3", etc. in order. "-" (minus sign) switches "+" and "-" each time you tap [*]. |
[Starting Chapter Number] | Specify the starting chapter number if a file is divided into chapters, and you want to print chapter numbers from the second chapter. You can specify starting chapter numbers when you have selected [Chapter Page] in [Page Number Type]. For example, to print chapter numbers from the third chapter, enter "-1". The first chapter of the file is counted as "-1", the second chapter as "0", and the third chapter is counted as "1". In [Starting Chapter Number], a chapter number is printed on the chapters that are count as 1 and later. If "2" is entered, a number is printed from the first page of the first chapter of the file as "2-1, 2-2". "-" (minus sign) switches "+" and "-" each time you tap [*]. |
[Text Details] | If necessary, select the print size, font, and other conditions. |
[Print Position] | If necessary, select the print position of the text. You can more finely adjust the print position in [Adjust Position]. |
[Insert Sheet Setting] | When you insert sheets using the Cover Sheet function of Insert Sheet function, specify whether or not to print a page number on the inserted sheet.
|
To add a stamp ([Stamp])
To display:
- [Classic Style]
- [Copy]
- [Application]
- [Stamp/Composition]
- [Stamp]
- [Stamp/Composition]
- [Application]
- [Copy]
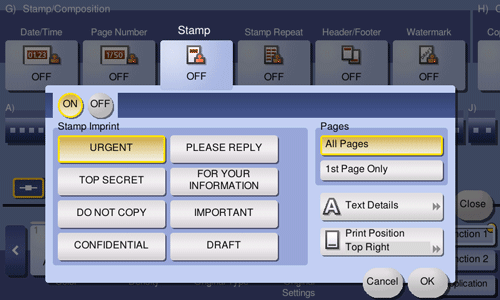
Text such as "PLEASE REPLY" and "DO NOT COPY" are printed on the first page or all pages. You can select the text to be printed from the registered fix stamps and arbitrary registered stamps.
Setting | Description |
|---|---|
[ON]/[OFF] | Select [ON] to specify Stamp. |
[Stamp Imprint] | Select the stamp you want to print. |
[Pages] | Select the range of pages to print. |
[Text Details] | If necessary, select the print size and other conditions. |
[Print Position] | If necessary, select the print position of the text. You can more finely adjust the print position in [Adjust Position]. |
To add a watermark ([Watermark])
To display:
- [Classic Style]
- [Copy]
- [Application]
- [Stamp/Composition]
- [Watermark]
- [Stamp/Composition]
- [Application]
- [Copy]
Text such as "Copy" and "Private" are printed on the center of all pages in a tint color.

Setting | Description |
|---|---|
[ON]/[OFF] | Select [ON] to specify Watermark. |
[Watermark Type] | Select the watermark you want to print. |
[Text Color] | If necessary, select the print color of the text. |

Part of the watermark may be lost depending on the paper size, such as A6 and B6. In this case, the machine automatically cancels the watermark function for copying.