
Copying while Specifying the Image Quality and Density
To automatically adjust to the appropriate image quality for the contents of the original ([Original Type])
To display:
- [Classic Style]
- [Copy]
- [Original Type]
- [Copy]
Select the optimum settings for the original to copy it at the optimum image quality.

Setting | Description |
|---|---|
[Text] | Copies an original, which consists primarily of text, at the optimum image quality level. This function sharpens the edges of each character, creating easy-to-read images. |
[Text/Photo Printed] | Copies the original, which consists of text and photos, at the optimum level of image quality. This function sharpens the edges of each character and reproduces smoother photos. Select this option to scan printed originals such as brochures and catalogs. |
[Text/Photo PhotoPaper] | Copies the original, which consists of text and photos, at the optimum level of image quality. This function sharpens the edges of each character and reproduces smoother photos. Select this option to scan originals that include photos printed on photographic paper. |
[Photo Printed] | Copies an original consisting only of photos at the optimum image quality level. Select this option to scan printed originals such as brochures and catalogs. |
[Photo PhotoPaper] | Copies an original consisting only of photos at the optimum image quality level. Select this option to scan originals printed on photographic paper. |
[Dot Matrix Original] | Copies an original, that primarily consists of text such as thin or faint characters, at the optimum image quality level. This function reproduces text using high pixel density, creating easy-to-read text. |
[Map] | Copies an original that has a colored background such as a map or that has been drawn by pencil or colored thin line, at the optimum level of image quality. A sharp copy image is produced. |
[Copied Paper] | Copies the original, which is output with an even density from the copier or printer, at the optimum image quality level. |
[Recall Image Adjustment Program] | Call the image quality adjustment program. The registered content of a program is applied. For the image adjustment program, you can register the settings of [Original Type], [Density], [Bkgd. Removal], [Text Enhancement], [Neg-/Pos. Reverse], [Background Color], [Color Adjust], and [Mirror Image]. For details on the registration procedure, refer to Here. |
To select a copy color ([Color])
To display:
- [Classic Style]
- [Copy]
- [Color]
- [Copy]
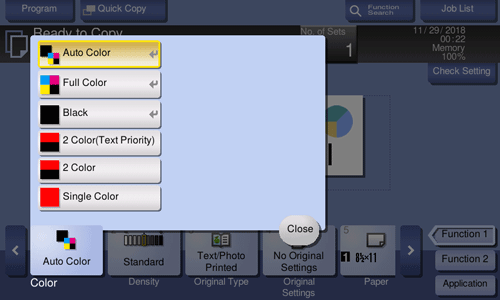
Select a copy color.
Setting | Description |
|---|---|
[Auto Color] | Makes copies with color settings to suit the colors of the scanned original. |
[Full Color] | Makes a copy in full color regardless of whether the scanned original is in color or in black and white. |
[Black] | Makes a copy in black and white regardless of whether the scanned original is in color or in black and white. |
[2 Color (Text Priority)] | Copies an original, which primarily consists of text, in the specified two colors. This will produce a lower cost color copy than one printed in full color. In the scanned original, an area judged to be color is copied with the specified color, and an area judged to be black is copied in black. |
[2 Color (Photo Priority)] | Copies an original, which primarily consists of photos, in the specified two colors. This will produce a lower cost color copy than one printed in full color. In the scanned original, an area judged to be color is copied with the specified color, and an area judged to be black is copied in black. |
[Single Color] | Makes a copy in the specified single color. This will produce a lower cost color copy than one printed in full color. The original is copied by converting the color differences (apparent color densities) and the gradation levels into density differences of the single color. If you set [Average Density], the original is copied by converting the gradation levels into density differences of the single color regardless of the original color. |

To adjust the copy density ([Density])
To display:
- [Classic Style]
- [Copy]
- [Density]
- [Copy]
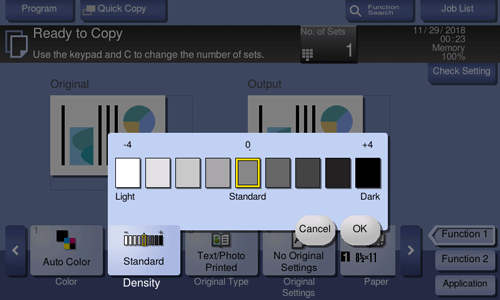
Adjust the density of a copy image.
To adjust the background density of the original to be scanned ([Bkgd. Removal])
To display:
- [Classic Style]
- [Copy]
- [Application]
- [Quality/Density]
- [Bkgd. Removal]
- [Quality/Density]
- [Application]
- [Copy]
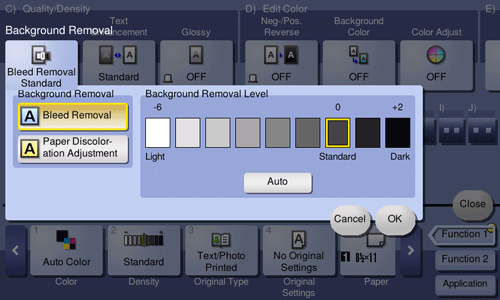
You can adjust the density of the background area for originals with colored backgrounds (newspaper, recycled paper, etc.) or originals that are so thin that text or images on the back would be scanned.
Setting | Description |
|---|---|
[Background Removal] | Copies a thin 2-sided original or an original with a colored background, at the optimum level of image quality.
|
[Background Removal Level] | Adjusts the density of the background color for an original with a colored background. If [Auto] is selected, the density of the background color is determined automatically, and the original is copied at the optimal background density level. |
To enhance text against the background ([Text Enhancement])
To display:
- [Classic Style]
- [Copy]
- [Application]
- [Quality/Density]
- [Text Enhancement]
- [Quality/Density]
- [Application]
- [Copy]
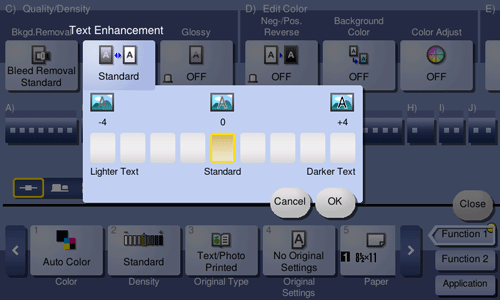
Highlights photos or texts when a text is superimposed over photos (figure, graph, etc.).
Setting | Description |
|---|---|
[Lighter Text] | If you want to enhance the background against text, adjust to the [Lighter Text] side. |
[Standard] | Copy with the optimal balance between the background and text. |
[Darker Text] | If you want to enhance text against the background, adjust to the [Darker Text] side. |
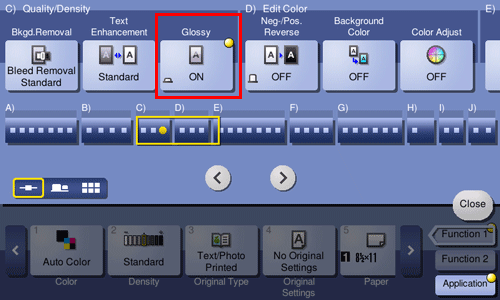
To make the image glossy ([Glossy])
To display:
- [Classic Style]
- [Copy]
- [Application]
- [Quality/Density]
- [Glossy]
- [Quality/Density]
- [Application]
- [Copy]
Copies an image with a glossy finish.
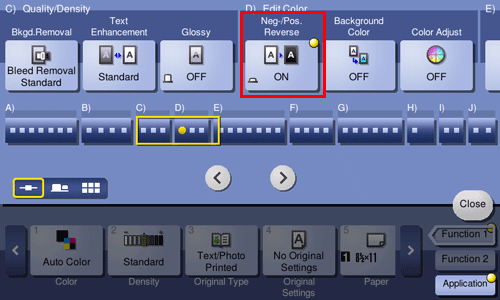
To reverse the contrast and color ([Neg-/Pos. Reverse])
To display:
- [Classic Style]
- [Copy]
- [Application]
- [Edit Color]
- [Neg-/Pos. Reverse]
- [Edit Color]
- [Application]
- [Copy]
Reverses the contrast and colors of an image to make copies. The finished image looks like a negative print photo.
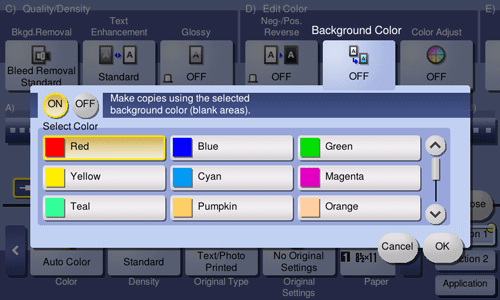
To apply a color to the background ([Background Color])
To display:
- [Classic Style]
- [Copy]
- [Application]
- [Edit Color]
- [Background Color]
- [Edit Color]
- [Application]
- [Copy]
Colors the blank area of the original with a specified background color to make copies.
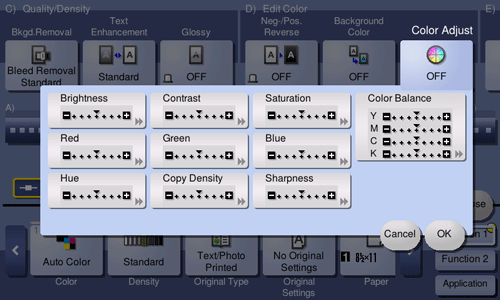
To fine-adjust the image quality according to the original ([Color Adjust])
To display:
- [Classic Style]
- [Copy]
- [Application]
- [Edit Color]
- [Color Adjust]
- [Edit Color]
- [Application]
- [Copy]
Adjust the color quality of the original for copying. You can check the finishing by printing a sample copy.
Setting | Description |
|---|---|
[Brightness] | Adjust the brightness level. |
[Contrast] | Adjust the shading of an image. |
[Saturation] | Adjust the saturation level. |
[Red] | Adjust the intensity of red. |
[Green] | Adjust the intensity of green. |
[Blue] | Adjust the intensity of blue. |
[Hue] | Adjust the hue. The hue refers to a color trend relative to discrete colors such as red, blue and yellow. By adjusting the hue, the image can attain more reddish or bluish tone, for example. |
[Copy Density] | Adjust the copy density. |
[Sharpness] | Sharpen the edges of the image to improve legibility. Smoothen the rough contour or sharpen the blurred image. |
[Color Balance] | Adjust the density for yellow (Y), magenta (M), cyan (C), and black (K). By changing the amount of each of the four toners, tints in the copy can be adjusted. |