
Adjusting the Layout for Copying
To enlarge or reduce an image for copying ([Zoom])
To display:
- [Classic Style]
- [Copy]
- [Zoom]
- [Copy]
Copy an original image enlarged or reduced by an arbitrary zoom ratio.

Setting | Description |
|---|---|
[Auto] | Automatically makes a copy with the optimal zoom ratio to match the image of the original with the paper size. This is convenient because you do not need to specify the zoom ratio. |
[+]/[-] | Enter the zoom ratio manually. |
Fixed Zoom | Select a preset zoom ratio when copying a standard-size original onto standard-size paper. The paper tray is automatically exchanged depending on the selected zoom ratio. |
[Minimal] | Places an original image in the center after slightly reducing the original size when copying. Select this option when copying the entire original image, including its edges. |
[Manual] | Specify zoom ratios individually for the lengthwise and widthwise directions for copying. Select [X] or [Y], and enter the zoom ratio. |
[Zoom Ratio] | Makes a copy at the registered zoom ratio. If you tap [Set Zoom], you can change the registered zoom ratio. |
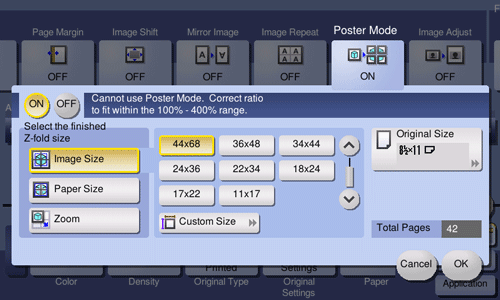
To copy a poster-sized image ([Poster Mode])
To display:
- [Classic Style]
- [Copy]
- [Application]
- [Layout]
- [Poster Mode]
- [Layout]
- [Application]
- [Copy]
Enlarges an original image, and divides it into multiple sheets to make copies. When you join the printed sheets, you can create a large image like a poster.
Setting | Description |
|---|---|
[ON]/[OFF] | Select [ON] to specify Poster Mode. |
[Select the finished Z-fold size] | Specify the finished size by using any of [Image Size], [Paper Size] and [Zoom].
|
[Original Size] | Select the size of the original to be scanned. |
[Total Pages] | Displays the number of sheets to be output. |
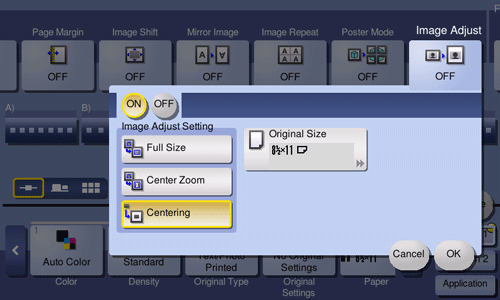
To copy the original image without margin ([Image Adjust])
To display:
- [Classic Style]
- [Copy]
- [Application]
- [Layout]
- [Image Adjust]
- [Layout]
- [Application]
- [Copy]
Specify how to arrange the original image on the paper. You can enlarge a part of the original to the maximum limits of the paper, or arrange the original image at the center of the page while the original size remains unchanged.
Setting | Description |
|---|---|
[ON]/[OFF] | Select [ON] to specify Image Adjust. |
[Image Adjust Setting] | Select the image arrangement method.
|
[Original Size] | Select the size of the original to be scanned. |
To reverse the left and right of the original image ([Mirror Image])
To display:
- [Classic Style]
- [Copy]
- [Application]
- [Layout]
- [Mirror Image]
- [Layout]
- [Application]
- [Copy]
Copy the original image by reversing its left and right, like a reflection image on the mirror.

Setting | Description |
|---|---|
[ON]/[OFF] | Select [ON] to specify Mirror Image. |
[Original Size] | Select the size of the original to be scanned. |
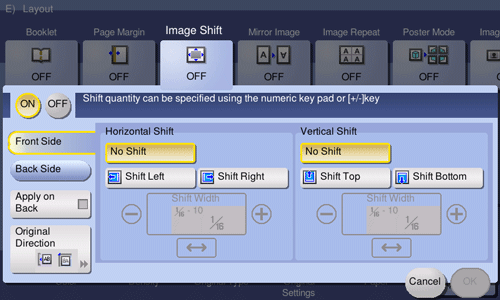
To fine-adjust the print position ([Image Shift])
To display:
- [Classic Style]
- [Copy]
- [Application]
- [Layout]
- [Image Shift]
- [Layout]
- [Application]
- [Copy]
You can fine tune the image position by shifting it in a horizontal or vertical direction according to the paper size. When an image is printed on both sides, the image position on the back side can also be fine tuned.
Setting | Description |
|---|---|
[ON]/[OFF] | Select [ON] to shift an image. |
[Front Side]/[Back Side] | Adjusts the image position on the print paper by shifting it in horizontal or vertical direction.
|
[Apply on Back] | Set this item to use the same settings as used on the front side for the rear side of the print paper. |
[Original Direction] | Specify the original loading direction so that the vertical direction of the scanned original is set correctly. |